My boss issued a challenge. We buy glue sticks by the 25 lb box around here and some kids just wanna see the world stuck together with spider-webby strings.
So obviously we need a glue stick dispenser.
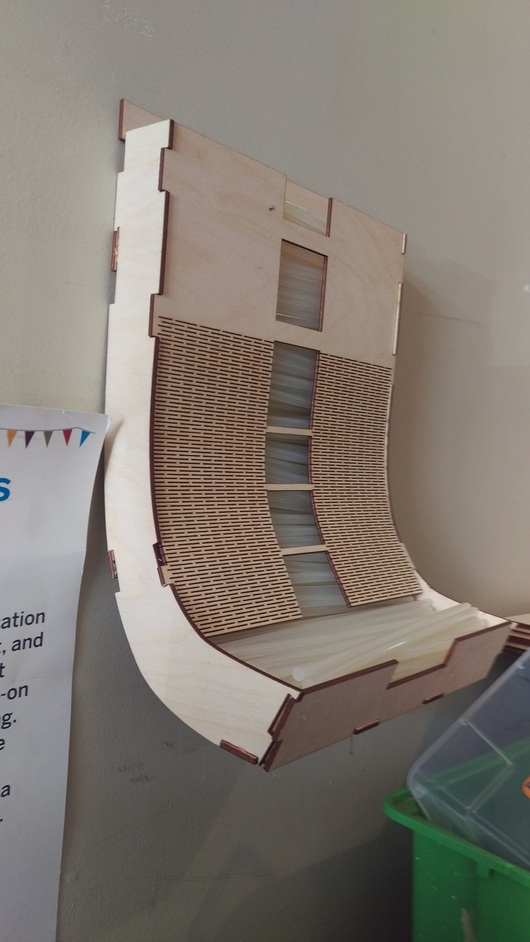
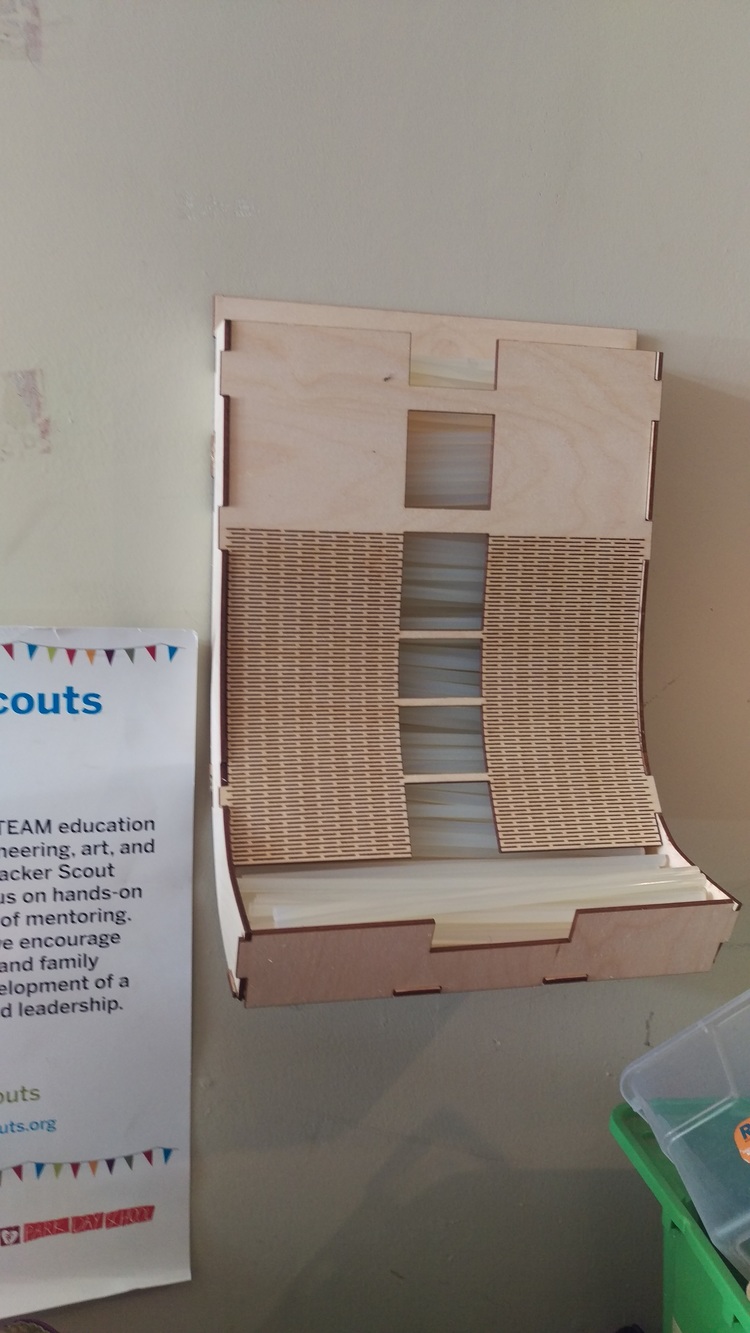
Here’s prototype 1. Clearly I have miles to go before I’m done, but I learned a lot from this iteration.
First problem: when designing in Inkscape, I can use the ruler tool to measure along any straight line, but measuring the curved path for tabs befuddled me. If anyone knows how, I’d be grateful. As it stood, I used a dremel to get my eye-balled slots and tabs to actually connect.
Next version I want the slots to be L-shaped so that there’s plywood support BEHIND each tab and we’re not just trusting to wood glue. Wood glue is legit magical and it held up for weeks of kid abuse, but I did finally take the thing down with some mild pressure.
Also I want to put more support underneath and against the wall… possibly with hooks for hanging some glue guns. We have a bucket, but so often I want to hang them somewhere so they can cool off before I stow them.
Triangles underneath to brace the curve against the wall would add considerable strength.
My gun has the little wire prop to keep the nozzle off the surface when free standing, I hang the gun by it from a cup hook to cool.
Several hooks under the front edge to hang the guns from would work. Maybe recessed a bit to keep the hot tips further from where you reach for refill sticks.
Cool! Can you make the side slots captive and their tabs protrude with a little notch so the whole thing locks together? I wish I used that much hot glue. (Although I think the kids at my son’s school may.)
Pick up a pin nailer (23 ga) and nail through the slots/tabs in addition to glue. They are headless so they don’t really show but they provide some nice stability as well as help hold the parts together tightly while the glue dries.
Regarding placing the tabs and slots correctly, not an Inkscape expert by any means, but if it can tell you both the radius and the angle around it, you should be able to do the math to get the circumferential distance around to the tap location.
The other option would be to forego the cool curved design and simply have the hopper straight down the wall with the basket at the bottom extending out a few inches beyond the front of the hopper to give easy access to the sticks. Of course, that would eliminate the cool curved design too, so there’s a tradeoff…
Really cool to see this prototype. Looks finished to me! I had the same question regarding the bottom radius when I was making my kitchen match box. I ended up doing the calculations on the arc of the circle that made up the radius of the bottom. I designed in Sketchup but I was unaware of any feature to assist in getting that measurement. I guess the other CAD programs might do this for you. I use Inkscape for vector work and haven’t spent the time to see how it would work in there.
Having just struggled through similar issues I can suggest two methods (neither of which is perfect).
learn a program like Onshape/Rhino/Solidworks. They are a big investment in time, and you only ever want to learn one, but if you get good at it then challenges like this become much easier!
Get a set of cheap digital calipers and measure in the real world! At one point in my last project I was trying to figure out how far around a curve to stop and put a tab. I ended up taking a piece of wire, bending it into the shape I wanted, marking it with a sharpie, and then measuring. As long as you leave a little slop and flexibility then you can get away with a lot (as you know if you have a dremel).
Just grabs one of those from harbour freight, haven’t had a chance to use it, but 20$ vs 200$ else where, worth a shot. I have used them a lot over the years, but I find you still need to be careful near ends of manufactured materials because they can still split materials.
This is one of the cases where I would say step away from Inkscape and go with something more CAD style (as @jkopel suggests).
Model it in 3D design with OnShape or another system. Then either export from there as laser-cut file type (not sure which ones can do that comfortably) or at least be able to make some measurements in program.
Jordan - good pick. No need for a top end pinner unless you’re in business. Just oil it before use and get some goods pins from Home Depot or somewhere. The pins from Harbor Freight are sometimes a little iffy qualitywise. But they’re virtually invisible and make a great backup for the glue in wood projects.
By the way put a little blue painters tape on the nose of the pinner - it prevents the striker from marking the wood.
Thanks for the advice. I wish we had harbour freight on our side of the border. Even when exchange was at its worse, you can’t compete. Our closest store is princess auto or Canadian tire , and their prices don’t even compare. Yes it is cheap Chinese knock offs and lower quality, but for occasional use items, perfect.
It’s $28 in the US and is an excellent craft/hobbyist version (vs the $150 Porter Cable). It does 1/2" to 1" pins. I tend to use the 1/2" & 3/4" most often.
This is great. I just couldn’t figure out how to ask the question to get a good answer. Just what I needed. In Inkscape it is an extension > visualize path > measure path. The measure path dialog comes up and you can do several things with fonts display to put the measurement on the path and also choose units for measuring.
The first round taught me that the real strength I need is against the forces of humans, not so much the work of holding glue sticks. Even en masse, they’re not all that heavy.
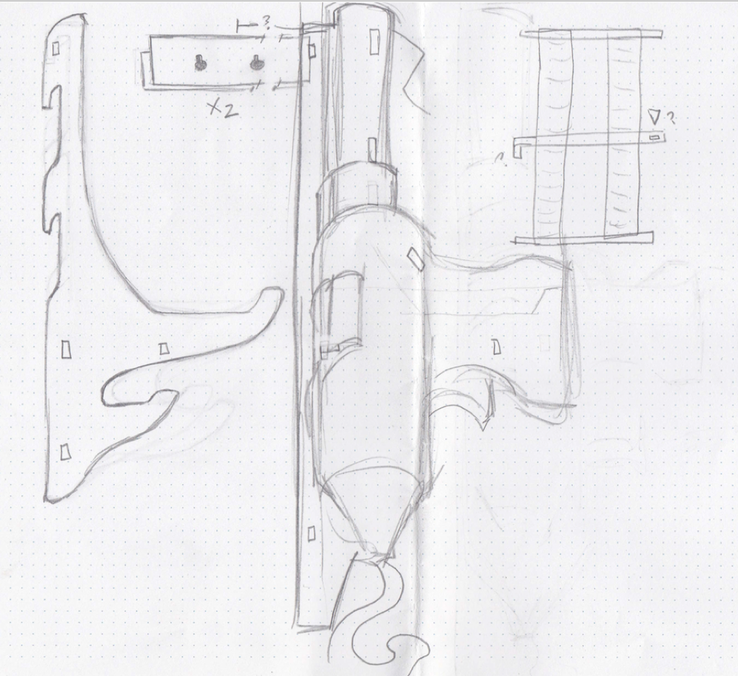
I’ve realized the living hinge under-belly is unnecessary. What I REALLY want is a series of 3 or 4 of these rack pieces on the left bracketed between some glue gun shaped edges. The living hinge can still be useful in the front, but I also want more open space for reaching through to fix crooked sticks… I haven’t worked out how I want to connect the whole thing yet, see the slots on the rack piece? I’m thinking maybe bracing with slats through or something?
I also want it to be able to be disassembled, and taken off the wall. So, I think a couple of wall anchor pieces that are stacked so they’re taller in front and shorter against the wall that the whole assembly can hook onto…
I’m not sure you can laser a french cleat. But maybe you could make a stacked approximation that would be better than just a couple pieces.
Instead of doing a standard smallish-radius living hinge on the front, can you play with alternating flat and curved sections, or even parts with the openings lasered in and hinges in the remainder?