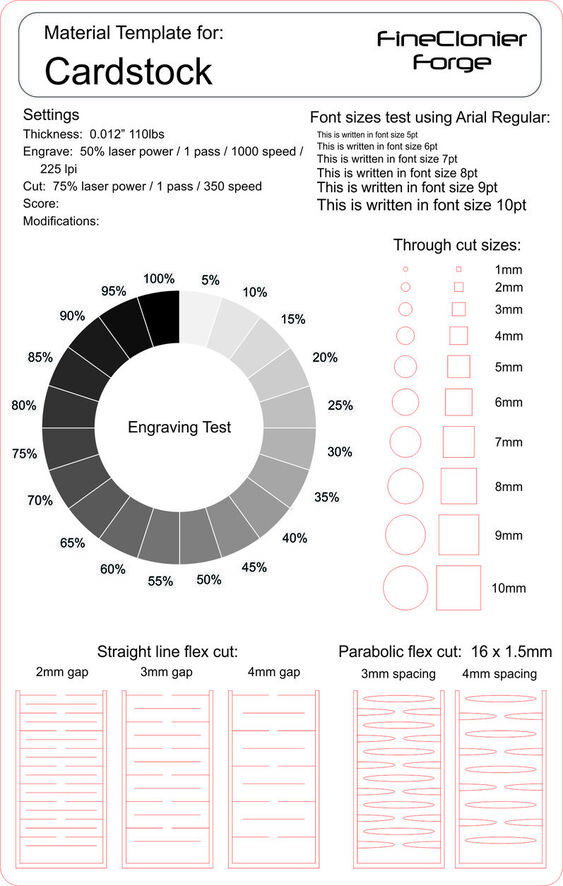
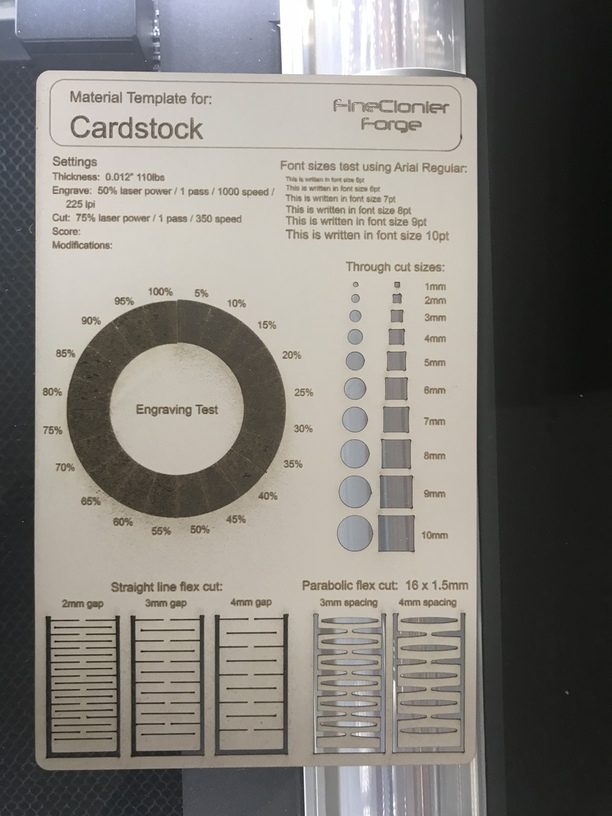
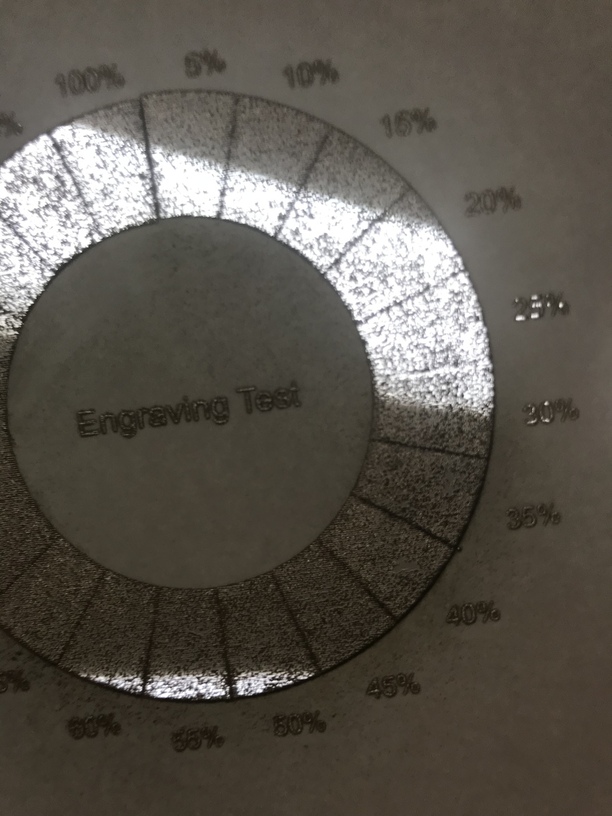
I am using a template I found in Thingiverse to create material guides so I will remember all of my settings. On the guide it has a gradient stepping by 5%. When I printed I didn’t get any gradient. I am attaching a jpg of the template and two photos. Believe my settings are too high for the 110 lb card stock, but even at these settings I should have seen some gradient.
Original template, I redrew it, because it wasn’t playing nice in Corel Draw. I uploaded as Pdf, which has been working awesomely for me as opposed to svg, where I get issues.
This is likely going to get shot over to beyond the manual - unless you can replicate an issue with a PG material, like draftboard.
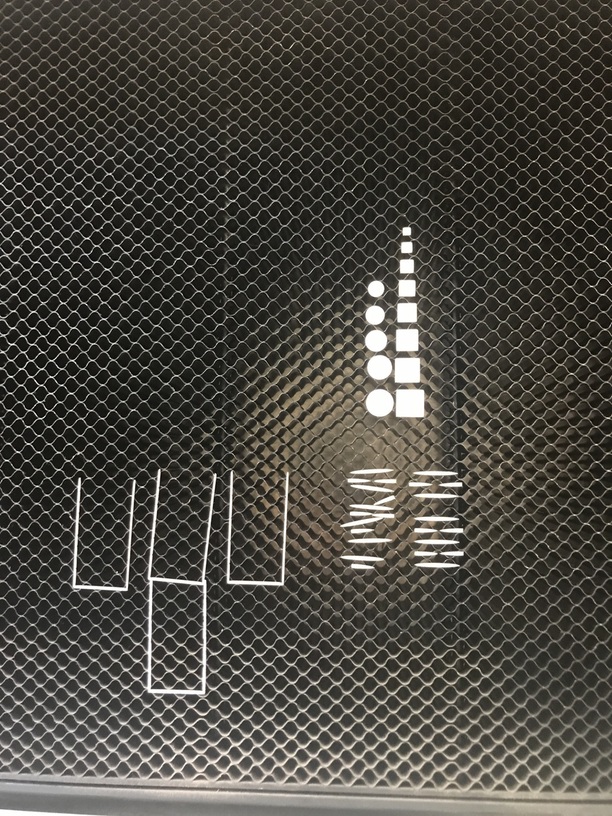
I’m confused by the gradient circle and your settings. The engrave test is meant to illustrate the differences between various power settings, right? 5%, 10%, and so on. But, you mention 50% power in your post. And they look like they were all engraved at the same power. Or, maybe it’s just late and I don’t get it.
Were you using one of the Proofgrade presets for engrave, or were you doing: “convert to dots” or “convert to pattern” or “vary power”? If you were using vary power, you won’t get much gradient because you don’t have much depth to work with. You’ve really only got three possibilities for a pixel, burned, burned all the way through and not touched. You should see a gradient at “convert to dots” but it’ll just be that the dots are farther apart.
Aside: The 1-100 scale for laser power is just numbers, it isn’t % of anything.
You are going to have to set it up different… just because it has shades of gray in the documents doesn’t mean anything, if you set the laser at just one static power. If you’re setting to dither, it will just vary the spacing of the dots or pattern. If you’re setting to vary power, it will vary the power based on the value of the gray but you won’t have any fine detail for each specific one like you are wanting.
You need to go into the document and change each little 5-10-15-20% etc section to a different color and then assign the accompanying powers in the UI.
Maybe I am misunderstanding the gradient engrave feature. It was my understanding that the greyscale value modulated the power setting from the one selected, so in my gradient I expected the 100% black to be the 50% setting I set. The 50% gradient would be 50% of 50, thus 25%. So in that circle I would basically get something that went from very little to the max of 50%.
Ok, posted part of this while others were replying, how then is the engraved Glowforge circle in hard maple made? I thought that the UI looked at gradients, like the ones I used, and varied the power accordingly. I was not using proofgrade settings as this is cardstock and not a proofgrade material. So this is a manual engrave, where I don’t see options beyond power, speed, lpi, and # of passes.
Except for the power scale isn’t %, I think that is correct. It doesn’t only work with proofgrade. If you did this pattern on acrylic (proofgrade or not) you’d find that each of the patches was at a different depth in the material. But the paper really doesn’t have enough to show much depth except for punched through or not. It’s not darker/lighter like ink, it’s burned or burned.
So you’re using vary-power in the manual settings? It works on both PG and non-PG. It ramps the power between 0 and your indicated max power, ignoring white. What the exact settings the planner chooses in between, I don’t know for sure, but your thoughts should be approximately correct (since it’s not percents as mentioned).
So, working in manual, this will definitely get bumped over to beyond the manual. If you suspect you have an issue with the power modulation of the laser, you need to run the test on PG draftboard.
Either way - take a screen shot of what your settings are and it will be easier to figure out what is up.
Thanks will try that. I assumed the color would change from barely burned to darkly burned.
I don’t see many options though, so will post a screenshot of settings tomorrow to figure out what isn’t quite right.
By the way, and this is my 2 cents, manual settings are valid controls on the instrument and should be addressed “in the manual.” There is more to life than proofgrades, or manual wouldn’t exist.
Vectors don’t have a variable power option (at this time - no idea what the plan is there)
So engraving vectors like that, you set your max power and it blasted everything at 50% but varied the dots or pattern to approximate the shades (think halftone).
In Illustrator, I would rasterize that portion of the test print and make sure it’s embedded when you export the SVG. When you load the SVG, you’ll have the option to set vary-power in the engrave section for that rasterized asset. From there, you can set the max power for the operation and the min power in the vary-power section.
THAT IS IT! I work almost completely in Corel Draw and create everything as a vector. Never raster. That is why I haven’t seen those settings yet. Thank you!
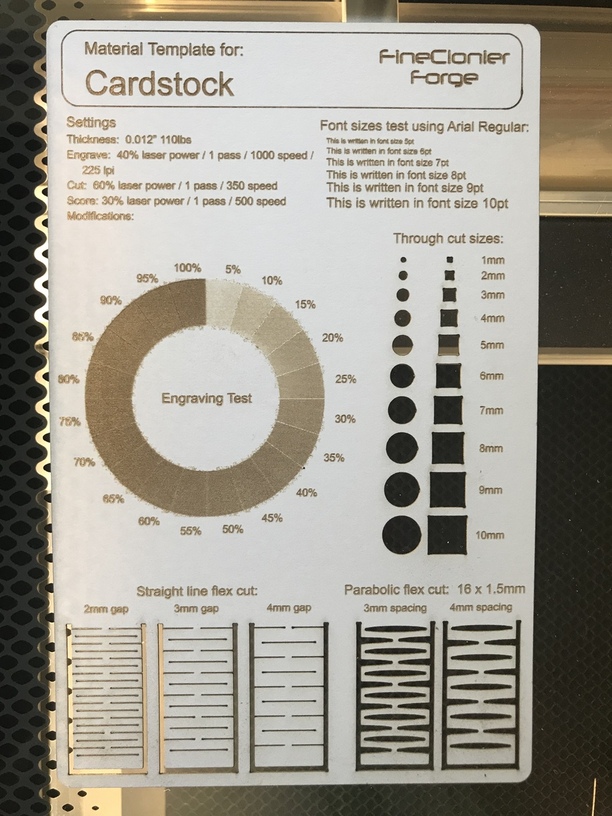
Perfect advice. All worked perfectly and I think I have dialed in 110 lb cardstock settings. I might be able to dial it down to 35% on the engrave from 40, but cut is near perfect, see what was left on the crumb tray on the second photo, smaller circles had to be gently pushed out of the cardstock, but did so with only slight force.