Hi! I have a grid of squares for a game board that is printed in pieces and assembled from there.
When I print the pieces of the board so that the lines are scored at an angle, the lines going one direction are slightly further apart than the lines going the other direction. Eventually that adds up to the lines being off by at least the width of the scored line, making it look uneven.
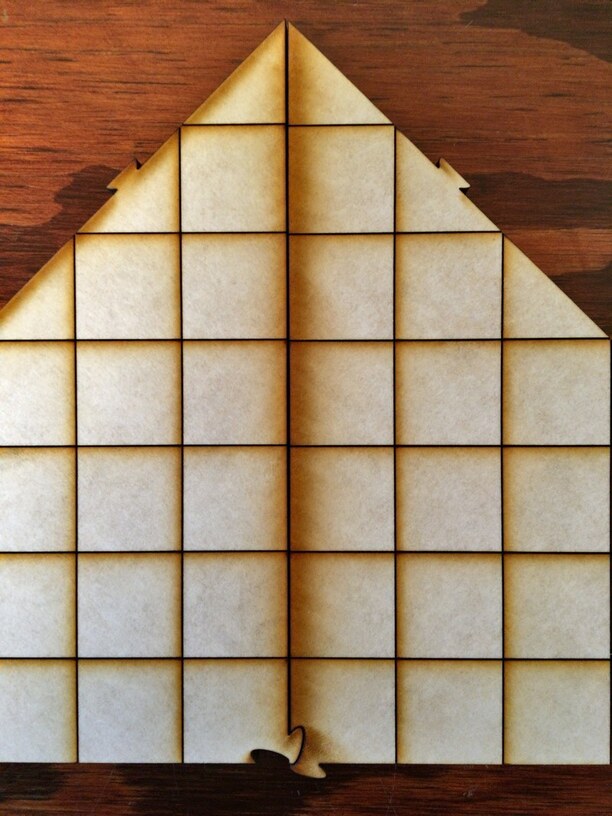
In the file, all the lines are equally spaced and line up as expected, but on multiple prints this is a consistent thing. Notice how the lines toward bottom, where the pieces are connected, line up fine, but then eventually as they go up get off. These are two identical board pieces, but one is rotated to line up with the other. The lines along the edge shown on the left are further apart than the right. And that side of the piece seems to be a little bit longer than the other one, too.
I’m not sure if I’m just missing something and going crazy, if this is something to just be expected and I should try to manually change the source file to correct, or if it’s an actual problem of some sort.
Not really a solution, just an observation… I’m wondering why you didn’t rotate the whole design 45 degrees so most of your lines are in parallel with the gantry. Seems like you’d use less material that way as well.
You’re probably not missing anything. Not crazy. For now, we’re supposed to expect things to drift or just be off by just a bit. To be better fixed in the future. December saw a major corrective action that made many people are better than they had been but there’s still room to improve and GF has been fairly open about that.
I think camera alignment is expected to be off and get better but geometric accuracy with respect to the SVG should be spot on. However how the gantry is aligned to be perfectly orthogonal to the Y rails is a mystery and definitely seems to be be out on some machines. I don’t know if that would explain this effect though.
Good thought. I want the grain going that specific way for this for a few reasons, so I set it up to cut at an angle. (Here’s the finished product)
However, I did do a test with scores all up/down/left/right and it is much more accurate, so I may try to find an easy way to rotate the material 45 degrees somehow… but I don’t know how yet…
This was about trying to cut the scores left/right/up/down (because that turns out more accurate), but have the material at a 45 degree angle (because that’s how I need the grain to run).
Just to be clear, the Glowforge’s Cut/score/engrave is precisely consistent with itself - parts of files don’t wander around randomly. What’s not precise is the lid camera’s image, because it’s taking an extremely wide angle image, and using the thickness of the material to convert the image to a “top view”, meaning that the placement of your file on the image of the bed might be a bit off (a quarter inch or less, typically). So don’t place cuts right on the edges of your material - leave a quarter inch buffer and your cuts all come out fine.
If you need to place an operation precisely on an object, you need to make a jig. This is a common technique for laser cutting (since most laser cutters don’t have a bed camera, you work with jigs a lot for repeatable positioning), not unique to the GF. For example, I put engraves on slate squares by making a file with a square the size of the slate, with the engrave in the middle. Then I put in a piece of cardboard, held down by magnets, and run the cut. I remove the square from the cardboard and replace it with the slate, then I run the engrave. Since they’re in the same file, the square and the engrave are perfectly aligned. And with the jig, the engrave is repeatable - just keep swapping in material and running the engrave again.