Help! My GF has stopped working

If you are not using proofgrade settings you might check the power setting to see that it isn’t set to 1.

Yes, the lens being backwards will do this.

1 Like

Check the material height you entered. It sounds like the focus is off. Maybe you left off a zero at the beginning of the height measurement.

(Obviously that needs to be directed to @awheds, not @jbmanning5!) ROFL!

1 Like

I guess I should have started with the simplest… :slight_smile:

You’re using slate, so I assume you, @awheds, are using manual settings. You need to make sure to enter a material height - though the autofocus/scanning operation should override it if you haven’t changed the focal height setting in your manual cut settings.

You also mention that you can see it hitting the crumbtray but not making an impact/mark on the material. What are your settings? A screenshot would go a long way here.

A: just a photo can mean lots of things. Is it embedded in an svg? Is there a clipping mask? Does it have a ton of white space around the subject that won’t burn when you select “vary power”?

B: it saves everyone’s time. It prevents pointless speculation by the people who are spending their time trying to help you. It prevents useless posts by people who repeat the same basic troubleshooting that you probably already did (if you didn’t already try stuff why would you post at all?) it prevents people having to say “hey if you include the file that will really help”.

C: because time and time and time after time I’ve seen weird stuff come down to the file that I didn’t expect would be file related. If you read the forum a lot (I haven’t taken the time to see if you have but let’s assume you have) then this shouldn’t be news to you either.

I’ll admit “just a photo” sounds like it’s not the file but without it, the picture is incomplete (no pun intended) and you’re asking people to do your troubleshooting for you.

I get that by the time you post here you’re probably frustrated but it’s like Jerry Maguire: help us help you.

2 Likes

OK, like I said, its a boring photo but this is it.


Here is a screen shot of my settings. You can see the bottom right area is the photo I uploaded earlier. The other three are different photos but with the same settings. The bottom right is the first one the printer is trying to do.

I edited this post as I saw the GF didn’t remember the vary power setting. I had it on vary power if that matters. It looks like it will leave two pictures of the screen. the vary power one is the correct one.

I don’t know the timeline of when you cleaned, but if the focus appears to be off (as in you can see it hitting the crumb tray, but it’s not leaving a mark on your material), it’s possible you reinstalled the lens upside down.

It should look like this:

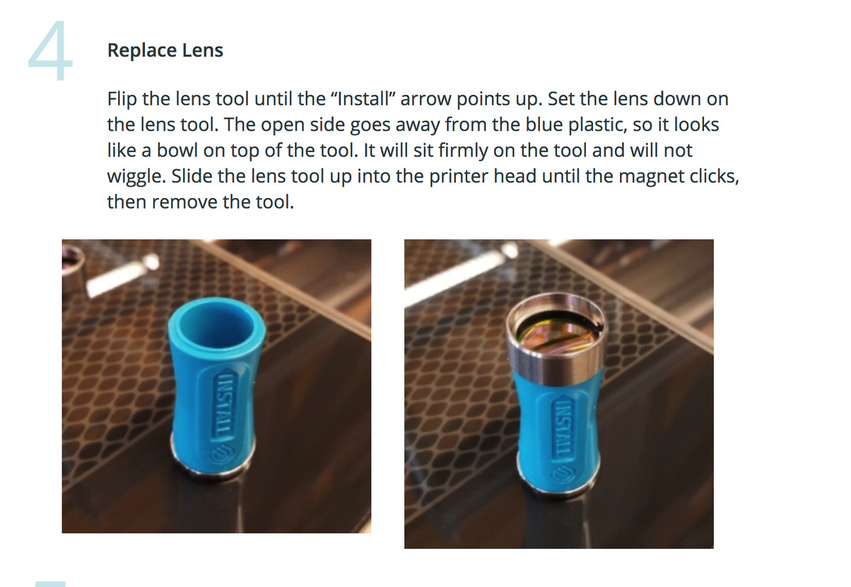
The lens material will be biased down, towards the tool and then lens will sit firmly on the installation tool.

Hmm nice map. And you’re just dragging the jpg into the UI? Or are you embedding it in an svg?

Thanks for the compliment. I’m saving it as a PNG and importing within the UI.

I’m pretty sure you don’t want to use the Vary Power setting on slate. When using Vary Power on a photograph that light and lacking in contrast, the results are going to look like absolutely nothing.

Vary Power reduces the power from the laser with lighter colors. That photo is very washed out - the laser is probably just doing exactly what you told it to do, at settings so low that it’s not generating any results.

Try printing it with Convert to Dots selected and set your power to 30%. Everything else is probably okay.

See if you get a different result using those settings on a piece of test material (slate, if you want to print it on slate).

(And if you want to get a better result, take that photo into Photoshop first and increase the contrast. I don’t think you’re going to get the results you’re looking for with the photo in that condition.)

LMK if that works. :slightly_smiling_face:

3 Likes

How can you see that, CO2 laser light is invisible. All you can see is visible light generated by heat when it hits something.


I’ll try that. These settings have worked for me in the past. The photo is washed out because I edit it in photoshop to reduce the engraving some. For me, it was easier to use recommended settings from this forum then adjust the photo to get what I wanted.

Well, those turned out pretty well, so if those settings worked for you I’d just stick with them.

Is it working again now?

1 Like

Thanks for letting us know about this. I’m sorry you ran into trouble. If possible, I’d like you to run a couple of tests that will help us investigate further.

Could you please do the following?

  1. Turn off your Glowforge, then turn it back on
  2. We included an extra piece of Proofgrade Draftboard with your materials shipment for troubleshooting. Place the Proofgrade Draftboard in the center of the bed and print the Gift of Good Measure using the default settings. Allow the print to finish
  3. When the print finishes, leave the lid closed and wait until the fans stop and the picture updates
  4. Check the completed print:
    a. If the Gift of Good Measure fails to engrave, please let us know the date and time of the print
    b. If the Gift of Good Measure engraves successfully, please try another print of the design you’re having trouble with. Engrave the design on Proofgrade Draftboard using Proofgrade settings. When the print finishes, leave the lid closed and wait until the fans stop and the picture updates. If the issue still occurs, please let us know the date and time of the finished print

Thank you in advance!

Update.

I tried making the coaster with the same map but using dots. It looked like junk.

I followed Vee’s suggestion. I printed the gift of good measure just fine.

I put in the coaster that was now ruined because of the dot print. I then went back to photoshop and returned the levels to full for a stronger image. The GF printed it just fine but it was way, way to strong. So, I go back to my original settings. This is what I was printing yesterday that didn’t work. Today, it is printing flawlessly again. hmm… No idea what went wrong. I’m guessing it was an error on the server side but I have no idea if I could repeat it to help GF find the bug.

The only thing I can think I did differently was when inputting my manual settings I added the material height there, tried to print, it gave the no material selected error where I chose uncertified and input the material height again. Perhaps it added them both together.

Yesterday was quite frustrating before I had to head out the door to work. Thank you everyone for helping me. This is a nice community to have for support and help.

Don’t mess with the contrast of your source image. If it’s printing too dark, maybe you could try to lower the power of the laser instead.

I’m not messing with contrast but the over all levels of the picture. I just dim it slightly.

Thanks for the update. I’m glad things are working better now.

I’m going to close this topic, but please do post a new one if you see the issue again or have another question. I’m happy to help!