And I’ll be the one to say, as gently as possible, that it’s against forum rules to request design files unless they are offered…
12 Likes
This is just superbly outstanding. What fine craftsmanship you possess.
6 Likes
BEEutiful
4 Likes
How long was that buzzing around your head before it flew out?
5 Likes
Also, it’s a against forum policy to ask for files.
2 Likes
I had thought that because my stuff was very complicated getting such precision would bee more difficult but this shows far more complication and thin bits than the previous stuff you have posted just getting those bee legs out of one piece of wood and fitting them in the other without breaking them or having a larger hole at the points where the speed had to reach stop before changing direction is quite stunning.
I could easily imagine them in a jeweler’s showcase displaying extravagant necklaces but am still having trouble imaging them used in any more mundane application…
3 Likes
You’re a master and you’re also amazing with your time and responses to these posts and direct messages. I’ve been inspired to try connections like these and I’m now creating some picture frames based off of your instructions / pictures / designs (my own flair of course). Thank you for inspiring and sharing your time and info! Truly appreciated!!!
1 Like
I have tricks here. One thing to know is that this was not my first bee. I did a test cut and fit to be sure that the pieces were viable. I got it to insert without breaking in my test, but was unsatisfied with the overburn at the thinner/sharper points, so I went back and redesigned a bit to ease those corners and make it less prone to acceleration effects. Here’s test bee:
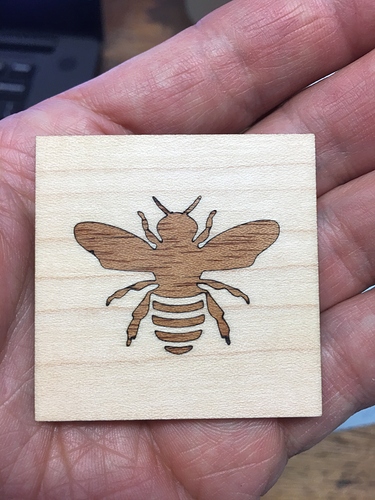
Mahogany, Maple
You can see the parts that need adjustment pretty clearly, “knees”, tips of hind legs, etc.
Likewise, I did a similar test burn with the honeycomb:
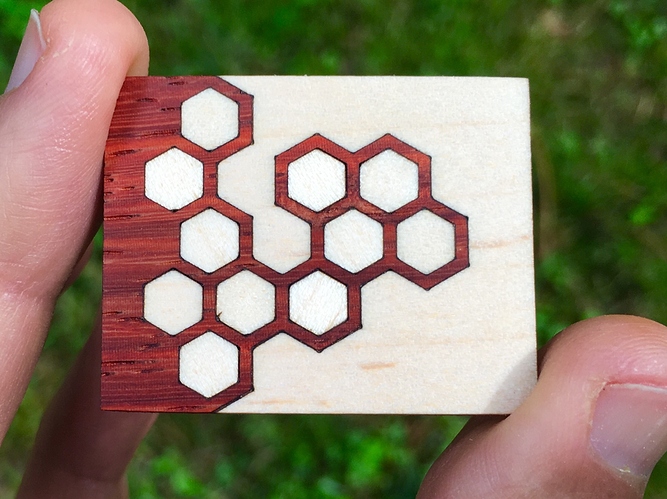
Padauk, Maple
You can see the very sharp points on the honeycomb were overburning. I thought a 30 degree bend wouldn’t have too many acceleration problems, but clearly they did. I think this design is still great and the sharp points add something fun, but I didn’t want that here. Since this is an organic form and not an abstraction, I wanted to get it exactly right.
As for inserting without breaking, my trick there is twofold: I flip one piece to help them set properly (the kerf profile assists here), and once they are aligned (you can feel it begin to get into place), I press it together using something flat. In this case I used a scrap 2" square of baltic birch. I press down on the baltic, which distributes pressure evenly and gets the pieces to go together without any breakage.
Pro tip: even if it cracks, if your engrave is tightly kerf corrected, you’ll never see it. This one didn’t crack but I’ve had others that did and once assembled, there was no way to know.
16 Likes
Quite aside from the prohibition of asking; If he gave you all the final files and all the cut settings I seriously doubt you could come close to his result. Just looking at what he did I could make a set of cut files that would be indistinguishable but the result would not be close and they would still be as much a poor fake as if I painted my own Mons Lisa.
And If I spent that much effort and was able to match his craft skills why would I ever want to make the same thing? Making a ruler or hold down pins having a file is good and they are in the free area, but such artistic and individualist work as that> who would want to copy it?
13 Likes
You could have a museum display of your testing pieces.
When I was a member of the Miami Ceramic League they would pay for many visiting artists to come and teach their techniques and so after a number of years had the most amazing museum of works designed to teach by dozens of world-famous artists, so each piece was unique even in a collection of works by that artist.
I have very few pieces worthy of looking at but what I have seen of your “experiments” you could do a Museum of your own. Separated as we are across the globe instead of concentrated in a single city it would be harder but I wonder if @dan might do such a museum in the offices in Seattle.
8 Likes
I don’t know if I gave my two cents worth or not, but this is beyond stunning! Amazing work!
3 Likes
First of all, you’re welcome. ![]()
I hope you post pics of your work, I’d love to see what you come up with.
5 Likes
I’m trying - but as my 12 yr old daughter reminded me last night, there’s more to life than sitting in front of AutoCAD and designing pieces to be cut on a laser cutter! My time lately has been spent in end of year school events and weekends full of getting ready for summer stuff.
But I’ll share as soon as I have something worthy of sharing!
7 Likes
Ah, yes. This is the busy season for parents all across the US. I’m in the same boat.
2 Likes
Forgot I needed to make a notebook for our monthly poker group. I bought the hinges and paper a while back and with our next game coming up in a couple of weeks, I thought it best to complete this and do a card themed edge around the book inspired by evansd2 - I’ll post pics!
5 Likes
Amazing. Beautiful! Thanks for taking the time to share all the info!
2 Likes
As with most art … There really aren’t words to express what it makes a person feel. Thank you so much for all the photos and your wonderful write-up. It is an amazing piece.
9 Likes
Bee still my heart!! It’s soooo lovely!!
I’d say you’ve outdone yourself…and, seeing your work here, you’ll outdo yourself again in a few days.
Thanks so much for sharing the project and the process (invaluable).
7 Likes
Wow. I’m pretty proud of my inlay work and it doesn’t hold a candle to how flawless yours is.
3 Likes