I’ve been having trouble with my GF Pro over the past month with cutting all the way through. I’ve had to engage support, I’ve gone through all the steps, cleaned, etc. My question is…this time when I started having trouble it was cutting “hot”, just meaning the cut looks charred on top, and didn’t cut all the way through. Cleaned all lens, air assist fan, and got it cutting good for GIft of Good Measure and one cut of a pair of earrings, then immediately started cutting “hot” again. Why would it be fixed, cut good for 2 cuts, then go back to the same issue?
2 Likes
Support will be able to look at your logs and give you a good idea of what is going on. My only guess is that there is some error with the focusing.
3 Likes
Posting here opens a 2nd ticket with support - which they will have to close before they can continue working on your 1st ticket - next time do one or the other, but not both.
What @dklgood said - it sounds like your head is having a focusing issue. It might be a mechanical issue, but it could also be your material. A staff member will be able to look at the logs and see which. You’re going to need to be patient and wait for their response.
In the meantime, I’d pull the head and make sure the tube where the lens goes up and down is truly clean - also check the opening in the side of that tube. Debris can definitely muck with the lens.
2 Likes
@mngrahams
I’m so sorry for the delay in response I want to get your Glowforge back up and running correctly. <br />
I extracted the logs from your Glowforge to investigate, and it looks like the Glowforge is having trouble communicating with the printer head. There are two key connections I’d like you to check for me.
Could you please do the following?
Turn off your Glowforge.
Holding only the finished black surfaces, grasp the printer head as shown. Pull gently up and back to disengage the magnets and remove the head.

There is a small tab in the center of the wire ribbon. Push down fully on the tab to release it, and gently pull the wire ribbon plug from the printer head.
Take a clear photo of the gold pins inside the printer head where you just unplugged the wire ribbon. It should look like this.
Pick up the printer head and wire ribbon. Make sure the tab on the wire ribbon is facing up. Slide the ribbon back into the head until it clicks.
As shown, lower the printer head over the metal plate so that it rests next to the two round posts. Then push it gently away from you – you’ll feel a “click” as magnets pull the printer head until it sits snugly atop the metal plate.
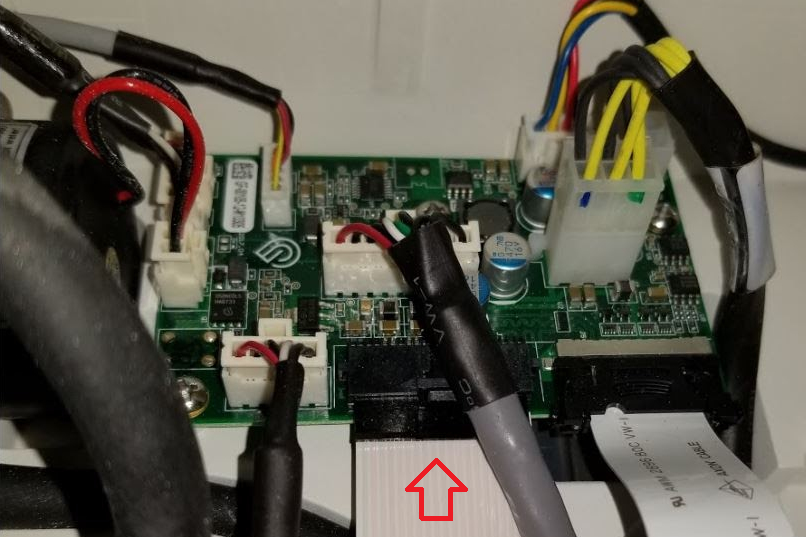
Pull the laser arm all the way forward.
Reach over the laser arm, and to the left of the inside of the unit and you’ll see this circuit board:
Take a photo of the circuit board. If the cable I’ve indicated above with the red arrow appears to be loose, please reconnect it and try printing again. This cable should ‘click’ back into place.
Turn your Glowforge back on.
run a test print of your choice
post the photos you took in step 4 and step 9.


Attachments


![]()
This topic was automatically closed 30 days after the last reply. New replies are no longer allowed.