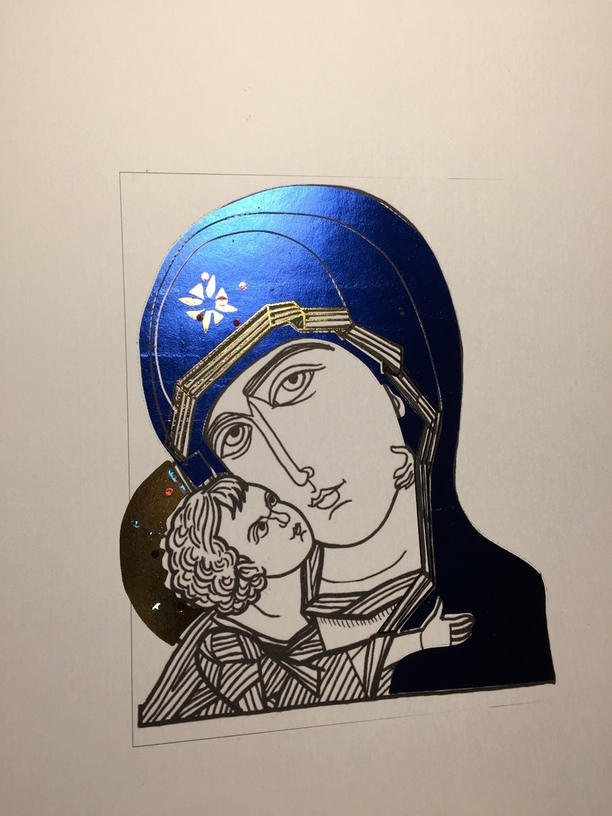
Nope! No smears…looks just perfect! I had to print toner on top of foil…and finally completed an image with 4 colors on it, though a couple of them (silver in the halo and pink in the gems) are difficult to see. It worked like a charm, and with the exception of some misalignment on my part, this procedure is wonderful. Very time consuming, but wonderful.
16 Likes
Wow, it’s awesome!
2 Likes
Thank you. I’m using iCraft Deco Foil. This is my first time doing this. I bought a very inexpensive laser printer ($84) and a laminator. I sprang for the one made especially for doing this process, so though more expensive, it’s a very large size and does a great job.
I just finished what I now consider a successful print (see my next post), but the time put in and the steps it took to get there were considerable.
First, I downloaded a black and white image from online. Then, I began using the bezier pen tool in Affinity Design to trace the features that I wanted to have foil on. Each different color of foil must have it’s own dedicated layer…so I saved each layer separately. Used a different program (Print Shop) where I make cards to start the printing process.
- I printed the entire original B/W image in my regular ink jet printer.
- Put the first layer down over it (in this case, it would be Mary’s blue robe) and printed that using my laser printer.
- Took it back into my little studio and placed the foil and ran it through the laminator.
- Repeat the process for every layer.
Any foil already on the image withstands being run through the printer again many times, very well.
So, I had the original image + 4 more layers.
The time consuming part is doing the tracing and creating all the layers. Cheers go to Erin for turning me on to this beautiful medium!
14 Likes
Super wow. So it’s basically like 4-color printing, only with foil.
2 Likes
And to think that the Eastern iconographers have to fast and pray to write icons as beautiful as this. Thanks for sharing.
6 Likes
It’s absolutely stunning!
1 Like
Yes…basically, that’s true. Took me quite a while to realize that I had to print out the entire image in B/W first though…then add the layers on afterward. Duh! 
Thank you. When I worked in the office at a seminary some years ago,I did some very interesting reading about ‘praying’ an icon. There was a monk there that was well-known for this type of art.
2 Likes
If it was Mt. Angel we have a connection. A former student of mine studied under a master there. He is doing his doctorate now and writes some amazing icons.
6 Likes
Hi,
I’ve done some foiling like this for Christmas Cards in the past. It’s pretty neat and easy to do on paper.
I don’t know if this video on Laser cut foil has been posted in the forum, but thought it would be a good fit in this shiny topic.
The product allows you to apply the foil directly to the substrate, then raster away parts of it, leaving the unengraved area foiled. Or, you can vector engrave, then peel away part of the foil, leaving some with the original material exposed and some foiled. Even apply to cheap material, cut it out and get the look of shiny metal on the surface of a shape.

Here’s one vendor to give you an idea of the price. A 6" x 25’ roll for about $32. With judicious trimming coupled with the Glowforge camera alignment, I imagine this roll could go pretty far. I’m definitely going to try it.
http://www.johnsonplastics.com/red-6-x-25-engravable-laser-foil
21 Likes
Oh boy…a small world occurrence…thousands of miles apart. SO cool and always fascinating to me. Yes, it was indeed, Mt. Angel.
4 Likes
The world gets smaller every day 
1 Like
I really enjoyed the video and would love to try that myself…hopefully sooner than later. I also bookmarked the laser foil supply page. Thank you
2 Likes
That turned out amazingly well! I can’t believe how well the printer printed on the foil. That’s awesome. Thanks for sharing your experiments and the process. I honestly probably wouldn’t have tried printing on the foil at all.
I can picture the final result matted and frame and looking just phenomenal.
2 Likes
Outta likes…again!  Since this was part of my learning curve, I figured there was only one way to find out how toner would print on foil…and now we know. Now that I have the process and experimentation down for this, I’m going to do the same image again but make sure I don’t make any mistakes…and make it frame worthy as a Christmas gift for my daughter. Then, I’m going to begin working on another one. Addictive!
13 Likes
Thanks for the video link.
It now get me thinking of other uses for the lasering foil.
2 Likes
So… referring to the video, is it just adhesive-backed and the laser is only cutting/engraving it? Is there any heat-based adhesion/extra bonding from the lasering process? Or is essentially comparable to sign-vinyl and Wrap Film in terms of how it sticks to stuff and how it wears?
3 Likes
How hot the platen? My pizza press does go to 200 degrees F.
It’s all adhesive backed. Apparently it bonds tightly over time. One other video out there recommends applying the foil and weeding out any excess within a short period of time. @marmak3261 No heat Is necessary with the foil I referenced. Don’t know about the foil that @Xabbess used.
It doesn’t mention it in the videos, but I’d probably apply some extra pressure when it is complete. Just stack some books or other weights or it for a couple hours.
1 Like
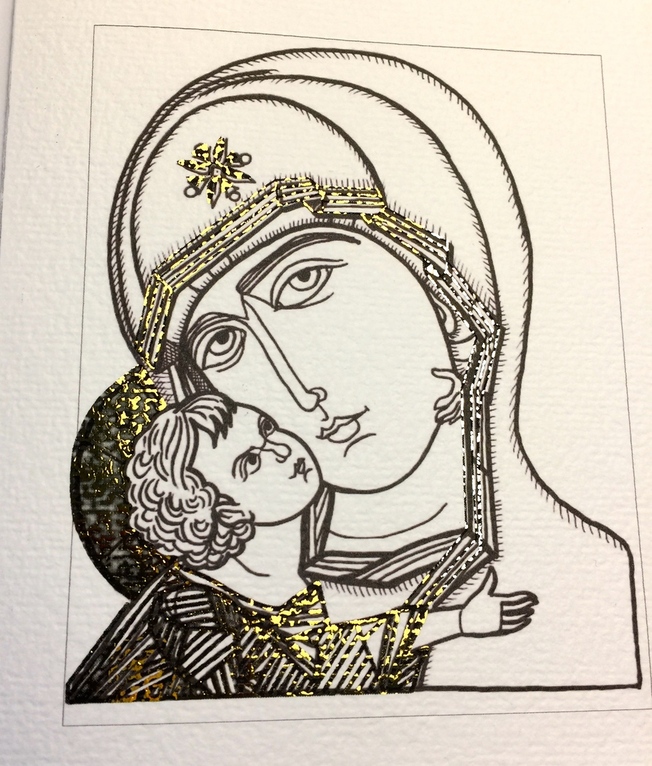
For anyone who might be interested, here’s another print done on water color rag paper. I know I read that the foil won’t come out smoothly, but it’s actually a very nice look…very textured and rather subtle. I like it almost better…but that could be depending on the subject matter of the image being used. There are both silver and gold on this, as I just used up two scraps laying around.
14 Likes