I need to print and cut around 50+ sheets of these game tokens.
They are pre-printed and mounted on 2mm MDF.
Registration is killing me!!!
Problem 1: The print on the sheet is not always in the same location - it can drift both horizontally and vertically
Problem 2: The print on the sheet may also drift with upto 2 degrees of rotation.
Problem 3: My GF standard alignment is around 1/4 inch out vertically and 1/16th inch horizontally - but this varies after every calibration.
Problem 4: The very slight rotation is impossible in the User Interface
Problem 5: I can’t use a jig because of problems 1 and 2.
Oh. and the advanced course is I would really like to print this double sided - but I’ve given that up as being completely impossible.
What I have been doing is
With a test score that is the top left and top right corners start with a test I know will be too far up and to the left
Eyeball it in the GF and tweak with arrows down and right
Repeat steps 1 and 2 until the score lines up as best I can
Then run the actual cut grid and run the proper cut.
If the rotation is out of whack I’ve been opening up the GF and trying to align the print square against the edge of the GF then going back to Step 1 again.
P.S. I know someone is going to talk about bleed - yes, I am already adjusting my art to include more blead, but these tokens are max 3/4 inch across, my tolerances are quite tight and bleed doesn’t fix the rotation problem.
I’d start with a stack of cardboard. Stick the game piece sheet in the GF and use hold down pins to mark the alignment of top and left edges. Line your cut lines up with the pieces, but take the sheet out and replace it with cardboard for the actual cut. Then put the cardboard over the game piece sheet with top and left side aligned, and see which way it needs to be adjusted. Repeat until it matches, then stick the game piece sheet in and make the cuts. Repeat as needed. Time consuming, but cardboard is cheap!
OK, so I end up with a cardboard sheet with a hole in it, and I need to align the printed sheet so the print fits the hole. But how do I do that without moving the sheet? Or am I missing something?
That’s a quandary. in terms of positioning, the distance moved by nudging with the keyboard arrows narrows with the UI magnification. The higher the magnification the smaller the distance moved. I guess we can go up to 500% now, so tiny movements are possible. I don’t know if the same holds true for rotation.
When I need to check alignment, I will mask and run a low power check just toasting the mask to see how it lines up. Maybe that can be of some help.
Wait, I thought of a better way. Make a pair of crossed lines on the blank end of your sheet, and a matching one on your cut line svg. Stick the sheet in the GF and line up the crosses (ignoring the cut lines) and score it. Adjust placement until the crosses line up, and then you can safely un-ignore the cutlines and make your cuts.
This assumes you can make sure the sheet is straight so the cut lines will stay on target all the way across. I’d line them up against the front door, using a spacer if necessary…although if the printing on the sheet isn’t square with the edges, that won’t do it either…
Totally unrelated, but did you print the MDF yourself? I just posted about this. I’m trying to figure out what sort of place I need to contact about printing on MDF. Do I need a UV printing service?
You’d be using the holddown pins to line up the top and left edges of the sheet in the GF, so when you take it out and put it back in, you’re putting it in the same position each time by butting it up against them.
To both of you, yes, that is in effect what I’m doing, but it’s taking me 3 or 4 goes per sheet and each time waiting for the “scanning…”, “preparing…”, “cooling…” it is taking for ever to get each sheet done.
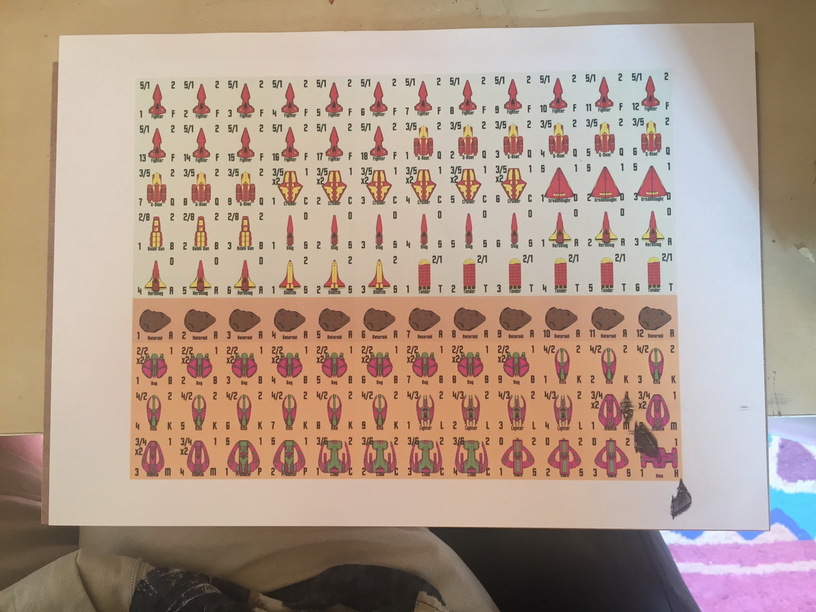
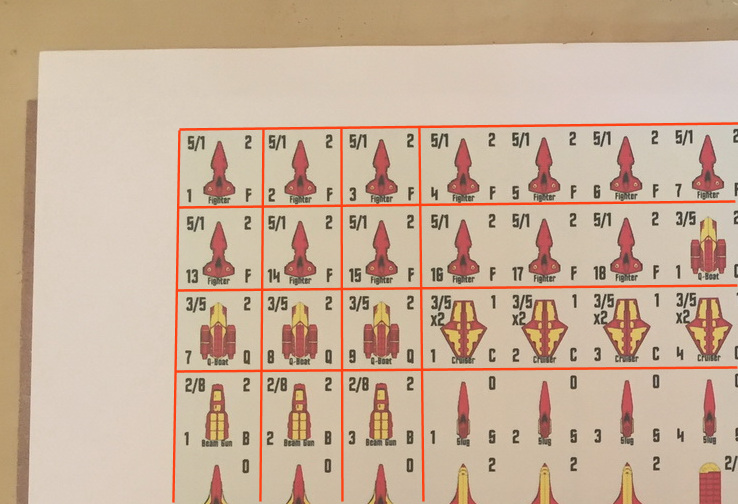
If it helps, this is how I’m needing to cut - the red lines indicate the laser cuts. In other words, I haven’t got a print to the edge of the page that I can use for alignment.
Ah. This is what I’m trying to avoid. There has to be a better way! Yours look great, though, so if I can’t figure out a better option, I’ll suck it up.
I wish there was a perfect way to do this. Unfortunately, with the cameras as they are (without 3 point registration) it’s just a too hard.
I’ve tried making prototype (single and doubled sided) in the same manner you are trying. The Glowforge’s variation of registration (on top of printing drift) has forced me to use camera alignment with a frame and pins. It’s not perfect, but the best I can do for now.
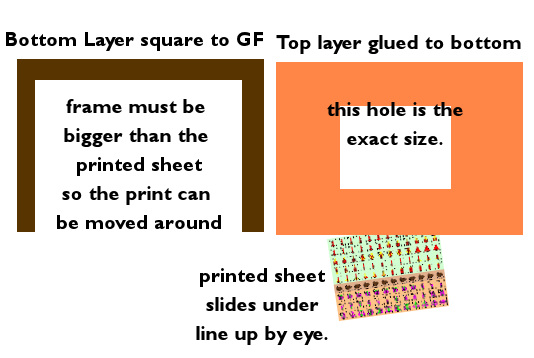
I like what you are thinking. Some sort of double layered jig. The top layer has the hole cut in it - supported on the bottom layer by some edge so that I could then I slide the printed sheet underneath and align by eye directly. That would work
For example. Bottom layer is a 20 x 16 sheet with only 3 edges, maybe an inch wide each. The space must be bigger than the printed sheets so you can move them around.
On top of this you glue a second sheet - initially without a hole in it. This whole thing gets pushed to the back of the GF so it stays permanently in place.
Next, run a cut of just the outside of the final cuts to make a hole in the top frame.
Then, as long as you never move the frame, you slide each printed sheet into the bottom layer, line it up by eye against the hole then run the full cut sequence on the sheet on the bottom.
I guess you could add some additional registration cuts in the top layer to help line everything up.
I feel like I might be re-inventing a wheel here - but would this work?
This is similar to what you are talking about: I used to do registration for some screenprinting by using an overlay sheet. The applicable variant here would be to have a fixed base (either the tray or, a sheet of material firmly attached) then, a piece of something laserable and translucent like velum, attached firmly along one edge.
Print registration marks (+) in at least two (maybe three) corners of each printed sheet.
Add corresponding registration marks to the vector cut. Use very low power to etch the reg marks on the translucent sheet.
Put the printed sheet under the translucent sheet, align to registration marks, fold translucent sheet out of the way, cut.
P.S., I see the discussion trended even more this direction while I was typing. Great minds and all that.
I knew it had to be done before - translucent sheet folded away could get in the way of the GF gantry, but I could use a sheet of acrylic and just lift it away when aligned.
In fact my diagram is covers more area than I would need, since I could get away with just the top edge and a little bit of the left and right edges in the upper layer - that would make getting the printed sheet in and out so much easier.
Are you using a 20x12 artboard? The objects should show up exactly the size and placement as they do in your design software - there shouldn’t be any drift.
Then just mark your bed with a piece of painters tape or something or use a a piece of scrap. Butt the piece of material against the tape or scrap and you should be able to swap out pieces of material and get them into the same place as the previous one and eliminate any misplacement due to that factor.
Interesting idea. Please let me know your results. I’ve been using a frame size to hold a landscape 8.5x11 and using a low tack spray to hold the paper for cutting. Always looking for another way to work. Thanks in advance.

 This is what I’m trying to avoid. There has to be a better way! Yours look great, though, so if I can’t figure out a better option, I’ll suck it up.