I’m trying to engrave the circles of this image. The file was made in Inkscape. GFUI will not let me engrave just the circle outlines. It wants to engrave the entire circle. It is driving me crazy trying to figure this out! Can anyone help? Thanks!
Scoring does not produce a wide enough line. I can barely see it! Thanks!
You need to expand the lines you want engraved, or you could leave it as a score and defocus the laser. Also, you need to make sure there is no fill in the circle unless you want the entire circle to engrave. As it is, the smallest circle is engraving and you only want the tools to engrave or score.
“expand the lines” in Inkscape is Path->stroke to path.
Basically, make your circle, then set the line width to however thick you wanted the engraved area to be. Then go to Path->stroke to path, it’ll turn your circle into a “donut”, meaning a filled ring, waiting to be engraved.
This is similar to what you would have done with the text when you did “object to path” to convert the letters to filled shapes.
What @evansd2 said. But, I think you also have to have the fill color set after you do stroke to path. And maybe unset the stroke color (I’m not sure if that matters though).
Both of these behaviors are default, so if you follow those steps exactly, that’s exactly what you’ll end up with.
Also: it doesn’t strictly matter if it’s filled or stroked, you can always override the settings and say “nope, this is a cut” or “this is an engrave”. The fill/stroke thing is really more for helping you streamline the workflow and keep it all straight as you design… and it will help you understand your engraved vector areas exactly before you sent it to the GF.
Okay thanks! I only piped up because I just ran into that today. I was trying to engrave a rectangle outline, and I did stroke to path on it, but when I brought it into the GFUI, it was going to engrave the whole rectangle, not just the outline. I checked again in Inkscape and saw the fill color was not set and the stroke color was. When I turned off the stroke color and set the fill, it looked like I expected it to.
I think maybe it was going to cut the rectangle, not engrave it. I don’t have a Glowforge at the moment so I suppose I can’t test this, but unless they’ve changed the way SVGs are being interpreted in the UI in the last month, I’m pretty sure it wasn’t going to try to engrave your empty-fill rectangle. Like I said, you can always change the type of operation on the job list; it comes in as a cut by default, but you can just change that on the fly.
You can test stuff in the UI without a machine, I did when I didn’t have mine. You can upload files and put settings on things, it just shows your machine as offline. The only thing you really can’t do is calculate the run time. I actually got a lot done when I was waiting on mine!
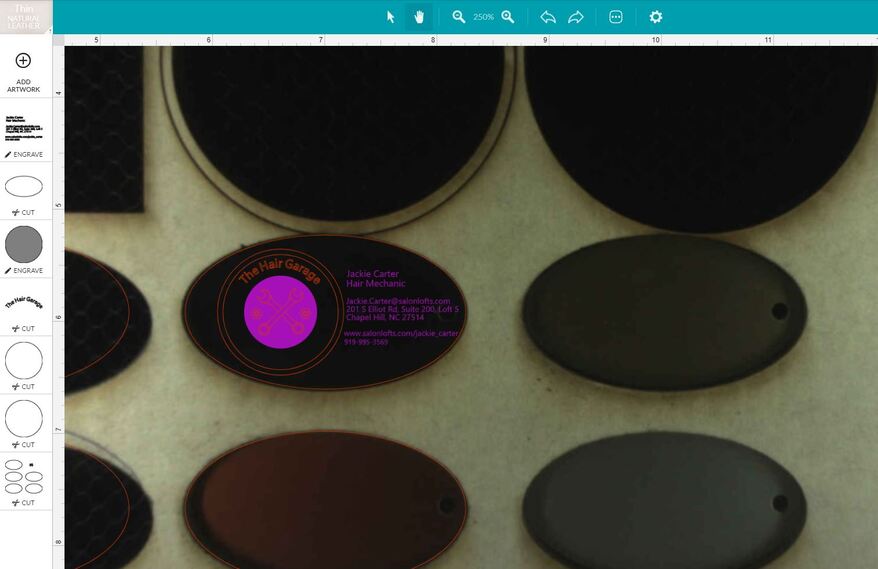
If you want to engrave the design as shown in your second image, you need to simply upload a single black and white bitmap (PNG, JPG) version of that to the GF UI. You don’t need all those different elements, except for the outer ellipse for the cut.
Thanks so much for all the advice. I getting there i think!! Now it will let me engrave just the outline of the circle, I did the Path > Stroke to path. But it is also engraving the little “marks” and see how the circle is narrower. How do I turn off the marks?
When I tried the fill it filled the entire large circle and I could no longer see the smaller circle, i.e. I guess I don’t know how to fill them separately!
I’m new to both Inkscape and Glowforge and have very little experience( as you tell tell from my stupidity!) with design software such as illustrator, Corel or Photoshop.
I have seen that behavior before as the node gets somehow reversed and points in a direction opposite what it is supposed to. In Inkscape and node edit and selecting that top node you will see handles pointing out each side making that "mark"that is a loop-da-loop so if you take each handle and move it to the other side the problem is fixed.
Thank You!! I see what you are talking about. There are a gazillion little nodes so I have to figure out which ones are causing the issue. Now that I know the problem I can probably have my hubby fix the node issue. He did the design in Aspire software so he can probably fix the node problem there! And then bring back in Inkscape to GUI.
Thanks again! Hopefully I can get it figured out this time.
Cheryl
In inkscape it’s super easy to create this. Just create 2 solid circles one the size of the outside and one the size of the inside. Create them without a stroke but fill them both. Center them together and with the small one on top select it, hold shift, select the larger one and (assuming your default setting is “last selected” in the alignment tool) go to path, difference.
Like this:
Many paths often get the same result, but some are a longer more dangerous path (like when the outside is above the inside and you get nothing) and others are very much more flexible. I did not know about Stroke to Path but can think of dozens of situations that I wish I had known


