I am trying to make a large number of wooden coils for a local business and I would like the logo to be engraved all at once for the coins instead of individually. I’m not sure how to go about doing this, I am using inkscape for the design of the coins. The UI recognizes all of the circles as one operation and all of the words I added to the coins but not the logos. Any help would be appreciated.
Are the logos raster assets?
You’ll need to select all of them, and rasterize them together, creating one large image.
1 Like
How would I go about doing that in Inkscape?
Check some of the tutorials listed here:
2 Likes
I have been through a lot of those but I wasn’t able to find one that helped. The UI told me that there are a lot of colors so I’m not sure if that is why it’s going that but everything is black and white.
So this will sounds weird, but is it all the same black? RGB=000?
All of the logos should be. I made one coin how I wanted it in Inkscape grouped everything together then proceeded to copy and paste until I had the desired amount of coins. Which is a lot lol.
It is. The UI treats individual raster images as separate operations. (So it’s basically telling you that you have a lot of operations set up…which you probably already know.) ![]()
I’m not the Inkscape expert around here, but combining raster and text images into a single image is pretty easy:
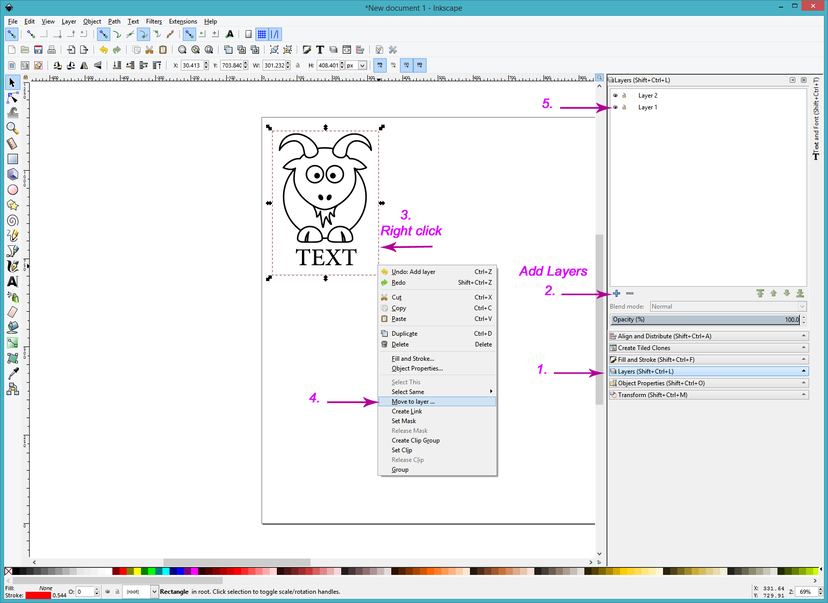
1. Hide your cutting lines in the Layer palette and lock them. You don’t want to accidentally delete them.
To do this:
- Open the Layers Palette
- Add a couple of Layers (plus sign)
- Right click on the cut line to select it
- Move to Layer - choose Layer 2 (to put them on top of the image)
- Click the Eye and Lock icons (AFTER you have made your copies in the next step.)
2. Make your copies of everything
3. Turn off the Cut lines (Hide that layer and lock it)
4. Rasterize everything else into one image
- Select everything
- Go to Edit > Make Bitmap Copy
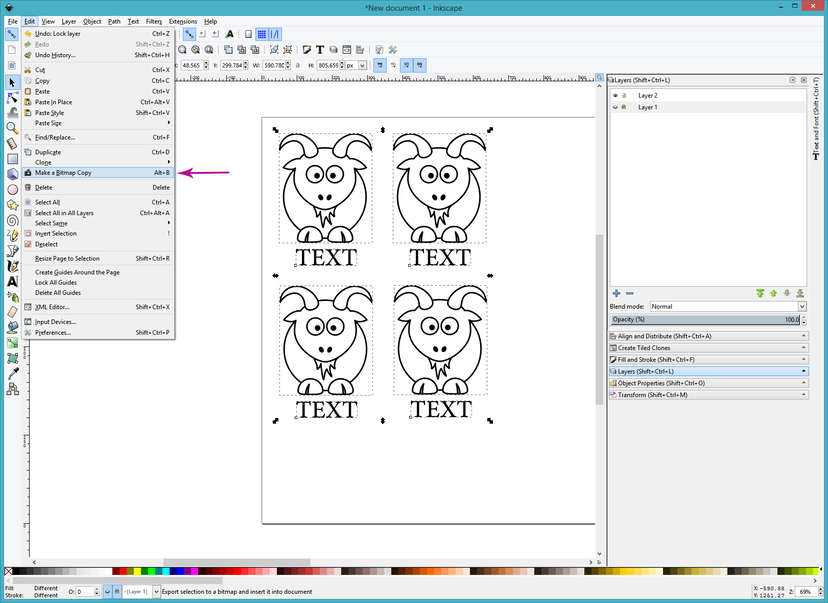
- Right click on the resulting image and shift it to Layer 1
- Turn off the view and lock Layer 1 as well.
It’s going to look like nothing happened, but it did. The raster image is hidden, what remains on the screen is the original elements used to create the design.
-
Select everything on the screen and move it off the artboard or delete it. (I prefer to keep a copy of the originals in another file or out to the side, in case the resolution or placement needs tweaking, but it’s up to you.)
-
Last Step: Unhide and Unlock both Layers, then select everything and Group it. If you don’t group it, you can shift the cut lines relative to the image.
For this reason…make sure that your total design is small enough to fit on your bed in the Glowforge with significant leeway. Since you are engraving, you are limited to a total size of 18 inches wide. (You might need to leave off a column, and the only way to do that is to go back to the original design and start over.)
6 Likes
Sweet thank you. I’ll have to give that a try when I get home.
1 Like
When I am doing a number of the same thing with a Raster engrave I make and load just one into the GFUI and copy and paste them there. They will engrave one at a time but you can arrange them however you want (and even scale them as needed) this is particularly useful if I am trying to use up scrap as you get as many as you need, arranged and sized to get the most use from the scrap.
3 Likes
Thanks everyone for the suggestions!
1 Like
Life happened and I finally did what you said and it worked perfectly. One thing that I found out since I had a file with all 100 of the designs already laid out I just had to ungroup everything select the cut line and choose select same object type. I was then able to change the stroke color of the cut line only and select all of the circles at once and add them to the layer instead of each individual one lol. Thank you so much for the help.
4 Likes
Awesome! Didn’t realize Inkscape had a “Select Same” option. That does make it easier if you’ve already got them laid out. 
1 Like
So I ran into an issue with this. Creating the Bitmap copy of the image gives it terrible quality, any work around for that?
Check the Bitmap settings in your Preferences. I think it’s in the Input/Output tab. (If you don’t want things to be resized, you need to keep the output DPI at 96, but you can likely increase the input DPI and improve the results.)
(If your original image is coming in at 72 DPI though (for instance you got something off of the internet), you aren’t going to be able to improve it. You want to start with a higher DPI image.
3 Likes
that one worked out perfectly thank you so much!!
1 Like
I did a design in inkscape that I took to Gimp to finish out . To get minimum pixel distortion I brought it in huge (5000 x 8000) and did the work in Gimp before popping back into inkscape for simple cuts and engraving.
Brought into the GFUI when I tried to engrave the image the GFUI choked and gave me a “you have to be kidding!” error that I had to go back to the reducing it by half and thus one quarter the original size. It did not matter much with my design but if it was a hundred small designs in one image it would have made a difference.
That must be a new error 
I’ve uploaded SVG files with embedded images, up to about 25mb, and been ok.
1 Like
I cut it in half and it went through fine. I did not really need the final image to be that tight so did not care, but when spread over the entire bed as a bunch of circles with engrave could be an issue.
This topic was automatically closed 30 days after the last reply. New replies are no longer allowed.