I had a plan, much did not happen as expected

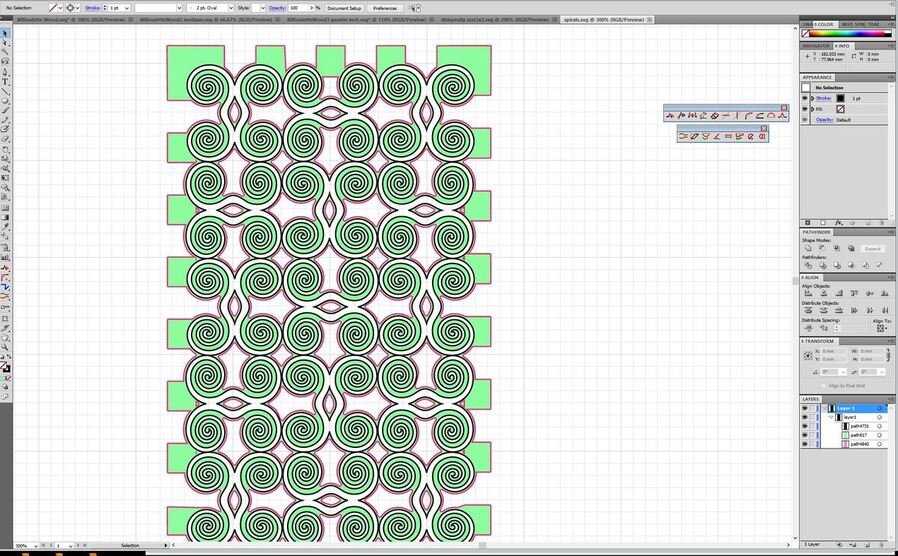
I had five different colors with five different names and what I got in the GFUI was three different arrangements to make something of. When you put something on ignore of course it still blocks your view of the other layers so it was very hard to see what was what but since each chosen layer lit up I made my plans accordingly.

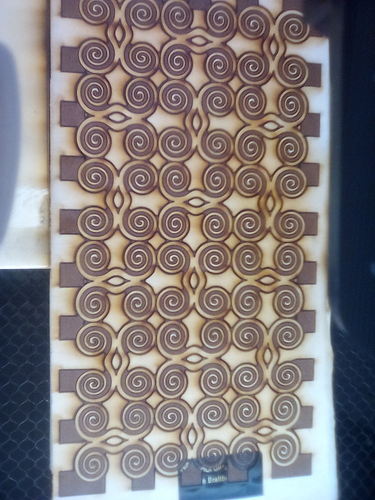
The first problem was one of parallax as what you see in the GFUI is not what you get so I had a plan. Run the design as a very light score and see where it lands that way you can make sure that it lands on the work! So I did that decided I wanted it there and made the score an engrave, doing nothing but changing the score to an engrave and changing nothing else it started the engrave an eighth inch back and a schootch over this made it hang over the edge a bit but as they were mounting tabs I figured the tabs would just be a bit shorter.

That first engrave just barely darkened the wood, so I ran it again and a final time at 350 zooms and full power. I also ran it at 75 Lpi as I figured that any gap would just burn off as indeed it did. I figured a final run at a low power high speed and high resolution would taken out some char and even things out. I even left the spirals extra thick thinking a final score would sharpen them up.

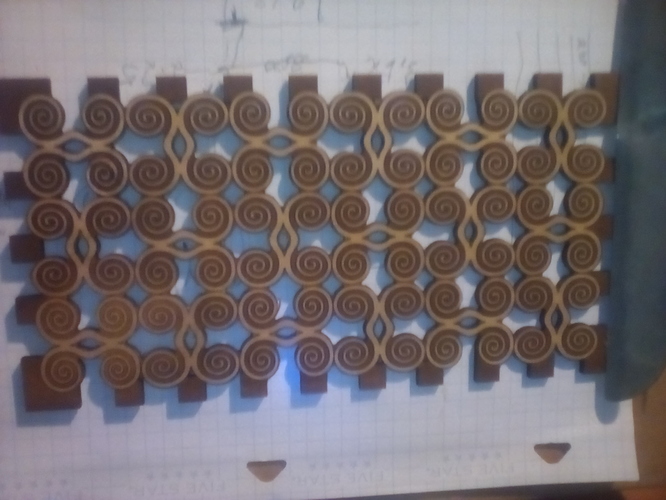
Then with a cutout of the whole piece and the gaps between the spirals it should look pretty nice. That was not the result I got.

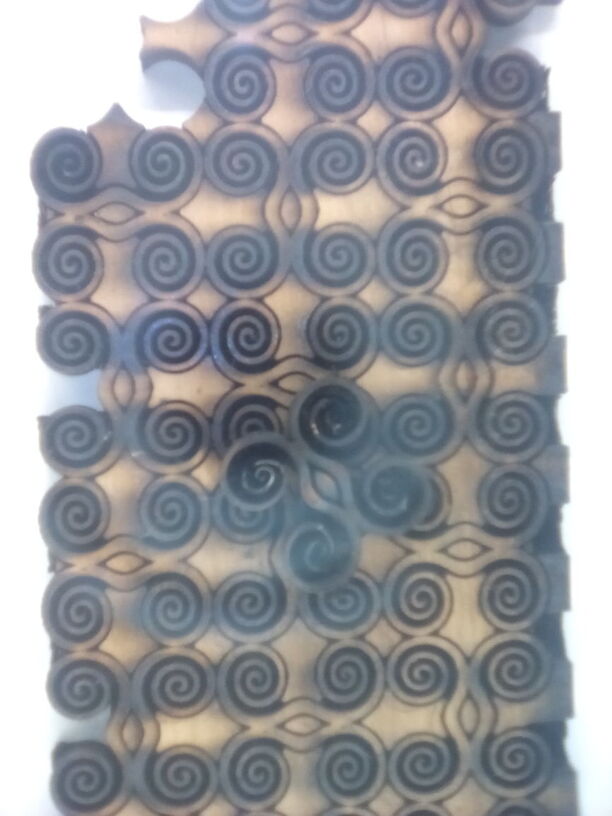
That very last cutout did its thing around the outside and then went to each spiral center and burned it up. I lifted the lid to end the cut but it was all pretty much toast. Checking back only the places that were supposed to be cut showed up so i tried again and the same thing happened again the whole thing was earlier today from 4:30 to seven if support wants to look at the logs,.

I am not sure what is a bug, what is my stupidity, or just the crying need to include object’s names and ability to move stuff from one group to another in the GFUI.

If you are trying to do what I think you’re trying to do, and just cut out the spiral design, I think you’ve got a few too many steps in there, and it will char badly if you keep burning it in the same place. (As you found out.)

You just need to run one cut, although you can break it up into different colors if you like. You don’t need to score it first, or engrave or score it again to clean it up…you are wanting to cut all the way through the wood. The laser will do that with the right settings.

If you want to load the SVG file I can try to take a look at it later tonight and see if there is a way to optimize the cuts from the inside out using different colors on those and going inside out. (Be sure to zip the file before you load it here first though.)

As far as the placement issue goes, are you trying to place the cuts on a small item, or cut the entire shape out of material that is large enough that exact placement doesn’t matter?

2 Likes

What I want is a many layer design that is thin spirals at the top and cut out with holes at the bottom. The spirals are too delicate to stand alone so the space was supposed to be engraved away leaving enough meat to survive.

It was my own ignorance of good settings that over did the engrave a bit too deep , but what was only supposed to cut the holes tried to cut the spiral all the way down and just burned them up.

This appears to be a problem with what the GFUI did with my files saying it was going to cut one thing and cutting far more. This is the second time today that has happened though the first time was far less a problem the early look before it was toast was really nice and I have many examples of thinner pieces though most are straight and not curly.

I am on my tablet and the file is on the computer so I will send it pm when back to the computer.
Being able to see the interaction on the tablet when in the room with the Glowforge is another thing I have mentioned before as about 30 feet down a hallway stands between Glowforge and computer.

Okay here’s the explanation…I’ll send the modified file back to you privately

Basically, you need to set the operations in the GFUI by changing either the stroke color on the parts if you want a Score or a Cut, or changing the Fill color on the parts if you want an Engrave.

Layers make absolutely no difference in the operations set up by the Glowforge interface. So if you want to have a separate Score operation, and a different Cut operation, set the stroke color for the Score to be blue on the lines themselves that you want to score, and the stroke color for the Cuts to be Black. Or vice versa, it doesn’t matter what color you use, just that they are different. When you get into the GF interface, you can tell it which lines you want to Score, and which lines you want to Cut by hovering the mouse over the thumbnails in the left column and seeing which lines turn blue.

The other thing you want to avoid is including a stroke color on areas that you want to have engraved. It always defaults to a Cut if there is a stroke color associated with your shapes, even if they are filled. If you design the areas to be engraved without a stroke color, just giving them a Fill color, the interface will interpret that correctly as an item that you want to be engraved. For a design like this one, since you had all black stroke colors assigned, when you cut the black lines, they cut out around your engraving. So always leave the stroke color as null when you want to engrave.

The file I worked up will show two Cut operations and one engrave operation. If the interior lines are meant to be Scored and not Cut, you will need to override one set of cut lines (the interior ones which are set up as black) and turn them into a Score. Then you should be able to Engrave it and Cut it out as desired.

In the file below, you would Engrave the Green Fill areas, Score the Black Lines (which are on a separate layer and are unfilled) and Cut the Pink Lines. And it doesn’t matter that the lines look large, those are just so you can see them, the machine will cut in the same place no matter how thick the lines appear to be.

(And I would use a really light engrave on that, and a very light score…those spirals are very tight.)

Okay, I’ll PM the file to you since you don’t want it posted.

2 Likes

The problem is also that I want a lot of depth even thinking the spirals might be a seperate sheet except that they would be as loose parts. Of the several variations pressing a thin shot of soft copper as was a part of the intaglio printing thread, and it was this I was thinking of as first trial.

Oh…well do a single deeper pass then, but I’d leave off the score. There’s really not much holding that together. :slightly_smiling_face:

The original idea was to engrave to an outset causing less damage to the fine detail and then the score would get the edge surface you were looking for without the striations that a lower (and faster) lpi would give.

But I did not think of various colors in the outline but wondering why they did not in the GFBI as someplace they were going to cut.

You know, you might want to consider acrylic instead of wood for something that delicate.

most of what I have designed has many variations including making the spirals as-holes or as the original was just half as decoration on a shelf etc even as a fancy living hinge though I see plywood does not lend itself to that.

As to your earlier question about making the piece as big as possible, that was my intention on that piece of wood that would not leave much scrap, the design was a small version to use on a 3-inch piece of wood. If you are not pushing limits you can’t find them, a failed experiment just means you discovered a point past them.

1 Like

I did the experiment with the score in as turned out to be 3/4 of the depth while the engrave was quite shallow but at the narrowest points less than half the previous engrave width that was a result I really like.
spirally1
As desired the middle cut took what was thin and made it nearly hairline which I really like. I would have preferred a deeper engrave, and that middle cut went a lot deeper so it is possible to bring that out but would be a lot of work with jewelry tools.
spirally2
What I said about hand sanitizer, add the caveat not to use it on MDF as it stains it with the residue and might even dissolve it. I put it in the sun to dry and will upload the final later. MDF doesn’t seem to bend as well as regular wood but I have hope yet that the design might as four of them make a round light holder or shade.

2 Likes

Thank you so much for the help @Jules.

@rbtdanforth That turned out great! If you have any other questions, please post a new topic.

1 Like