I am having some difficulty when cutting designs on my Glowforge. After tracing s design and uploading to my machine, I find the piece I have cut often is a little off from my design. I am A Chalk Couture designer and use Silhouette Cameo software to trace the design from one of our Transfers (photo of the Transfer uploaded to the Silhouette program). I then trace the design and save as an SVG. The machine cuts my file beautifully but when I am ready to ‘chalk’ on the woodcut, it’s just a little off. Is there another step I need to do in the Silhouette program before saving and cutting? I sure would appreciate help with this. Thanks!!
Welcome to the forum.
When you say it is a little off, do you mean the size is incorrect or the placement/alignment?
2 Likes
The machine is rated for ~1/4" alignment, if you’ve run the camera calibration procedure and are within that, then that will be as good as it gets.
1 Like
I don’t know specifically what you are making, but one thing that works for many things is to 1) pin the material down first and do not move it, or 2) to use a jig.
Like let’s say I am making a keychain and I want to engrave both sides.
I would make my design all lined up together.
Like my first print would be the black (cut) and red (engrave or score).
First, I would pin the material down. Place my design where I want it. Then do the first print.
Black: cut, Red: engrave, Blue: ignore.
Then I would remove the keychain, do whatever I need to do to it. Maybe I’m painting it or whatever. When all of that is done, put the item back into the glowforge, fitting it back into the spot it came out of. Then do the rest of the print.
So for my example, I’m printing on the other side - so I flip it over and have the blank side up. I do the second print.
Black: ignore Red: ignore, Blue: engrave.
If you prefer a jig, I don’t want to make this comment any more complicated, so I’ll just say to search the forum and there are lots of posts about making a jig. ![]()
Again, without knowing more specifics, it’s hard to know if this is the exact solution that will work for you, but I hope it’s helpful.
1 Like
Ok, thanks so much
1 Like
To be honest, I’m not quite sure what the problem is. What happens is this…when I place my Chalk Couture transfer on the piece I have cut out, the Transfer (stencil design) doesn’t quite line up correctly on the piece I’ve cut. The size seems to be correct, but lining the transfer seems to be off. Now, this only happens when I have tried to make it from the exact size of the transfer design. Whenever I offset the design on Silhouette, there doesn’t seem to be a problem because the cutout is actually a little larger now. I’m so new to all of this that I’m not really sure how to describe the problem; so, I understand if it’s not clear. Thanks for trying to help, though!
No, a jig isn’t what I need. I do appreciate your help though!
A jig may in fact be exactly what you need. Use a piece of material that can be located in the exact same spot every time (up against a corner of the crumb tray) and cut your shape from it. Then if you line it up in the same spot every time, the design will print in the same place.
Others have reported difficulty getting their tray back in the same location, but mine seats very firmly in the exact same spot every time. I can score a design, remove the tray and material, and print again, you can’t even tell it was printed twice.
1 Like
If you could supply a photo of your Chalk Couture transfer on the piece cut by your Glowforge so we could see what/where it is off, we could offer better assistance.
1 Like
Do you “set focus” on the material before you place your design?
1 Like
Ok, thanks so much!
I haven’t manually. I’m not sure how to do that.
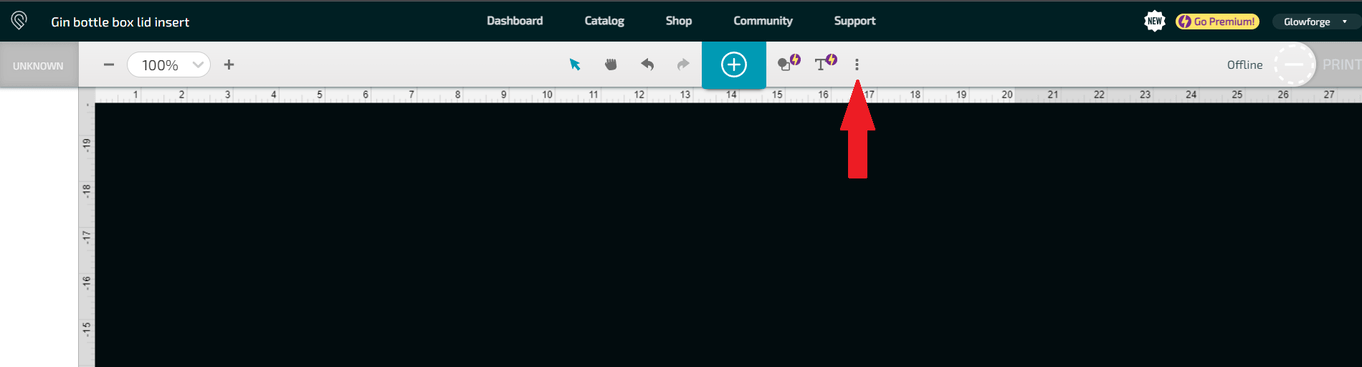
Click the 3 dots to find “set focus”.
Move the target around until it lands on your material and watch for a red light to shine down briefly onto the material. If it hits a void or misses completely, redo it until it lands on your workpiece where you need it. Then you can move your graphics into place and they should be exactly where you want them.
1 Like
Thank you so very much!!!
1 Like
I sounds like rather than an alignment issue, you may be having a SIZE issue.
I know that Illustrator will save an SVG at a different resolution than the glowforge uses and this will make things the wrong size. The fix in illustrator is to either uncheck RESPONSIVE in the advanced save dialog, or just save as PDF. Another option is to click the little ruler in the bottom left corner, then lets you enter X and Y coordinates, and well as Height and Width of the graphics. Compare what you have in Silhouette and make was you have in glowforge the same. It is IS an alignment issue, I have a great tutorial all about glowforge jigs on youtube. lithosandlasers Creating a jig for your glowforge Lets get Jiggy
Her write up clearly said “The size seems to be correct.”
Her write up also clearly stated the file CUT fine, but was not the same size as the physical item/template she traced, yet everyone here is telling her to set focus or use a jig. You yourself told her to use set focus, when setting focus is not her issue and will not change to outcome of her cut. If she had alignment issues, a jig would be the solution. WHERE on the material you set focus has zero affect on the location of the engrave/cut, only the cameras view of that. Go outside, point your cell phone camera at your car. Don’t move your body, but move your arms sideways. You will see different angles of the car, yet the car never moved, only the cameras view. In my tutorial I demonstrate setting focus in the top right corner, having the display show my cut is way way off, then cutting it and it is exactly where I placed the jig. But, none of this matters, because even though she said “The size SEEMS to be correct” She follows that up with “Lining it up to the transfer seems to be off” Size can totally appear correct, until you try to line stuff up. The nut can look like an exact fit at the store, until you get home and try to thread it on your bolt.
MATH does not lie. She can easily check the dimensions of her silhouette file and the size of the item in the glowforge interface. The trace could also be off slightly. She also says this is only an issue when exact size matters, but of course that is when you would notice it was not the exact size ![]()
Also, NEVER EVER more your graphics to align with something based on the camera view. The camera lies and wastes almost as much material and people using proofgrade settings on non-proofgrade materials.
Never said she should do that! I told her to use set focus before placing her artwork. That is correct information.
1 Like
Setting focus measures the distance from the laser to the material. It does not matter where you click, as long as it is on your material.
I have video proof of this.
But you said “Then you can move your graphics into place and they should be exactly where you want them.” While setting focus before placing your artwork will get you in the ballpark, it is nowhere near exact, so this is where a jig IS 100% exact.
But again, her issue is size and not alignment.
The size of her cut does not match the size of her blank. No amount of set focus or even jig is ever going to fix that.
Also, if I had a quarter for every time I helped someone and the told me “It is not X” and it 100% was X, I would have like $50 ![]()
1 Like
Well this conversation is over. Clearly you aren’t reading what I wrote.
1 Like