So I have paper images that I adhere to the medium mdf and I need to cut them out. My first problem is they don’t cut where they are lined up to cut. So I did what was recommended, made crosses lined it up, adjusted the setting of my cut lines and… 2 images will but correctly, next to the initial crosses, and the rest of all the image cuts are off. Anywhere between 1/16-1/32 which wouldn’t seem like a big deal but when the piece itself is only 1.65 inch it’s a big deal. I know this can be done because I know ppl who do this with the forge. But for the life of me I can’t get it to cut evenly throughout the sheet. And that blurry blown out image from the inside cameras??? How do you even line up the cut lines there? Please help  thank you in advance for any advice.
Cheryl
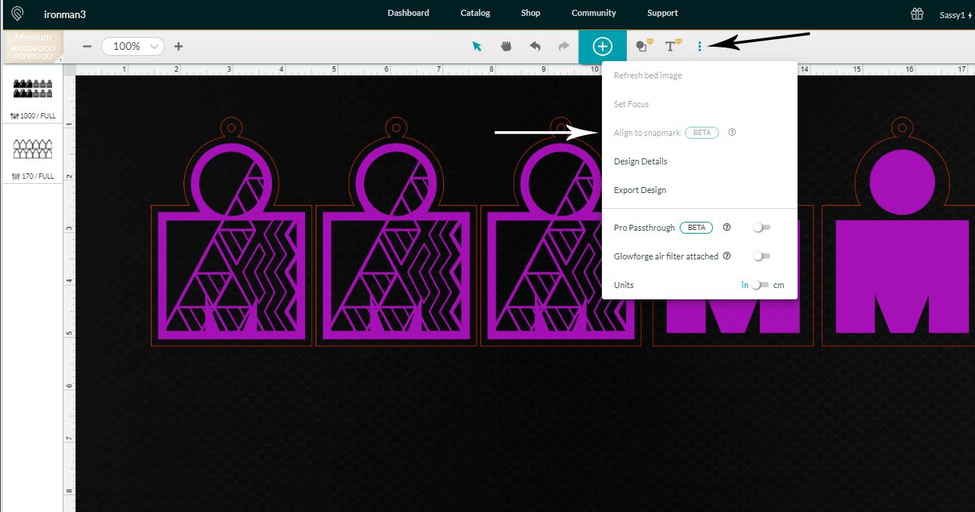
Generally, that kind of work, (known as a Print and Cut file), is done most accurately with the Snapmarks function. (Which I’m not sure has been widely released as part of the Premium Package yet, although I think it is slated to be eventually.)
If you have access to the Beta, it will be under the three dots icon in the interface.
If you don’t have that yet, click on each design element with the Set Focus tool and align the cut marks around each one individually. If you see the other designs shift slightly, you have to ignore it. They are most accurate immediately after clicking with Set Focus in that one spot. (What that tool does is temporarily adjust the view in that spot to remove the fisheye effect caused by the camera.)
Print and cut is not something that can be done easily with the Glowforge. Do you have access to the digital file that is printed? You say you know people that successfully do this kind of work. Is it possible that you could contact them directly to get tips about their workflow?
Most of the people tell me it’s trial and error. Some just don’t want to disclose how they do it because they feel it conflicts with them making money 
So I unfortunately don’t have that beta test yet 
And when I used set focus it still was not lining up properly. Can you do that more than once if there’s 10 on the page, can you set focus 10x before cutting? And are you saying after I set focus if it looks like my cut lines moved away from the image edges I should leave that and trust that the machine knows now? Thank you so much for taking the time to help me! I really appreciate it
Exactly. Ten on a page is ten uses of the Set Focus tool, followed immediately by shifting those cutlines into place.
You really can’t get completely accurate without the Snapmarks, but that should get you a lot closer. It also helps to make sure you have the material completely squared on the bed. The designs will come in squared, you need to make sure the material is as well. Any tilt at all is going to make it extremely difficult to line them up.
Another non-Snapmarks approach:
(1) Have consistent relative placement of the images on the substrate – that is: the relationship of each of your images when adhered to the MDF needs to be precisely consistent. This could be accomplished, for instance, by printing all of the images for a single job on one piece of paper (this is called “ganging”) and, adhering the entire, uncut piece of stock to the MDF. Typically, you would align the images and make them exactly evenly spaced.
(2) Produce a cut file that matches your images exactly.
(3) Set up a jig so that you can place your MDF-with-images in precisely where the cut file will cut. There are other posts with details on how to work with jigs. For example:
Getting to less than 1/32" error is likely to take a lot of attention to detail.
Not sure how no one has mentioned the camera recalibrator yet, but if you haven’t run that, then I’d start there. All of the other suggestions are still great, too.
The easiest way to do this is to have the machine print a light score where it will cut, then apply the print to the material in the correct place - obviously it will need to be pinned down so it doesn’t move.
You could also use registration marks outside the cut area.
The Glowforge camera is not designed for precise placement. It is spec’d at 1/4", although you can get much better, it’s simply not designed for this kind of thing.
That’s not how folks work here. You’ve come to the right place.
Thank you! I really appreciate everyone’s help
This topic was automatically closed 32 days after the last reply. New replies are no longer allowed.