Cutting Proofgrade thick acrylic and the cut is not going all the way thru.
Worked good a week or so ago but now I have to make two passes to cut all the way thru.
Cleaned lenses and checked crumb tray is ok.
This was today 2/20/18 at about 8:30 - 9 AM EST
You’ll want to provide the date/time/timezone of the job so they can review logs.
Now it’s not cutting completely through even with 2 passes.
2/20/18 10:30 am
What timezone are you in?
Same as my first post EST
1 Like
Ah, yes… Didn’t notice you updated the OP.
Thanks for letting providing the dates and times. I’m sorry that your print didn’t come out beautifully!
To cut successfully, there are three important things to check. First, your material must lie flat. This requires a clean, properly installed crumb tray and flat materials. Second, there must be no obstructions, dirt, or damage preventing the laser light from reaching your material. Third, your design must be set up properly - for example, with lines that are fully on the material and that are set to cut. It’s hard to know which issue might be affecting your print, so please thoroughly inspect your unit and design according to the suggestions in our troubleshooter.
I examined the logs from these prints and it looks like there may be a buildup of dust contributing to the trouble you’re having. Could you please start by cleaning the Things That Need Wiping?
Once you’ve cleaned, please try your print again. If it doesn’t print well, please let us know and send photos of the front and back of the print.
Thank you in advance!
1 Like
When I first had the problem this morning I went thru the complete cleaning as indicated in the manual and retried the print with no improvement.
The front and rear of the PG Thick Acrylic are shown in the attached.
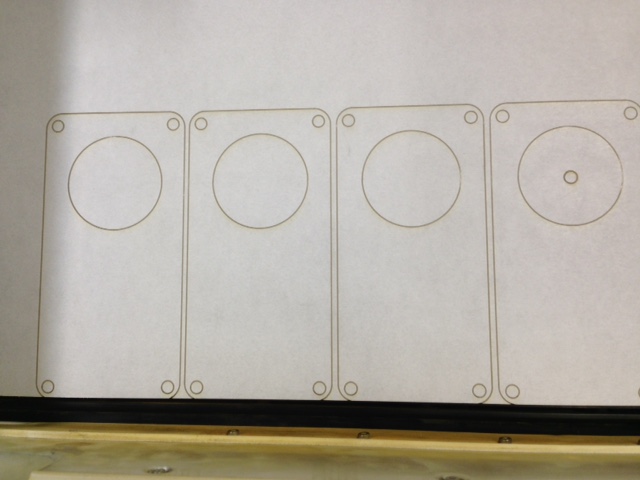
Cut side
Uncut side
I thought maybe it was my file so I tried the T-Square that I had printed successfully a couple of weeks ago and got this result.
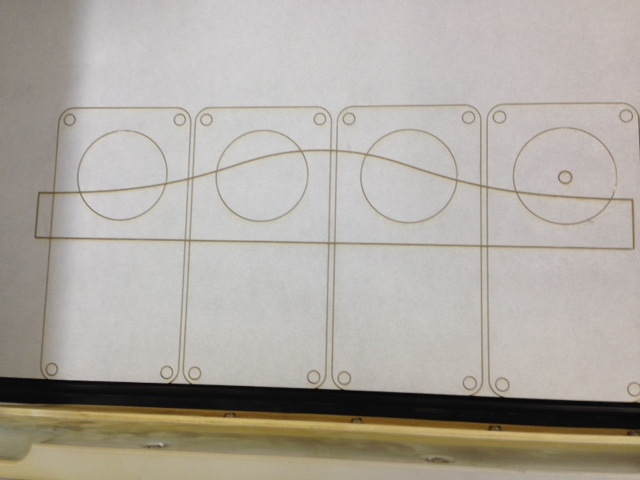
The back side was still untouched.
Proof grade almost never cuts well for me. It mostly relates to the material warping, and the settings seem to be tuned with little margin of error in mind. I almost always turn the GF setting up by something like 10% or so.
Between increasing power a little, and making the material lay flat, I get pretty good results.
It seems a number of people are having issues cutting through PG material.
Mothership problems?
Thanks for taking the time to do that, @lcronkite.
Could you please try one more step for me?
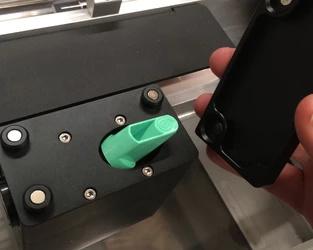
- Turn off your Glowforge
- Open the lid and gently move the printer head to the center
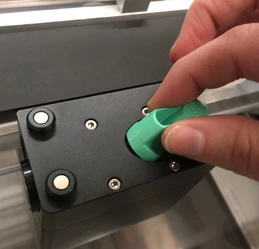
- Firmly grasp the top edge of the printer head
- The top of the printer head is held on by strong magnets. Grasping and pulling up carefully, remove it and set it aside
- Gently remove the mirror holder
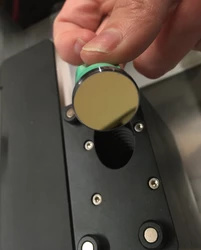
- Using a Zeiss wipe, gently wipe the surface of the mirror
- Replace the mirror holder by setting it back into the notch. It will rest softly in place - there is no need to push it in and you don’t need to place it at a particular angle
- Replace the top of the printer head
After following these steps, could you please try printing again, and let me know the results? Also, could you let me know if you’re also having trouble with cutting through on other Proofgrade materials? Thank you!
3 Likes
Ah yes. The hidden mirror trick.
Mirror had some residue on it before I cleaned it.
Cutting properly now.
Had no problem cutting Proofgrade Medium Maple plywood prior to cleaning this mirror.
4 Likes
Hidden is right…I had no idea this mirror was even there. ![]() Good to know if I have the same issues in the future.
Good to know if I have the same issues in the future.
It looks like I spoke too soon.
When I ran the test cut after cleaning the hidden mirror I only cut a 1/4" circle and it worked fine.
Later when I ran the whole job the same problem occurred. Incomplete through cut.
I can get around this since I know in advance to make two passes but there seems to be a glitch somewhere since I have done previous cuts on this material with only one pass.
Another hidden mirror?
2 Likes
You can be forgiven for overlooking it because it was advertised as:
Sealed Optics — Enclosed optical path with cleanable and replaceable windows protects the laser optics to avoid replacement or realignment
From that one would think it was just the two exposed windows that would need cleaning. But they made the mistake of blowing smokey air through the head which gets the mirror and lens dirty as well. If you don’t clean them they will get burnt and need replacing.
Every other laser uses clean air for the air assist which keeps the front of the lens clean and the smoke is drawn down through the bed to keep the rest of the mirrors clean. I imagine they actually need far less cleaning than the GF and they too shouldn’t need realigning after cleaning and are more easily accessible.
1 Like
More easily accessible? The lid on the head lifts off. No tools. Nothing.
I see that manufacturers like Trotec "recommends inspecting the lens and the mirror on the machining head once a day and checking the side mirrors once a month. "
1 Like
You imagine incorrectly based on my experience.
When you build your new design you’ll have plenty of opportunity to figure out a way to simplify the cleaning and alignment of mirrors. And then have a path beaten to your front door because everyone will want the magic - it’s a major PITA with most lasers. ![]()
2 Likes
That’s great to hear!
I’m going to close this thread - if the problem reoccurs, go ahead and post a new topic. Thanks again for letting us know about this!