Did you contact her or did @bonny reach out to you? Mine’s still doing the same thing (not finding the marks after I watch it go right over and laze each of them), and if it’s a calibration issue she can fix I’d love to get that hookup.
My issue is completely different than yours. My laser head never moved. It’s as if the routine that recognizes the Snapmarks on the preview image times out or something. Bonny contacted me a while back after I had first posted here. She said then that my particular issue was unusual and that they weren’t sure what was causing it.
I’ll just sit tight until they get it sorted out.
3 Likes
Love this example @Jules. Little froggy on the house is pretty sweet too.
1 Like
@Jules, what weight of paper do you use for your triskele-making? I’m assuming you’re scoring the fold-lines, do you score them from the front, or flip the design and score from the back?
I get my neurons all tangled when I try to think about how to use front-and-back snapmarks on stuff and get them to come out right. 
Those are a heavy gloss photo paper from Office Depot. (Just their in-house brand.) And I score the front. (It actually burns away the ink at the score, it doesn’t darken it, so having a white band around the artwork works best.)
2 Likes
@bonny
Similar to post #622…
I recently got Snapmarks and just tried a couple of things. I printed the pencil jig with no problem. However, when trying to do the engrave on the pencils, the print was way off - like inches. Also, the printer head slammed into the railing in the upper left position and made a terrible sound. I have had no problem printing other things after this happened. No problem with centering, focusing and printing. I tried using Snapmark again, and once again the head tried to go beyond its home position and the “snapping” of the artwork did not happen after the scan occurred. I did not get an error message regarding Snapmarks. The head “homes” properly when not trying to use Snapmarks. Any suggestions?
After selecting the Snapmark magnet and the unit gives you the success indication, your preview image should be very close to the intended engrave. It will be offset exactly the amount that your particular unit camera image is in error. Usually this will be very close directly under the camera and up to 1/4" or so toward the edges. If it is off much more than that then the process didn’t work. Don’t bother to hit print.
You could run a light score over just the snapmarks and ignore the rest of the job to check positioning. I do that to be safe and it only takes a few seconds.
Thanks. The problem seems to be that after the snapmarks are scanned, the head does not return to the left home position. When I hit print after the snapmarks scan, the head crashes into the right railing (because it tries to travel the full distance of the bed, I think). Anyway, everything else works. I am able to align work closely as I have tested the offset of my machine. This just seems to be an individual bug that I am having. I sure hate the sound of the head trying to go beyond its capacity!
Almost all of the earliest machine would slam and bounce the sides occassionally during calibration. Support kept telling us that it wouldn’t damage the unit. Still sounded horrible.
Obviously your issue is different but the result is the same.
That horrible sound you hear when the head tries to move past a limit is almost certainly made when a stepper motor is forced to skip steps. I’ve heard that baleful howl many times in my engineering career.
In short, the motor is attempting to rotate its shaft by energizing its electromagnetic stator coils in a wave-like pattern, which should cause the teeth on the shaft to be attracted to the energized coils in turn. Imagine the coils “handing off” the rotor to each other with a powerful twisting motion. The sing-song vibrating sounds emanating from a smooth-running motor are the sound the rotor makes as it jumps from step to step.
When the motor is stalled, the energized coils are unable to move the rotor to the next step. Each time the coils are cycled, they exert a torque on the rotor/shaft on energizing, which is then released as the coils de-energize. This cycling torque and dropping of the step produces that loud vibrating howl as the mechanism is tensed and released with each skipped step.
Experienced only rarely and occasionally, this should not cause permanent damage to the motor or mechanism. However, high-energy vibrations like this are not good for the machine in the long run and should be minimized and avoided if possible. If your GF is experiencing these head “crashes,” it’s a good idea to not intentionally reproduce the issue unless you’re troubleshooting.
3 Likes
@bonny, Just to report. I downloaded the snapmark pencil template file just now in my Firefox browser (version 62.0.3 10-23-18 @ 4:30EST) and opened it up in Inkscape (version 0.92) and the snapmarks were sized at .343" x .417".
@bonny, I think that there is something wrong with the snapmarks on my machine. I’ve tried the pencil jig several times before, but I had put it on hardboard. I think that material is too dark for the snapmark recognition. This time around I changed as few things as possible and even used Proofgrade Maple and it still didn’t work.
- I downloaded the template as an svg file to my computer
- Opened the template in Inkscape and posted that the snapmarks came in at .343" x .417" (I don’t know how to get inkscape to go to four decimal places)
- Fixed the snapmarks to .3322" x .4047" as per @Jules guide, Inkscape rounded them to .332" x .405"
- Moved Snapmarks in closer to each other to take up less room on my Proofgrade
- Loaded file into GFUI and printed the template
- Took everything out, removed the masking, put the jig back in with pencils to engrave and hit the button to do the snapmarks
- Got a message that it was scanning for snapmarks
- The head of the GF moved and took close up pictures of BOTH of the snapmarks (it had never done this before)
- Head went back to upper left position and then a box popped up saying “No Matching Snapmarks”
(Ran these steps twice, and still got the below image)
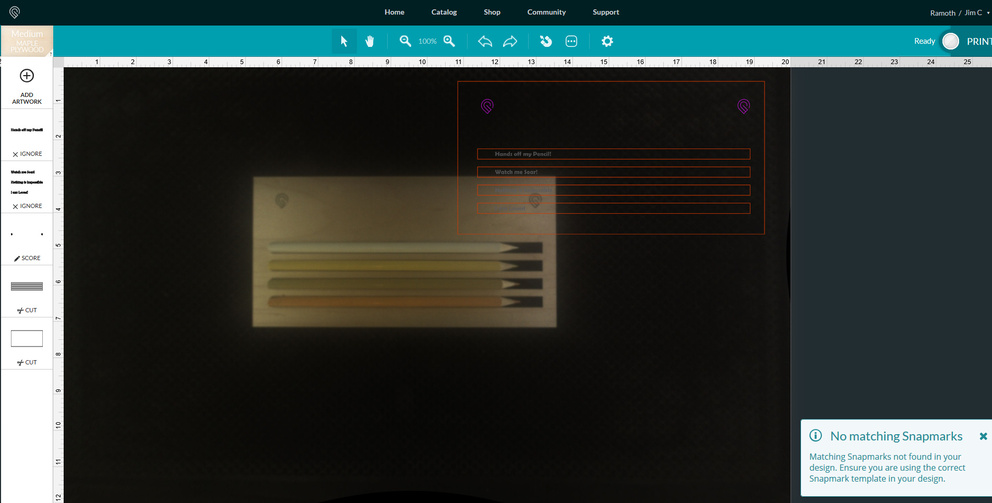
1 Like
Jim, if you’ve got a calipers handy, physically measure the size of each snapmark on the jig, jot down the numbers, and compare that to the correct sizes.
Then take one more measurement…measure the straight line distance from point to point on the Snapmarks and compare that to the length of a line drawn from point to point in the Inkscape program.
(It’s supposed to take pictures of both of the Snapmarks, so that part sounds good.) 
yep, got my calipers right here, but only 3 decimal places of accuracy. .332" wide for both and .405" high for both.
Distance between the two snapmarks are also approximately the same (about 6 11/16" as best as I can tell from a measuring tape, which is pretty close to the 6.7 I got using the ruler tool in inkscape)
Personally, I would take the Snapmark template directly from the download site. Upload it to the GF and see if it works. Don’t go through Inkscape or Illustrator, etc. Eliminate everything you can when debugging. If it works then it’s not your machine but something in the file conversion.
3 Likes
Not a bad idea…see if that one snaps without making any modifications to the file first.
Trying now. Just adding a Rectangle cut line (Using Add Artwork to add the rectangle). The SVG template is otherwise untouched by any vector program.
WELL…progress, I think.
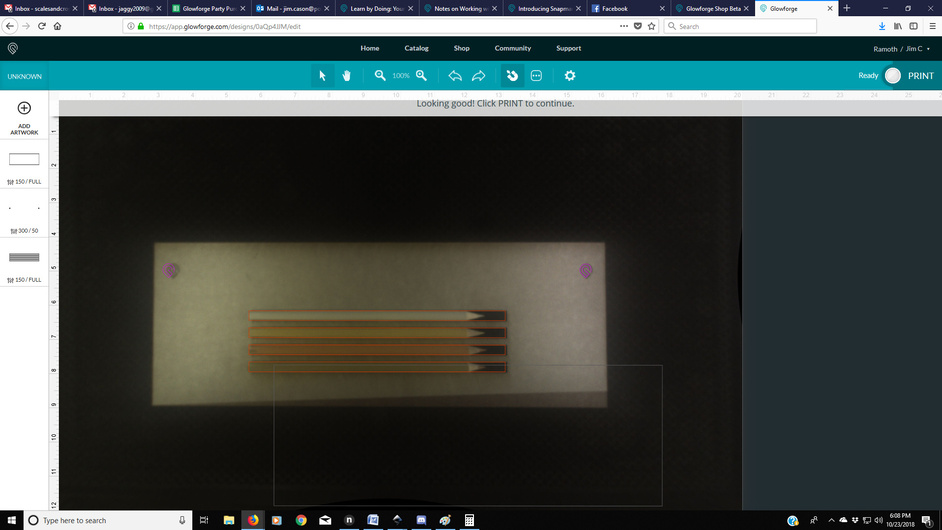
It found the snapmarks, but that rectangle is COMPLETELY off the reservation. It was all together before, but that is quite far off now after the snapmarks have been found. BUT the snapmarks were found. So this is probably an artifact of my Inkscape.
I don’t think I was careful to save as plan svg, and saved as Inkscape svg (hasn’t bitten me before, but maybe it is now).
Haven’t bothered to use plain SVG for anything in the last year.
About a month ago I found out that if you moved the Snapmarks relative to each other within the UI before printing that the process would fail when you selected the magnet. Not sure if it still does that. But it seemed as if the relative Snapmark positions were determined when the file was uploaded. Anytime I moved the Snapmarks it needed to be done in a third party program before uploading, not in the UI.
I wonder if something similar is happening with this latest test. Take all the above as anecdotal since I haven’t performed exhaustive testing.
2 Likes