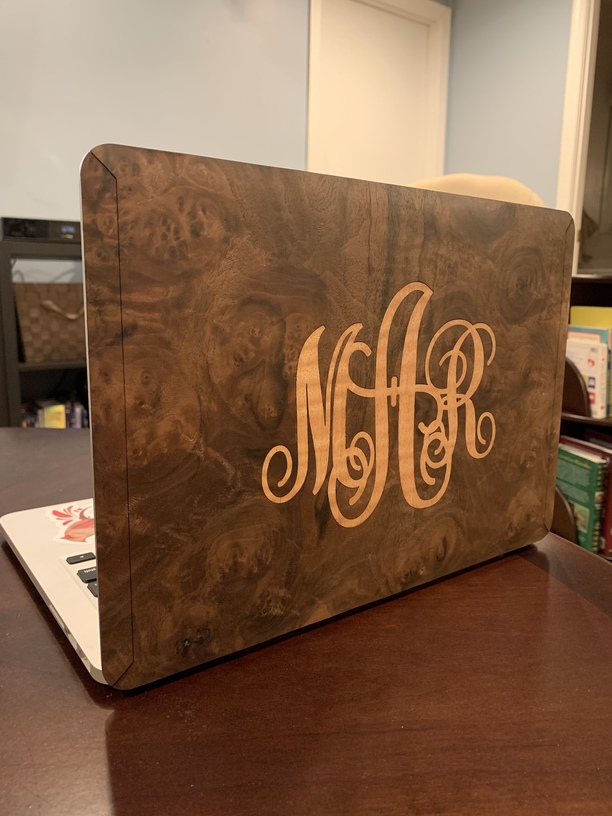
After a fair amount of frustration and some long breaks for my sanity I was finally able to complete a veneer laptop skin similar to the many others I have seen on this forum and elsewhere. This one is for my wife’s laptop and sports her monogram.
That is super pretty!!
2 Likes
What type of veneer is this? Also if you don’t mind sharing where you got it from I would appreciate it.
2 Likes
It’s walnut burl purchased from here: B&B Rare Woods
It’s raw wood veneer so you have to use a separately purchased double sided adhesive tape (3M makes the best) to adhere to laptop. You can buy veneers with the adhesive already applied, but I was unable to find any in the more interesting figured woods.
11 Likes
Magnificent! That looks wonderful! I really like how you managed the ‘bend-in’ toward the edges, with the two extra strips. 
5 Likes
Really lovely job on that!
2 Likes
Looks fantastic on the laptop.
2 Likes
Looks fabulous!
2 Likes
Love walnut burl! Excellent job on both the main piece and the monogram. Just beautiful!
2 Likes
So the frustration… Will you share what you learned?
3 Likes
Sure. This was my first attempt at messing around with kerf offsets as I wanted this to look as seamless as possible. I would say most of my frustration dealt with trying to lock that down. Design was done in Inkscape and I used the stroke width method for creating the offsets. This was worked fairly well, but trying to get all the variables (material type and thickness, laser speed and power, and and kerf offset numbers) to almost mystically align took a lot of trial and error.
Not sure if these numbers will help anyone due to their specificity to these particular materials, but, for what’s its worth, I ended up drawing the monogram, setting the stroke width to 0.15 mm and then using the “stroke to path” and “break apart” commands to the end up with two separate objects, one slightly larger that the other. The larger was used to cut out the monogram itself and the smaller to cut the “hole” for the monogram out of the walnut burl. I think, though not 100% sure, that I was getting better accuracy from the laser at a slower speed so I ended up cutting everything at a fairly low speed and power (150 and 35).
With above settings I was getting most of the monogram to fit very snugly into the walnut burl, however, there were little areas where I was still getting larger gaps than I liked. You can see a few if you zoom in on the top curve of the “A” and the “R”. This drove me absolutely insane (I have somewhat intractable perfectionist tendencies). Still don’t know exactly why these would pop up, but my two working theories are:
- Idiosyncrasies with Inkscape itself. It’s quite possible the stroke to path method for adjusting kerf offset isn’t dead on accurate.
- I simply couldn’t get the veneer to lay flat enough in the laser bed. This is a raw wood veneer with with no paper or adhesive backing (just a thin slice of wood) with a crazy grain pattern. It was far from flat and had all sorts conflicting internal pressures. I used about 35 magnets to try to hold down all the raised spots. Also, as the laser cut, some of the internal pressures in the wood released causing new areas to raise or curl up off the bed. I suspect all this caused small inaccuracies in the cut.
Finally, (sorry about the long post) There are a lot small, delicate, fiddly areas and a couple very small loose peices in this monogram design. Trying to keep them from breaking or getting lost presented a small challenge which I ultimately solved by using the adhesive transfer paper I usually use to mask materials with before lasering. After cutting the the walnut burl and removing all the magnets I stuck a large piece of masking material over the whole piece and removed it from the laser bed in toto. I then picked away the waste wood that was occupying what was supposed to be negative space. This not only provided some support and strength the more fragile areas of the design, but kept everything spatially arranged which made inserting the monogram much easier.
Sorry, again, for the long winded reply, but I hope some of my aggravation ends up being a net benefit for someone else.
4 Likes
Yup. Many of us were struggling with it (still do to some extent). When I thought, “how would I try to program that,” I kept coming back with you really can’t for all cases. Then @evansd2 had a stroke of obviousness.
It can still take this:
Beautiful job.
3 Likes
Oh Awesome. Thanks for pointing me to that post by @evansd2. There is so much good information on this forum it can sometimes be a little daunting to comb through it all to find just the bit you needed.
Isn’t it so often the case that the most brilliant of insights seem obvious in retrospect? ![]()
3 Likes
Yeah it was so obvious that it took me like 2 years of glowforging to think of it 
4 Likes
Fantastic job!
2 Likes
@scott_trahey, thanks for asking.
@bdandreson, don’t apologize for a great explanation of your technique. Most of us are eager to learn new techniques from each other and very much appreciate when people like you generously share their hard earned experience!
Congratulations on a beautiful work of art! I am sure your wife enjoys this beautiful custom work of art and can proudly say her husband made it for her when someone asks her where did she get the stunning laptop cover.
1 Like
But you covered up the apple logo… . But looks good! Good job.