This is probably the first time I LITERALLY put a handle on it! 
7 Likes
That technique would also work great!
Another very simple solution would be to cut a series of squarish wedge shapes around the edge of the lid (so the resulting shape looks like a gear) then turn the waste pieces through 90 degrees and fit them through slots cut around the perimeter of the lid. The protruding material would then act like the lip and would engage against the side of the bowl
3 Likes
I have a red milk shake maker - but I’ve never noticed it splashing. Maybe it’s because I use booze instead of milk for my shakes??
7 Likes
There’s also a mini-sized Kitchenaide now. Don’t see the point of it really, but they must have had demand for it.
Really? Uh-oh, I’m gonna have to buy one now…I have one of every kitchen tool made, and sometimes two.
![]()
5 Likes
I’ve seen them at Target.
1 Like
Jeez Louise! They’re cute but they aren’t any cheaper, are they? 
1 Like
And how dare you waste booze in splashing…lol
1 Like
Put a bird on it and then you’re golden.
2 Likes
My mom has Great Grandma’s shake maker in the closet. It doesn’t come out much. I just offered to store that on my counter, and so this is a very timely design. Now I just need my GlowForge and I’m set!
Booze… bah. If it works for you.
My husband has burned the motor out of a couple blenders making shakes for our family - and blenders don’t do nearly as good a shake as the correct tool.
2 Likes
Whoa! 
nice job on both of those! can’t wait to see what crazy stuff I “need” to make once I have one.
I’m amazed at how well this cement worked! In my experience I’ve clamped the two pieces together and filled a hypodermic needle/syringe with the cement and squirted it around the perimeter of the two pieces to be joined. It would “wick” underneath but not to a consistent depth (which it sounds like the engraved alignment feature helped to prevent the cement from traveling deeper?). I would also get a bunch of air bubbles as well. How did you do this so well @madebynick? Did you clamp the two pieces together? Which cement did you use (Weld-On #3)? Any other tips?!
Nice work!
Sorry, to be clear I do not experience any splashing and therefore don’t see the need, in my particular case, for a splash guard. I attribute this to the universe rewarding me for substituting booze for milk.
4 Likes
Thanks Christopher!
On this occasion I chose to clamp the two halves together tightly all the way around the perimeter. In conjunction with the engraved score, this prevented the cement from wicking underneath the two layers. Granted, as the cement has effectively created a filleted bond between the two layers, I could probably break the two layers apart by twisting. However, as this part isn’t structural in any way, this isn’t a problem!
Producing optically clear joint between layers is REALLY hard. The best results I’ve had are from shimming the two layers apart by a small amount, flowing lots of cement in between the two layers, allowing the cement to sit for a while and soften both surfaces, and then removing the shims. Be aware that if you apply pressure, you’ll see a lot of squeeze out!
11 Likes
This makes more sense and completely understandable given it’s intended use. Great tip!
As someone with far too little kitchen space, this is so much more appealing than the full-size machine!
1 Like
FWIW there are optical cements with the right index of refraction for pretty much anything. But pricey.
Hmmmm. must get Glowforge and acrylic
17 Likes
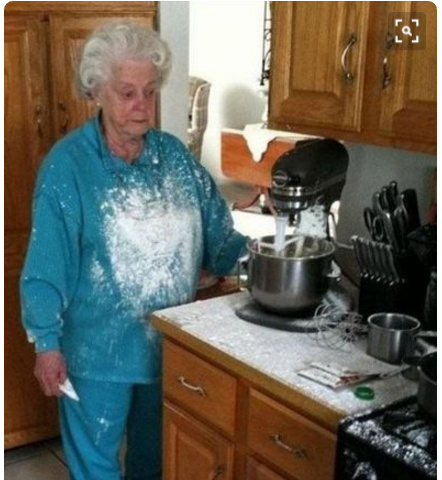
That looks like one of the “Have you ever had this happen to you?” moments in an infomercial!
3 Likes
It needs to be in b/w to be a “before” pic in a direct response ad. 
1 Like