Happy Sunday morning!
I am very frustrated, as this happens a fair bit randomly and I can’t figure out why!
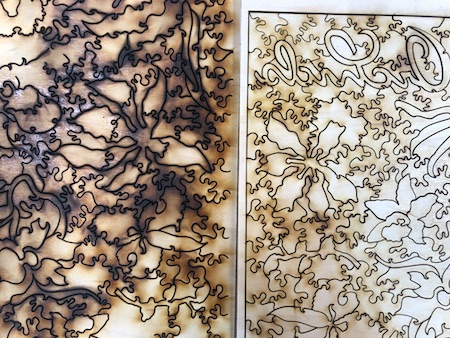
Please look at the image I uploaded for reference.
The one on the right was cut first, the one on the left was cut immediately after.
This was job 1 and 2 of the day, cut in the morning, in my garage which is at 65 or so degrees.
I hit set focus before printing both jobs.
Both jobs were cut on the same material, same settings which I use all the time and work well, other than when this happens. (I can confidently say this is NOT a settings issue.)
I also noticed when I pulled the lens housing off to check the lens, it was VERY hot to the touch…
(Proofgrade plywood tends to be infinitely more uniform…the results you are seeing there might be due to inconsistencies in the material. Possibly more air gaps in the fill in the sheet on the left…that’s what it looks like when the fill is not tightly packed, or might have channels and vugs in it.)
If you want to avoid those areas, hold a strong flashlight tight against the back of the wood and move it slowly around…you can see dense spots and air gaps. Just mark those areas on the front with a pencil and place your design to miss them.
And that design requires a lot of movement and cuts burning…things are going to heat up a lot. (Likely not an issue with the machine, if that was a cause for concern. I’ve seen MUCH worse char on cheap plywoods picked up from local hardware stores…the stuff is just junk.)
Have you cleaned your air assist fan lately? I’m wondering if it’s not providing enough airflow when you get the extra charring. It’s worth a look, at least, until staff shows up to look at your logs!
It looks and sounds like a focus issue, and the head getting hot could be a symptom - the focus control system might be jammed or faulty causing it to continuously cycle or be stalled, generating heat.
An in-focus cut should be crisp like the pic on the right. Out of focus, the diffused beam causes a wider mark, burning more of the surface rather than cutting cleanly through.
Thanks! That was my thought as well. I have also noticed when that happens the lens sits really now in the cylinder (as in far out towards the opening, not set back)
Thanks Jules but defnitely not a material issue. I can rule that out 100%.
Those 2 were cut from the same sheet. I can see “pockets” here and there not cutting through being material quality, but the sheets consistency cut fine, except when the attached happens, and then it’s The Whole sheet and not a small isolated area.
I’m so sorry to hear that you’ve hit this snag! Based on the images you’ve provided, the trouble may be related to the Air Assist Fan as @geek2nurse pointed to.
When you have a moment, could you work through the instructions here and let us know if this helps to improve the behavior you are seeing?
I did that today, as well as a main fan maintenance cleaning. It did it again right after that and actually stopped the printing and gave the orange button, but I shut the machine off and back on and the next print after that was fine…
I sincerely apologize for the lack of response from our team. I have assigned your ticket to myself and will be closely monitoring it in order to give you prompt responses.
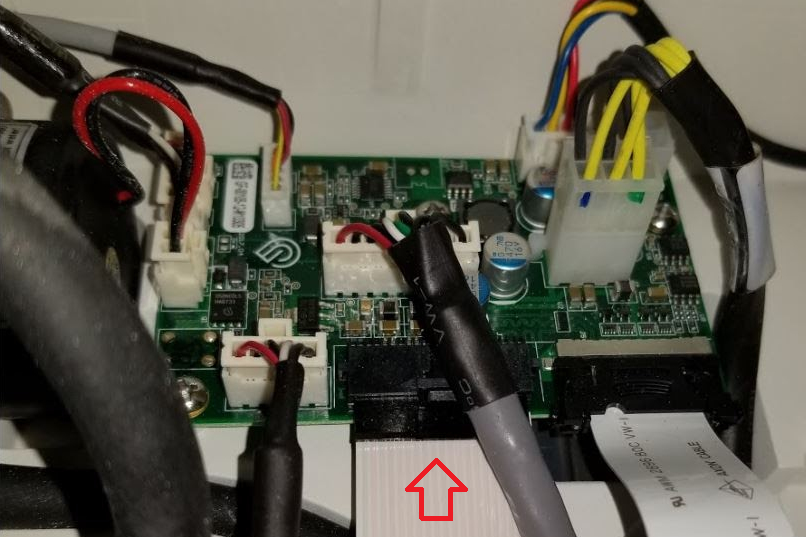
I extracted the logs from your Glowforge to investigate, and it looks like the orange button is appearing because the Glowforge is having trouble communicating with the printer head. There are two key connections I’d like you to check for me.
Could you please do the following?
Turn off your Glowforge.
Holding only the finished black surfaces, grasp the printer head as shown. Pull gently up and back to disengage the magnets and remove the head.
There is a small tab in the center of the wire ribbon. Push down fully on the tab to release it, and gently pull the wire ribbon plug from the printer head.
Pick up the printer head and wire ribbon. Make sure the tab on the wire ribbon is facing up. Slide the ribbon back into the head until it clicks.
As shown, lower the printer head over the metal plate so that it rests next to the two round posts. Then push it gently away from you – you’ll feel a “click” as magnets pull the printer head until it sits snugly atop the metal plate.
Take a photo of the circuit board. If the cable I’ve indicated above with the red arrow appears to be loose, please reconnect it and try printing again. This cable should ‘click’ back into place.
Turn your Glowforge back on. Please let us know if the orange button still appears.
Post the photos you took in step 4 and step 9.
Once we review the photos, we’ll follow up with next steps. Thank you!
It’s been a little while since I’ve seen any replies on this thread so I’m going to close it. If you still need help with this please either start a new thread or email support@glowforge.com.