Laser-Cut Dovetails (YouTube video)

@PlGHEADED @fan-of-glowforge

Really enjoying the back and forth between you two. I think you could get away with just two passes with the right jig.

Yet another thing that the Glowforge autofocus during cut may make possible.

EDIT: come to think of it you could create a really neat joint with this method too. Forgive my shaky paint drawing I’m not at my home computer.

Cut the yellow using your method.

1 Like

So I guess the natural question that follows is: It’s been advertised that the Forge can engrave on a curved surface, like the back of a phone. Can it cut on a curved (or flat inclined) surface? If so, then dovetails like this should be possible right out of the box. @Dan?

Yes, you’ve got a good point! The first of the three steps in the procedure I outlined can be skipped if the level of incline is not too steep, and the thickness of the sheet is not too large. However, if the original U-shaped cut is needed to guide the later inclined cuts, then it would still be needed.

1 Like

Brand new to this so forgive me if this is a dumb question, but why wouldn’t you start with a through cut, then engrave the slope at only the edges of the cut? Seems like it would be much faster and with less of the debris.

Edit: add crude diagram

1 Like

I’m working under the assumption that a flat 3D engrave may be difficult to do, and nearly impossible with materials like wood.

(Oops, I was thinking you were responding to my comments, not the original video!)

I really like this idea and the solution probably is a jig to hold each piece in a repeatable pattern.

1 Like

Bear in mind, the total focus range is .5 inches and the total Z height is 1.5".
Depending upon the angle you want to get you need to do the trig and figure out what is the widest set of dovetails you can cut.

6 Likes

Yes, cutting warped wood is definitely one of the key use cases.

6 Likes

A big reason I didn’t cut first is just because I didn’t anticipate the debris buildup. In other words, I only noticed the buildup of debris after I noticed that the cut didn’t come out right. If I try this again (which I’m leaning against) I’ll see if I can come up with a good way to cut the bulk of the material out beforehand.

Oddly enough, cutting before introduces a couple problems and may prove to actually take longer (depending on the orientation of the engrave).
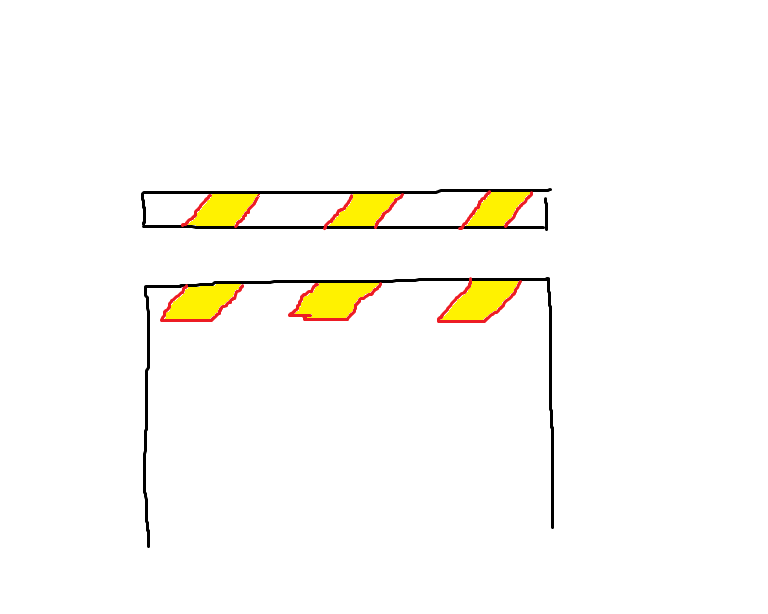
The problem I can anticipate is that cutting the piece out first will mean that the little piece has to be removed before continuing with the engrave. Of course, since the stock is sitting on top of the honeycomb tray, that little piece is going to fall out on its own 9 times out of 10. But the fact that the little piece isn’t guaranteed to fall out means that I’d have to check the part between that initial cut and the first engrave. For something like this where there’s only two, checking would not be a problem, but for a complicated set of parts with potentially dozens of slots, checking them all could become a bit of a chore. Then, if one of the pieces needs to be removed manually, that introduces a new problem: you’d have to make sure not to accidentally move the remaining stock while you go in with a little pair of tweezers or whatever (toothpick with a dab of superglue on the end?) to pick the little piece out. You’d have to be careful because moving the stock would mess up your alignment for subsequent cuts and engraves.

The way it could (technically) slow down the process is because the speed that the machine moves doesn’t necessarily change if the size/density of the engrave changes. The laser head basically swipes back and forth over the entire area that is to be engraved and then the laser blinks on and off very precisely in order to engrave whatever design you have. The speed of engraving a solid rectangle (where the laser stays on almost all the time) and engraving an outline a rectangle of the same size (where the laser would only blink for tiny fractions of a second during each swipe) will happen at nearly (if not exactly) the same speed.

Sorry, I don’t think I’m explaining this well… I’ll try again…
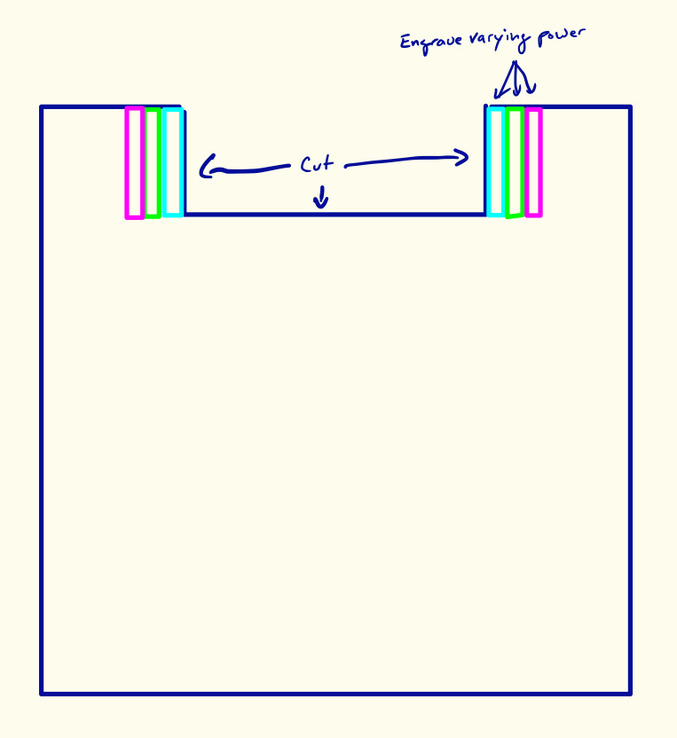
Imagine I wanted to engrave a giant capital letter “H”. At the beginning of the engrave it’ll only be doing the two points at the top of the two vertical lines. The laser head will start to the left of the first vertical line and sweep to the right side of the other vertical line. It’ll do the full sweep, even though the laser will only need to blink two times (one time for each of the two vertical lines). This will continue, with the head sweeping back and forth and the laser blinking two times until it reached the horizontal bar in the center of the “H”. At that point, the length will remain constant (from the left side to the right side) and the only thing that will change is how long the laser stays energized. Since the length of the sweep remains constant, the amount of time the machine takes to perform that sweep also remains constant.

So, only engraving those little patches probably wouldn’t shorten the time it takes to do the engrave. And the additional time taken to perform the cut would make the total job time slightly longer.

Not to negate everything I just said, but all this explanation only applies when the dovetail is oriented the way it was in my video (parallel to the Y axis, AKA “vertical”). If the part was rotated 90º the dovetail would then be parallel to the X axis, which would mean cutting the middle section out of the slot first would also translate to the machine needing to make fewer sweeps, which very well may reduce the overall job time.

Sorry for being verbose, I’m just trying to clearly answer your question.

1 Like

Although I have no experience with actual fabrication of dovetail joints, I would imagine that they work effectively with very minimal slope of the slots, maybe a couple of degrees?

If we assume 2 degrees, then it appears a 14" length of joint can be handled.

1 Like

Thanks you so much for this post. It makes such a difference to me when I see both the design process and laser process. It reminds me that I will have lots of work to do if I want to use my own designs, regardless of how the Glowforge Magic works. In the little I am using my Silhouette, I have to process the design file very carefully to ensure that cuts inside and outside are appropriate for the stencil outlines. That means selecting lots of little bits and pieces to differentiate. But you also demonstrate that the basic form of dovetails can be done and then cleaned up with a file and chisel, much like hand cut dovetails are always saw and chisel.

2 Likes

A very useful step in cutting the dovetail slots on an inclined sheet would be to use the Forge’s camera to guide future cuts to follow the edges of previous cuts. The camera will see both the top surface of the inclined sheet, as well as the internal edges of the previous cuts, due to the incline. I imagine this will make the automatic recognition of where to cut very difficult. Is there any manual mode that can be used, where cut locations can be “drawn,” or otherwise identified by the user, on the photographic image produced by the Forge?

I think you will want a bit more angle then that.
I did the math on a 2 degree angle and 1/4" stock (hopefully correctly :slight_smile: ) and the offset from top to bottom is only .0087" (tan 2 * .25 = .0087"). Obviously on 1/8" stock it would be half that.

That is really small as far as wood is concerned, and probably not enough to securely lock the pieces together. As a comparison, I think “traditional” dovetails are usually between 7 and 12 degrees. I doubt to exact angle matters that much, but 2 is mighty small and you might as well just use straight box joints.

7 Likes

Thanks for the feedback! I appreciate the voice of experience. If we go with 7 degrees, then we only get a 4" joint length.

I have two words for this sort of situation.
Experiment, experiment.
:sunglasses:

4 Likes

Wisdom born of experience?

1 Like

I love this thread!!

I keep wanting to try cubism when slants are hard. Thank you for barnstorming. :smiley:

2 Likes

Ah, if only I had a laser to do so…

1 Like

Ah, you’ve captured the true essence of making real progress and discoveries! As Yoda would say, “Wise truly, you are”.

Interesting that people are still thinking conventionally about this. Cutting on an inclined plane is a good solution to get a trapezoidal cut. Someone else suggested just cutting parallelograms which is a creative way of having to avoid doing two separate cuts. The laser on a GF will be very accurate, but realigning after a clumsy human hand moved something might prove to be more challenging. Less moves is probably going to be easier.

Another thing to consider, is the engraving approach. why not deliberately engrave the sides to have large steps? The suggestions at the top of the thread are doing small steps to simulate an inclined plane - why bother? The effect we are going for here is aesthetic appeal. (A finger joint could be cut in the same space that give more surface area, so we are probably doing this for the cool look) Cutting steps would give you a lot of surface area to glue, and it would look interesting and unusual.

Also not mentioned - if the piece wasn’t very deep, you could probably cut it from the end and do all kinds of crazy engraving style cuts.

9 Likes