Laser Cutting an Inch to the Right

I’m making cursive words for a sign and my Glowforge is constantly cutting an inch to the right of where I planned it in the dashboard? I’m new to Glowforge so this could possibly be a user error. Does anyone have an answer to this on how I can fix it?

Are you using the set focus tool? If not, are you putting in the focus height accurately? Have you run the lid camera calibration. An inch variance is not within the normal tolerances of visual alignment which is 1/8".

In addition to what @dklgood mentioned, a lot of times users believe this to be the case because there is a margin that is cropped from the camera view on the left and top of the bed. Approximately an inch on the left and an inch on the top won’t be visible. So you may be putting it on the far left side of the screen and notice it cutting about an inch to the right of that.

Is that the problem you’re having?

2 Likes

I am not completely sure. This is only my second time using. How exactly do you perform the focus tool?

What I’m doing is placing my svg file on the camera view of the proofgrade board and then selecting that it’s a cut file and printing. Is there something more I should be doing?

The entire board is visible in the camera view. The cut I’m trying to do is about 19 inches wide…so the entire board. But it’s pushing my design to the right an inch therefore cutting off the last inch of my design. So are you saying that I need to shrink my design down an inch and then move it to the left some?

@jbmanning5 @dklgood If this helps…this is what is happening.

Under the gear icon choose set focus, then place your cursor on the material and click. Watch to make sure that the red beam falls directly on your material. After this is done, place your design. Also, you will not be able to print all the way to the left. The actual print area is about 19.5" wide - measured from the right margin. If you look at the printhead in the home position, you will realize the Glowforge cannot print behind the head or further to the left than it is in the home position.

The picture is helpful. Your print is not an inch off, but it does seem more than what one would expect. Here is a link to the lid camera calibration procedure:Lid Camera Calibration Beta

I tried it once before and it actually printed the calibration an inch to the right as well but I’ll try it again now.

That does help. Have you moved the head at all by hand, perhaps when removing or placing new material inside? If so, the head should never be moved by hand while powered on, or it will lose its calibration and need to be restarted.

Have other cuts looked like this or it just started?

The first thing I would do is reboot the Glowforge to give it a fresh calibration and check it, using the set focus tool first, like dklgood mentioned.

1 Like

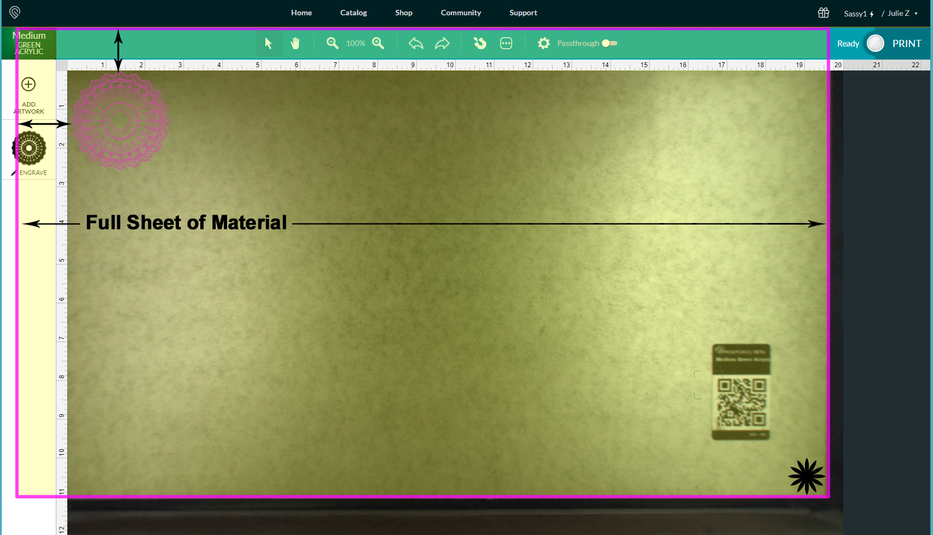
This diagram might help to explain it. There is about an inch of material hidden underneath the thumbnail column on the left. If you want to use a whole sheet of material, work out from the lower right corner. (Black Star) Make sure the metal gridded area is completely covered with material.

4 Likes

When I was young and used cursive words, my mom would give me a time out

4 Likes

This helps so much! I’m a visual learner. Thank you so much. Thank you all!!

1 Like

HAHAHAHA! :rofl:

1 Like

Thanks for the answers, everyone.

Could you please let me know if the advice from the community helped get you up and printing with your design?

It’s been a little while since I’ve seen any replies on this thread so I’m going to close it. If you still need help with this please either start a new thread or email support@glowforge.com.