Laser etched KeyBar key organizer (titanium)

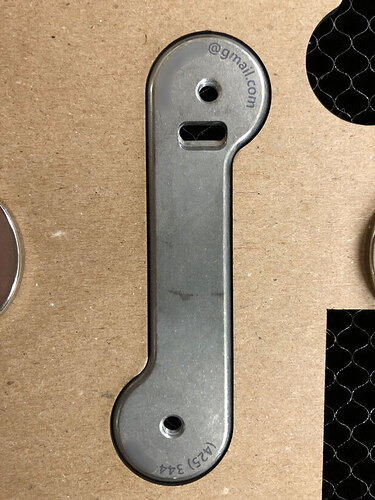
This evening I engraved my phone number and email address on my KeyBar key organizer. This is made out of titanium.

We are not allowed to post non-proofgrade material settings in this sub-forum, but if you are interested in that, I’ve created a thread over in the “Everything Else” forum with the details

Note that when lasering titanium it seems there is some risk of a mirrored surface forming that might reflect the beam and cause damage to the GF (or in extreme cases, the individual). From what I was able to read, this is something that occurs when lasering at high power for a long time, or repeatedly. I did not find any references to it happening at lower power engraves, but if you try this, be aware that do so at your own risk.

I did two engravings, some larger text inside the KeyBar, that was a bit of an experiment. I engraved at (redacted). This left a faint but readable grayish anodized (oxide) layer. This was the subtle look I was wanting, so I used similar settings on the outside: (redacted).

It’s a subtle look, but clearly readable under good light. If I had it to do over again, I would up the power and/or lower the speed a bit. But I am happy with it.

To align the keybar, I first created a shape in Illustrator matching the Keybar almost exactly. Fortunately, it’s a very simple shape consisting of two circles and a rectangle, with one of the corners radius-ed. I was able to get this pretty accurate by just measuring the radius of the circular portions, the overall length, and the width of the rectangle portion. Next I placed the text inside the shape where I wanted it, and then exported the whole thing.

In the GFUI, I cut only the shape outline out of some 0.1 inch chipboard that I purchased from Blicks. I then inserted the panel of the KeyBar that I wanted engraved, disabled the cut, and enabled the engrave. I set the focus of the engrave to match the thickness of the keybar panel. The image displayed in the GFUI indicated that things would be misaligned. This was the case even if I changed the overall material thickness to match that of the KeyBar (0.116"). In the end, I just ignored the image and trusted that my technique of placing within the cutout of the chipboard would align things correctly. Fortunately, this worked perfectly.

The image below shows the results. I’ve blurred out my personal information, but hopefully there is enough there for you to see the results.
28 Likes

Nice work! I saw another Ti post on the forum where they used varying power and played with the color of the oxide layer. There is no way you could heat titanium enough on the glowforge to make it mirror. At varying strength, you will just change the color of the oxide layer which is cool. I’d be concerned if the piece you were engraving started out polished, but this is perfectly safe. Thanks for posting!

3 Likes

I saw that, and got all excited until I realized that it was done on a 100W laser. There was another post done on the GF, but no settings. Unfortunately, a recurring theme here seems to be posts with pictures but no mention of settings.

BTW, if anyone wants the KeyBar shape, let me know.

Settings on non-PG materials are in posts in the Everything Else category. They’re not supposed to be included in posts in the Made on a Glowforge category per request of @dan

Some of the older information from the spring is not likely to be useful - that would have been done on PRUs which had a variety of power profiles with subsequent changes to the entire power/speed mapping approach in the GFUI as a result.

Calibration of your materials with your unit is something all laser operators tend to do as a matter of course - there are a variety of calibration “tools” (designs really) out there in the wild and a few here as well (I’ve posted a couple).

are you sure @dan.rose is who you meant cuz that seems to be me and I didn’t make any such request :slight_smile: I think we’re talking about the founder.

1 Like

can we make derisive comments as if you made the decision?

3 Likes

Gotta love autofill.

Certainly - I am all about the blame :slight_smile: though honestly not a fan of the rule I’m being blamed for - sharing is the whole point of a user forum.

4 Likes

Yeah. Discourse grabs the name that matches what you’re typing and I was typing Dan to end a sentence in a period and you’re the Dan that’s got a period in his name so it picked you instead of the other Dan. I corrected the post. :slight_smile:

3 Likes

Yeah, I know this. If you bother to read the thread, you’d see that I created two posts, one sanitized (without settings) an one with, in Everything Else.

It doesn’t change my point in the slightest. For that matter what I said applies equally to proofgrade materials. Many people are reading here to learn new techniques, and the vast majority of posts here do not include settings, which makes them of limited value for this purpose. I’d love to see that change.

I bothered. Although since I’m a hair under 202K posts read I can understand you presuming I might not have.

But, we all have been there with this. When they announced the change many of the regulars on the board at the time expressed the exact same sentiment. That’s why in MoaG you’ll find lots of older posts with the settings (non-PG settings on PG and settings on non-PG) - we used to post that info because we found it valuable. But Dan made the call and it’s his forum to make the rules on. We can not like it or we can get over it. Most of us got over it and do as you did - post a second one in Beyond the Manual that has settings. Unfortunately that doesn’t include everyone because you can’t force anyone to do it or suffer a fallout of topics being posted overall (and was one of the reasons we all thought it was a bad idea). So it’s not a “recurring theme here”, it’s the rule.

1 Like

As they say “happy just to be nominated”

1 Like

Yes, agreed. Maybe we should start a Wiki to capture settings and other useful info outside of this forum? I know people would contribute. We have an Epilog laser cutter at work, and we’ve got a very useful database of information there (it’s in a OneNote). I’m just amazed at how HARD it is to find even basic stuff like laser settings to do a decent photo engrave on maple plywood. I’ve had zero luck with the proofgrade settings, but I see tons of examples of good results here - none of which have a mention of settings. Very frustrating.

2 Likes

Nice. I have a titanium, flame-anodized knife scale off my Sebenza pocket knife that I am going to try engraving a design into. I’ll have to check your other thread for setting starting points. :wink:

2 Likes

That would be handy. Also some conversions between Epilog/Trotec and GF settings so we could map a project’s settings in one with ones that are likely to work with the GF. There are lots of projects out there folks can find/buy/download that have settings for one of those systems and being able to convert them quickly would be handy.

Trouble is I’m up to my eyeballs with real work (this is where I go to wash & dry the brain several times a day :slight_smile:)

3 Likes

Actually, settings on non-PG materials should be in Beyond the Manual, not Everything Else.

1 Like

Oops. You’re right. Fixed the post. Thanks for catching that.

1 Like