When I try to cut out a design is starts to cut and then stops and say the laser head was bumped and it will not continue to cut. Has anyone else had this problem?
If I engrave it works just fine.
When I try to cut out a design is starts to cut and then stops and say the laser head was bumped and it will not continue to cut. Has anyone else had this problem?
If I engrave it works just fine.
The laser follows a different path when it is cutting versus engraving…check your tracks and belts closely for debris to make sure there’s nothing in there to interfere with the movement.
Thank you for your assistance. I have checked the track and belts and am not finding anything 
Does it happen with any other file? Or just that one?
It happen with any file that I try to cut.
Okay, support might need to have you run additional tests when they see your post…hang on till they can review it.
Have you checked the ribbon cable that it is freely moving along the gantry? Double check how your head is seated. That’s all I can think of.
Does it happen no matter where the design is placed in the bed? Have you printed the Gift of Good Measure and it happened?
Thanks for letting us know about this - I’m so sorry for the trouble. I’m looking into this now and will follow up shortly with some additional steps.
Thanks for your patience. I’ve made a change on our end that should take care of this for you. Could you please reboot your Glowforge, try again, and let us know how it goes?
Thank you so much for your help. It is working now and actually, I can see the whole board on my computer and my designs are lining up on my board and computer. This will save me so much wood because I had to leave so much space between designs because they would overlap (if that makes sense). The only problem that I seem to still be having is that it doesn’t always cut completely through my wood when the design is in the lower left corner.
Thanks,
LuAnn
Hi there! Good to hear that change worked for you.
To cut successfully, there are three important things to check. First, your material must lie flat. This requires a clean, properly installed crumb tray and flat materials. Second, there must be no obstructions, dirt, or damage preventing the laser light from reaching your material. Third, your design must be set up properly - for example, with lines that are fully on the material and that are set to cut. It’s hard to know which issue might be affecting your print, so please thoroughly inspect your unit and design according to the suggestions below.
If the Crumb tray is mispositioned or holding bits of material from packaging or printing, it could keep your material from lying flat. Even a millimeter difference in height could affect your laser’s ability to cut.
Even when the Crumb Tray is clean and flat, the material may not be lying flat on the surface. Some materials can develop a curve (called ‘warp’), and warped material may not cut through consistently. The problem is especially likely to occur if the print is large.
Your Glowforge unit’s laser is powerful, yet it can be stopped by a tiny amount of dirt or damage to the lens or windows. If something gets between the laser light and your materials, they won’t cut through. Here’s how to check for damage and clean your lens and windows at the same time.
1. Remove Printer Head
Turn off your Glowforge. Grasp the printer head as shown, and pull gently up and back to disengage the magnets and remove it.
2. Remove lens and check for scratches or dirt.
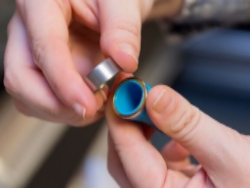
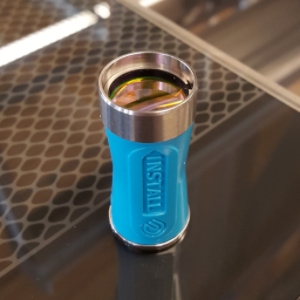
Look at the lens on the tool. It should be resting on top of the tool like a bowl, with the top open and with the orange-colored optics on the bottom. If it’s upside down, it won’t work properly.
Gently slide the lens off the lens tool. Be careful to touch only the metal ring to avoid fingerprints on the lens.

3. Put the Lens Back In
If the lens appears clean, you can put it back.

4. Replace Printer Head
Review instructions for snapping in your printer head, then put the head back on.
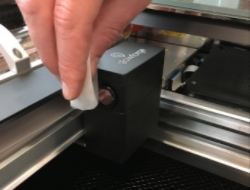
5. Inspect the Head Window and the Laser Window

Once you’ve inspected and cleaned, please try another print. We included an extra piece of Proofgrade Draftboard with your materials shipment for troubleshooting. Please print the Gift of Good Measure on Proofgrade Draftboard and let us know the result. If it doesn’t print well, please let us know the date and time of your print and send photos of the front and back of the print.
Thank you!
Hi @redstoneframes.
It’s been a little while since we’ve heard back from you. Did the steps that my colleague Chelsea sent you help solve your cut through troubles? If you’re still running into any troubles please don’t hesitate to let us know!
I have this same problem, (occurred at the end of a job), but it seems to happen when the arm is going back. Even when the GF freshly turned on and centering the head. Seems to occur when the arm is in the middle of the print area
They will have a better chance of seeing your issue @alma if you open a New thread in the Problems and Support section. (They don’t always catch additions to old posts.)
Posting a new thread opens a ticket for your machine.
good to know. I have sent them an email, I was just responding to the question if the bumping error had occurred to anyone else 
Okay, the email should do it. 
Hello Vee- I am having the same issue here with my machine, would you be able to take a look at my machine? thank you so much
Hi @kingofl337…if you need to have support take a look at your machine you might want to open a New thread in Problems and Support. They don’t always see posts tacked on to existing threads if they are working offline with the original poster.
They do open a ticket for your machine if you start a new thread. Try to describe the problem in as much detail as you can. What you were doing and what steps you took.
thank you so much!
It’s been a little while since I’ve seen any replies on this thread so I’m going to close it. If you still need help with this please either start a new thread or email support@glowforge.com.