It was about 2 weeks ago that I got the dreaded purple button and discovered the laser had stopped working. The project ran normally but no laser. I have cleaned the entire machine but just tried to fire it up again today and tried to cut a square in medium draftboard…still no laser. Not really sure what to do at this point. I can’t run any jobs. I’m hoping the Glowforge folks will see this post and offer some suggestions. Thanks!
Have you contacted them already about it (email?) or is this your first notice to them?
(This post opens a ticket for you, but they might not see it until they check the forum. )
Posting here opens a support ticket in their ticket system just like if you had emailed them. It’s best not to do both, since that slows the process down. 
Support will likely ask you to print a known-good design (the Gift of Good Measure) on the spare sheet of Medium Draftboard they provided with the machine, using default settings. Note the results, and time (plus timezone) of print. They can then check the logs. If it is not printing, the machine will need to be repaired or replaced.
No I have not emailed them. I only made this post . Thanks!
1 Like
Just ran a print of the Gift of Good Measure at 6:53 PM EST using default settings on Medium Draftboard. No results, no laser.
1 Like
Same thing happened to me. Ran through the motions but didn’t actually cut. They told me I had to send it in for $200 shipping and then between $400-$1000. They saw from my logs it can’t be fixed by sending me a part but couldn’t tell me what the issue was for me to have it sent to them. I’m out of warranty on my pro since feb. So now I’m spending another $600-$1200 to get something fixed that they see on my logs but can’t tell me what it is.
I’m waiting on a shipping label and have sent three emails asking them questions and I can’t even get a response
I’m sorry that you’ve run into trouble with your unit and your Glowforge isn’t printing. If your Printer Head is moving but you aren’t seeing the laser marking your material, there are two likely causes:
- The mirror in the Printer Head is not installed correctly and may have been damaged.
- The print power has been set to the lowest possible setting.
I extracted the logs from your Gift of Good Measure print, and was able to verify that default settigns were used, so we can rule out the 2nd possible cause. As a next step, please check the mirror inside your print head.
-
Follow these instructions to access the Printer Head mirror.
-
If you see damage to the mirror or the plastic handle (for example, if the plastic handle has been melted), please check the interior of the Printer Head for any additional damage. If you don’t see any signs of physical damage inside the Printer Head you can purchase a replacement Printer Head Mirror through the shop. Note: If there is damage to the plastic handle on the mirror, the mirror may be difficult to remove. You can follow the instructions here for removing a mirror that is stuck.
-
Once you receive your replacement mirror, please clean both the lens and Printer Head window, by following these cleaning instructions.
-
If you find any damage in the Printer Head, please take a photo of the damage and send it to us and we’ll follow up with next steps.
If the mirror looks normal, please let us know and we’ll follow up with next steps.
I’m sorry for the delayed response. I’m glad to see that we’ve since been in contact with you via email, and we’ll continue to work with you regarding your unit in the support ticket we have open via email.
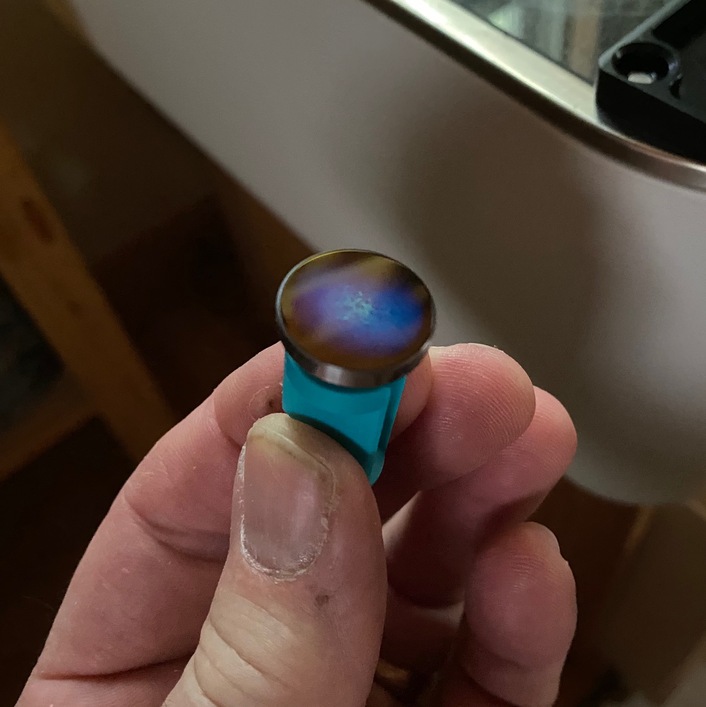
Thanks for the suggestion. I removed and cleaned the Printer Head Mirror. I am not sure if the slight discoloration and the sort of scratchy surface at the center are normal. The blue handle is not damaged at all. Let me know what you think about the mirror. Two photos attached. Thanks!!

That’s not good.
While you wait for Support to come back see if you can clean it. Soak the mirror with rubbing alcohol. You can put a few drops on the surface or turn it over and let it rest in a puddle of alcohol (perhaps in the alcohol bottle’s cap). Let it soak for a few minutes and then see if it will come off with a lens wipe.
If not, order 2 from the shop. That way if it happens again you’ll have a spare.
FYI: the laser mirror is a first surface mirror. On most mirrors the reflective coating is on the backside so when you clean a regular mirror you are wiping glass. On this mirror you are directly cleaning the very thin reflective coating. It is EXTREMELY easy to scratch it or dull the coating. Not good.
Thanks for the tip!! I just used some rubbing alcohol. It immediately removed the discoloration and looks like new. I reistalled it and still no laser.
Good that it’s clean but too bad about the no laser. If you’re sure you’ve got valid power settings (10+ will at least mark the material or masking) then you’re stuck waiting for Support to check the logs.
Because they’re working with you via email, we won’t get to see what happens as they won’t update this thread. Crossing fingers for you 
I’m so sorry for the trouble.
There are a couple issues here that may be separable.
Regarding the purple button
Let’s collect the logs from your unit and see if we can find more about what happened:
- Reboot your Glowforge once more and wait about 30 seconds
- Hold down the button on your Glowforge for ten seconds, until it glows with a teal color
- Your Glowforge is now broadcasting a temporary Wi-Fi access point. Connect your computer to “Glowforge XXX-XXX” (from your Wi-Fi Settings)
- Visit the following URL in your browser: http://192.168.192.1:3000/logs/zip
- A .zip file should download to your computer
- Reconnect to your usual Wi-Fi network and email the .zip file to support@glowforge.com
Please let me know if you run into any difficulty with these steps.
Regarding the Laser Not Working
I looked at the logs, and unfortunately both of your recent Gift of Good Measure prints had errors before the post-print bed image could be taken. Both errors were different, and as far as I can tell, wasn’t caused by anything you did.
I’m curious if you see the tube lighting up during the print. If so, we should check the rest of your optics and send photos? (both laser windows, and the print lens)
If the tube isn’t lighting up during the print, could you send a short video during a print. It would be helpful of the video could show both the tube (lighting up or not) as well as the area of the material below the print head.
I replied to support@glowforge.com with the zip file attached, but I received an email that it was rejected for some security reason (see below).
mx.google.com rejected your message to the following email addresses:
Glowforge Shop (support@glowforge.com)
Your message wasn’t delivered because the recipient’s email provider rejected it.
mx.google.com gave this error:
This message was blocked because its content presents a potential security issue. Please visit https://support.google.com/mail/?p=BlockedMessage to review our message content and attachment content guidelines. p7si9957214plo.168 - gsmtp
Diagnostic information for administrators:
Generating server: BL0PR14MB3604.namprd14.prod.outlook.com
support@glowforge.com
mx.google.com
Remote Server returned ‘552-5.7.0 This message was blocked because its content presents a potential 552-5.7.0 security issue. Please visit 552-5.7.0 https://support.google.com/mail/?p=BlockedMessage to review our 552 5.7.0 message content and attachment content guidelines. p7si9957214plo.168 - gsmtp’
Original message headers:
ARC-Seal: i=1; a=rsa-sha256; s=arcselector9901; d=[microsoft.com](http://microsoft.com); cv=none;
 b=nr9BSZsW8a4Z2hUqq90slPTL7Egt2x3qr4CoJgdABrDjRipV8dQVSO+1ghYonvVu626UJX2PZ0p68YNu83Nkkyn1HQZsMFNxQiRvWbnNxtHNwIPQBA310LcNKLBISJ4NKfkidbvPfNI+ltpRam1PUTxD+O91t380V9dcooheYzpxxe5Egdfr/nhUmJXcwDBiSJrD+nYRnk+RTLCYqzfApY5JXMJcgt0U7xSh3jt/LWt96LywTazB6XzjpGadTLks8zJv47CI20pwmtKmUr0RNlKJuZ11IW0MWDwjFLd7XEyw45BJKdru2HYlwFeQPA6wHvQibV5DtNa5+Kbuk7MSpg==
ARC-Message-Signature: i=1; a=rsa-sha256; c=relaxed/relaxed; d=[microsoft.com](http://microsoft.com);
 s=arcselector9901;
 h=From:Date:Subject:Message-ID:Content-Type:MIME-Version:X-MS-Exchange-SenderADCheck;
 bh=heR7N7hXVFg8eGtFnb283XHq8D2oXF5f4liUXFQJUx8=;
 b=hc7GTOPdbQZPfnpPSFG6Xpe8aB3E5XAGgCT2DQqcNOVeNaDBJ6sfLVwBmE4CrtavSTOPRjpwmR24fRJCrJFet3Lf0d9Z2SUmYeKZJEDtVPXtHAtiC2umi0ugxPwfvoUUIBE8PNzq8QifSKhe2oSzolXkzdPqqiiInfbOaZA89Bt7Lz9TjnLxgixdZN7gagTCX0y4JsUI9vz1ZJ+/DFjbhHYf5cqEvE2TKiE8zM6PLqN/KrGcw8vfpxdNftO4Puja3wdib1naJcjmfwPwuxOD5LeuGwyBK4dxrn8qNleXLO4dqVqJPPMkfFMqPnt1zA76NiT3G2FaJ0goPO8RDQxDKQ==
ARC-Authentication-Results: i=1; [mx.microsoft.com](http://mx.microsoft.com) 1; spf=pass
 smtp.mailfrom=[nice-racks.com](http://nice-racks.com); dmarc=pass action=none
 header.from=[nice-racks.com](http://nice-racks.com); dkim=pass header.d=[nice-racks.com](http://nice-racks.com); arc=none
DKIM-Signature: v=1; a=rsa-sha256; c=relaxed/relaxed;
 d=[NETORG5118704.onmicrosoft.com](http://NETORG5118704.onmicrosoft.com); s=selector1-NETORG5118704-onmicrosoft-com;
 h=From:Date:Subject:Message-ID:Content-Type:MIME-Version:X-MS-Exchange-SenderADCheck;
 bh=heR7N7hXVFg8eGtFnb283XHq8D2oXF5f4liUXFQJUx8=;
 b=fFejQgF4FGkvD0gUSmUqjQcu80CwBRuBl2jj10q7E+oc04o1Oecc/Ew2ZwbMN0wkLySTOywALcTb5brl8cA5EoPJDiE5tEOPH2bap3wn9S6c6LgLDyy4Vzeabzr+b83VhbBF3sJWGFZho1N9v8hCyz58A4WNZpirlaKEG9LSYfM=
Received: from [BL0PR14MB3809.namprd14.prod.outlook.com](http://BL0PR14MB3809.namprd14.prod.outlook.com) (2603:10b6:208:1c8::18)
 by [BL0PR14MB3604.namprd14.prod.outlook.com](http://BL0PR14MB3604.namprd14.prod.outlook.com) (2603:10b6:208:1cf::9) with
 Microsoft SMTP Server (version=TLS1_2,
 cipher=TLS_ECDHE_RSA_WITH_AES_256_GCM_SHA384) id 15.20.3261.19; Sun, 9 Aug
 2020 15:58:25 +0000
Received: from [BL0PR14MB3809.namprd14.prod.outlook.com](http://BL0PR14MB3809.namprd14.prod.outlook.com)
 ([fe80::5d00:195:f1b:d533]) by [BL0PR14MB3809.namprd14.prod.outlook.com](http://BL0PR14MB3809.namprd14.prod.outlook.com)
 ([fe80::5d00:195:f1b:d533%8]) with mapi id 15.20.3261.022; Sun, 9 Aug 2020
15:58:24 +0000I’m trying to link to a video of the Gift of Good Measure print. Let me know if this works.
https://www.dropbox.com/home/Glowforge?preview=Glowforge1.mov
I’m sorry to hear that you ran into a snag following my colleague Pip’s instructions. We were not able to access the recording of the print you performed, as we don’t have access to the drop box you uploaded the video to. I apologize for this inconvenience.
When you attempted to perform the Gift of Good Measure print, did you happen to see any light flashing on the inside of the laser tube? I’m concerned that the blemish on the 45-degree mirror, may be causing the trouble you’re running into, but I’d like to make sure we are also taking a look at the Purple button behavior you’re seeing. Based on the error messages I reviewed from the logs we extracted from your Glowforge, I’d like to take a look at two specific connections on your unit.
Could you please do the following?
- Turn off your Glowforge.
- Holding only the finished black surfaces, grasp the printer head as shown. Pull gently up and back to disengage the magnets and remove the head.

- There is a small tab in the center of the wire ribbon. Push down fully on the tab to release it, and gently pull the wire ribbon plug from the printer head.
- Take a clear photo of the gold pins inside the printer head where you just unplugged the wire ribbon. It should look like this.
- Pick up the printer head and wire ribbon. Make sure the tab on the wire ribbon is facing up. Slide the ribbon back into the head until it clicks.
- As shown, lower the printer head over the metal plate so that it rests next to the two round posts. Then push it gently away from you – you’ll feel a “click” as magnets pull the printer head until it sits snugly atop the metal plate.
- Pull the laser arm all the way forward.
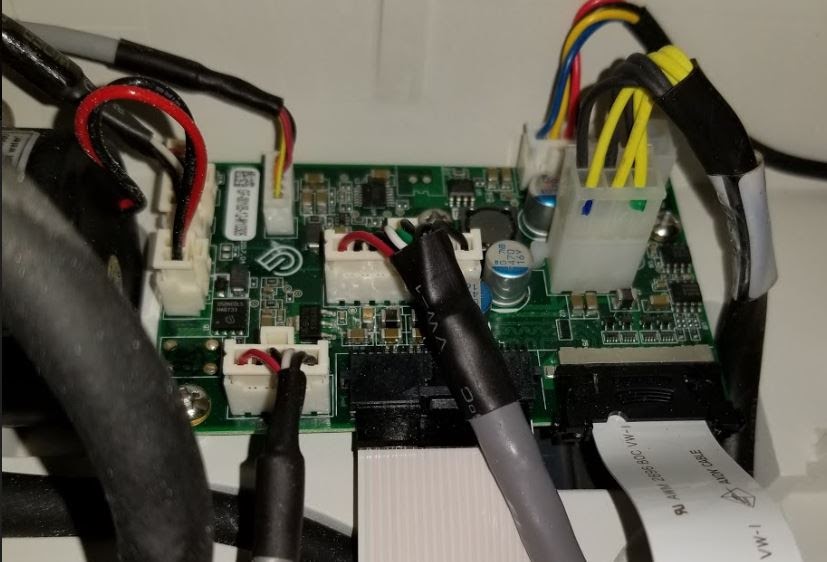
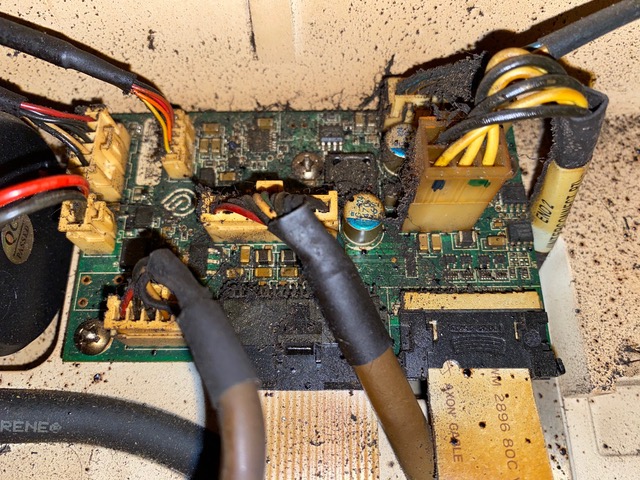
- Reach over the laser arm, and to the left of the inside of the unit and you’ll see this circuit board:
- Take a photo of this board.
- Turn your Glowforge back on.
- Send us the photos you took in step 4 and step 9.


Once we can review these images, and confirm that the light was flashing in the laser tube, we’ll send over the next best steps.
Here are the two requested images. The circuitboard was difficult to access and the space is too small for me to get my hand in there to clean it out.
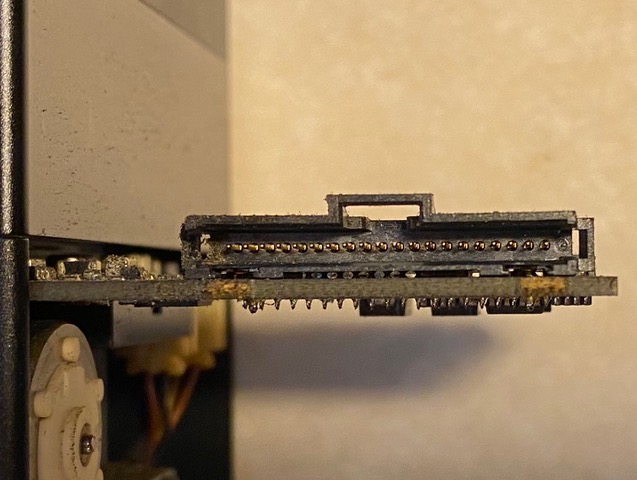
Thank you for working through those instructions, and for sending over these photos. Based on the images, the cables connected to the circuit board on your Glowforge appear to be fully seated, and the Pins do not appear to be bent or damaged. I’ve extracted the log files from your Glowforge, but I’m not able to see any recent connections or print attempts since we last talked to you.
Would it be possible to reboot your Glowforge, to see if re-seating the cable on the Printer Head allows for your Glowforge to work through its initial calibration motions? We’ll review the log files to see if it is still experiencing trouble communicating with the Printer head. Once we have this information, we’ll send over the next best steps.