So last night I went to bed determined to post some pictures of a puzzle box project partially made on a Glowforge. and wouldn’t you know it? A four step puzzle box post this morning!
I don’t want to be guy at the party who has (in his mind) a better fishing / hunting / fail / whatever story than the one someone just told, and considered not posting.
But I would still like to.
The project posted by @primal_healer is easily a more legitimate MOAG project. I’d love to try something like that. I promise the above is true.
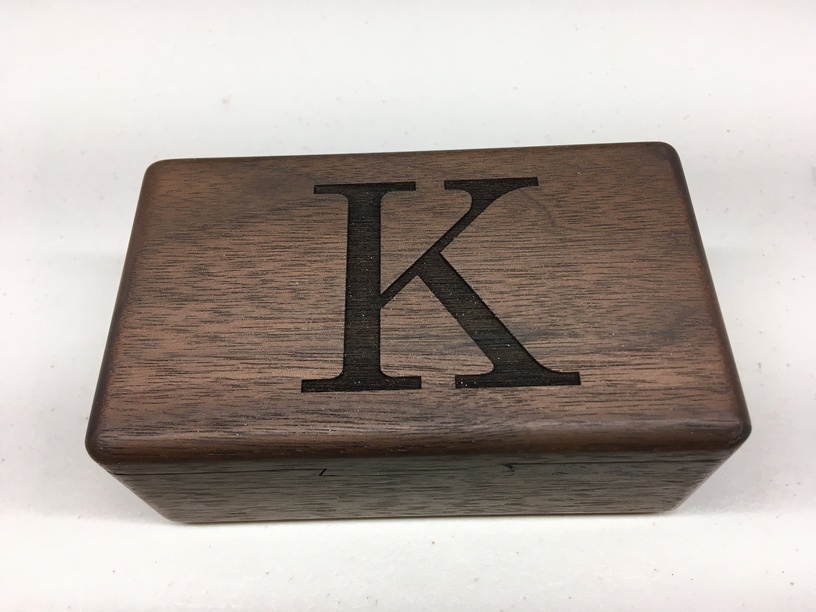
My project started out primarily as a woodworking project in walnut to get warmed up for building the bathroom vanities my wife is patiently waiting for. Also, there is a kid at church who I like to give fun things for Christmas and birthdays.
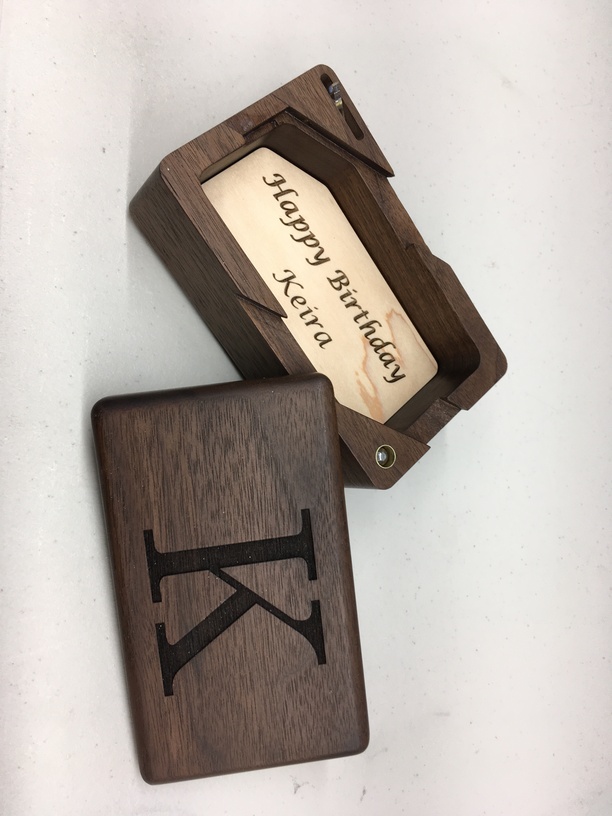
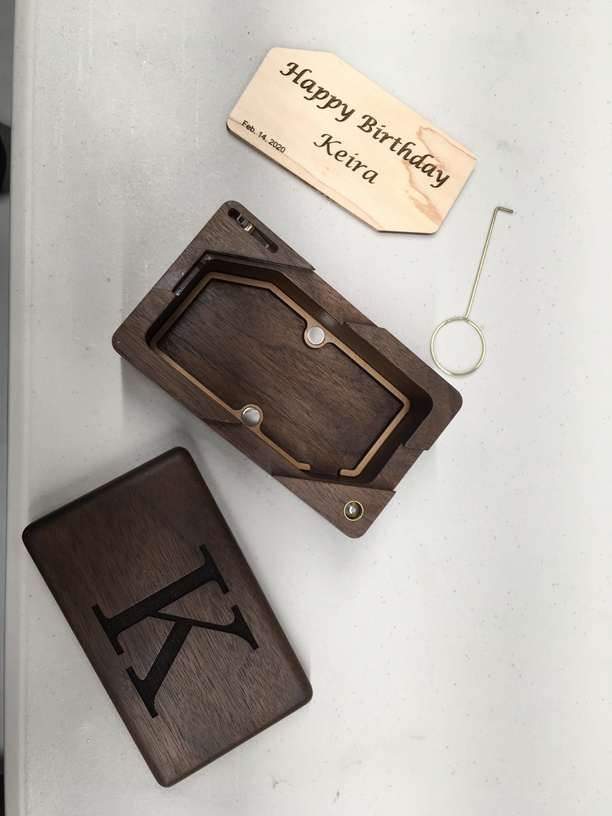
This is a two step. dovetailed box with magnetic plunger pin and a pivoting second catch that requires you to hold the box at a certain angle after you release the plunger and get the lid to slide a bit. I did have to give hints for her to open it.
The engrave in the lid worked really well; the box also has a false bottom with engrave; that, and the little riser for it were cut on the Glowforge. You can just see the little toggle catch in the top left corner of the box which is cut from clear acrylic.
The Glowforge let me dress this item up very easily. Oh, and to center the “K” on the lid I drew a rectangle the size of the box in my file, aligned to it by camera, and then set the rectangle to"Ignore". That came out perfectly centered!
Thanks, the woodworking here was mostly done on my milling machine, and hey anybody can blast around a piece of wood with a corner rounding bit. I get great pleasure from sanding and finishing fine wood. That piece ran away to 1200 grit wet sanding with oil and it turned out pretty nice.
But my Glowforge really let me put the frosting on the cake. I’ve finally named mine BTW. It is Gordon, in honour of Gordon Gould.
The finishing is my favorite part, can sit for hours staining sanding finishing and polishing. pretty sure i lost 4 hours of my life yesterday doing the finish on the box i made. Throw on some JRE podcasts and zone out.
Kinda hard to tell but the lower part of this image is the surface finish i was able to get on the second box in my post.
its on that black and yellow box i made. Rubbed and buffed some hard paraffin wax onto the surface till it was like a mirror. not the most robust coating but easy to fix if scuffed. that box and my other one are made from the cheapest plywood i can find at my local hardware store. i think its like 20-25$ for a 4’x8’ sheet of it.
Slowly learning how to do better finishes. my next project will be finished with CA glue on the outside and then wet sanded. or that is the plan at least.
I love CA for that. My challenge is "How in the world do you apply it to large areas? Also, have you ever got an eyeful of the fumes? Phew! Tear Gas. Like melting nylon while soldering stuff.
But CA is lovely on MDF. I do that a lot. Edge treatment especially. And no zip kicker - too many bubbles.
Yeah those fumes can be pretty gnarly. i was thinking i would do it outside and buy a cheap sprayer bottle from the hardware store and coat it that way. wont end well but should be fun
Wondering how well a sprayer would work- will it just seize up? As for thinning, I use nothing but super thin CA. I do not look for it to gap fill.
I usually pre-assemble the parts and then glue the parts and my fingers all together. When the parts are secure I disconnect my body parts from them and start sanding. When my fingers are cleaned up I start sanding the workpiece.
This is a beautiful project. Thank you for the write up and photos. If this is, indeed, a warm up to the vanity build, it was well worth the time invested. How great that your wife is patient. So many of us here in the forum seem blessed with patient spouses/partners/family/friends.
She has been waiting for her new kitchen to be painted for a year now. It is built from MDF, all sanded and working, but I need to completely dissemble a few of the units to get them painted. I have been tempted to paint it myself, but that super hard and slick finish which can only be achieved by a sprayed, two-part product stops me. With the virus outbreak I now have time, and so does the spray shop who will paint it. The rest is just drawer faces and gable pieces, so pretty simple to re & re.
 Very clean and elegant design.
 I may have this maple dresser that…