LED Lantern for Mother's Day

I’ve been dipping my toes into the Arduino pool recently, so I decided that this year’s Mother’s Day gift would be electronic.

My first idea was a huge success: a smoke generator that lets out a puff of acrid smelling smoke when you plug it in. Unfortunately, it only works once, so I set out to make something a little more durable.

This lantern was the end result. It’s driven by an Arduino Nano and a strip of addressable 5v LEDs, and a capacitance sensor on the lid lets you switch between 20 colors and patterns by tapping the top.

The top wasn’t firmly sealed in this video, as I was still making sure it wouldn’t become an electronic version of O’Leary’s cow. Now that I know it works and is safe, I’m going to glue on some elbow macaroni and glitter, wrap it up, and ship it out.

I’ll be making more of these: it’s surprisingly simple to cut and assemble, and with interchangeable panels and all the different lighting options, it’s tremendously customizable.

49 Likes

Hahaha—you are so funny.

I’m glad your next attempt was successful—it’s a great lamp!

6 Likes

Make sure you check the datasheet on that macaroni. The gluten free stuff is downright deadly!

What a beautiful gift.

4 Likes

i like the capacity touch idea. May have to steal that.

4 Likes

this is just wonderful! Can you tell us how to do it? I’m new to all of this.

2 Likes

Nice job! What material did you use for the light-colored panel?

2 Likes

You’re not supposed to let out the magic smoke.

4 Likes

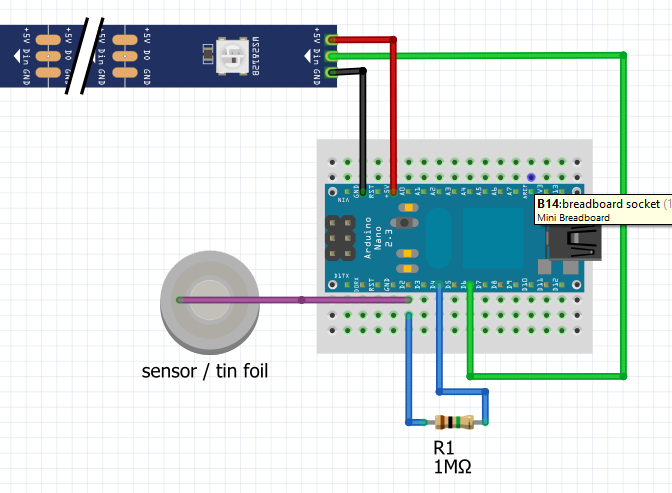
The heart of it is an Arduino Nano, and for those who are thinking of getting into electronics and/or coding, it’s a wonderful way to dive in. Just six connections needed on a quarter-size protoboard/breadboard: A 1K ohm resistor (or larger) between pins D2 and D4. A wire from pin D2 to a piece of tinfoil (the larger the foil, the more sensitive it will be). A strip of addressable LED lights (I used 3-pin, 5-volt WS2812 LEDs), power and ground wired to the Arduino’s 5v and ground pins, and the data wire to pin D6. I used a USB cable for power, so you can hook it up to a computer or an AC adapter (and so you can update the software without opening it up).

image

The outer shell is cherry-stained Proofgrade medium draftboard. It’s all friction-fit, no glue needed. Two patterns below:

Lantern_Exterior_Voronoi
Lantern_Exterior_Tree

The interior shell is white acrylic, with loose finger joints just to help keep its shape as you slide it into the outer shell. (One panel has a notch for the power cord; align it with the notched outer panel.)
Lantern_Interior

Inside, slot the two vertical struts together to form an open frame. Mount the electronics on the square platform and fit that into the struts. The horseshoe-shaped piece is there to keep the power cable from popping out of the Arduino if someone trips on the cord.

Lantern_Supports

Wind the LED strip through the holes in the struts, in a spiral. (Note: my lantern was meant for mood lighting, not bright illumination, so it uses 40 broadly spaced LEDs. If you want more LEDs, you may need to wire up the power separately from the Arduino to avoid overloading its built-in regulator.)

Slot the LED frame into the X-shaped holes in the base. Fit the outer shell together, slide it over the LEDs frame. Thread the power cable through the notch in the outer shell, and then slot the shell into the holes in the base.

Fit the inner shell together, and slide that between the LED frame and the outer shell. Again, make sure the notch fits over the power cable.

Hot-glue a square of tinfoil onto the square lid, then attach the wire from the Arduino to it. Power up the Arduino to verify that everything’s working, and when you’re satisfied that the magic smoke will remain safely inside the electronics, finish the assembly by fitting the lid onto the slots of the outer shell.

Sloppy Arduino code:
LEDLantern_CapTouch2.zip (1.8 KB)
Capacitance sensors can be twitchy, and depending on the tinfoil you use, the size of the tinfoil square, and the phase of the moon, you may need to adjust the THRESHOLD constant in the code. Uncomment the Serial lines to see what values the Arduino is reading off the foil.

And that’s it! Enjoy. :grin:

13 Likes

What a lovely gift!!

Followed up by gifting to all of us. Thank you so much!

5 Likes

Oooh. I want one. Thanks for sharing details!

2 Likes

Turned out looking great! Well done

2 Likes

How cool! Thanks for the detailed write up as well as the files!

1 Like

About what length of the led’s is it set up for? Did you have a link or was it purchased local to you?

Thanks.

I used a strip about 52" in length, of these LEDs. They’re spaced a little too widely for most of my projects, but they were perfect for this one.

When driving 5 volt LEDs off an arduino, one should take care not to overburden the 5 volt supply from the arduino. Arduinos cannot make vary much juice and will have problems when the number of LEDs is too great and/or brightness or whiteness is too much or some combination.

If your power supply is 5V, then simply tap into that to run the LEDS rather than pulling it from the board. If your power supply is something else, then some voltage regulator may be needed. Most programmable LEDS are 5 V, but some are 12 (ideal for cars and boats methinks) and those cannot be powered from the arduino. This guide gives far more info and is a good read for people interested in getting started with programmable LEDs.

4 Likes

Thanks, Mark! I mentioned that in passing, but it bears repeating, or your project may turn into another smoke generator.

I just bought a 16x16 LED matrix today, and I’m looking forward to playing with that. That’s definitely going to need its own power supply.

2 Likes

Love the Voronoi pattern, and the whole lamp. Looks great!

And thank you for sharing the details. (I was delighted to see you were using FastLED. I encourage you to please share your lamp with the Reddit FastLED group.) :slight_smile:

1 Like

not let it out? you’re not even allowed to talk about it. you know just like Fight Club. :slight_smile:

2 Likes

1st rule of electronics club: you don’t talk about the blue smoke!
2nd rule of electronics club: you don’t talk about the blue smoke!

3 Likes

That made me laugh. :slight_smile: