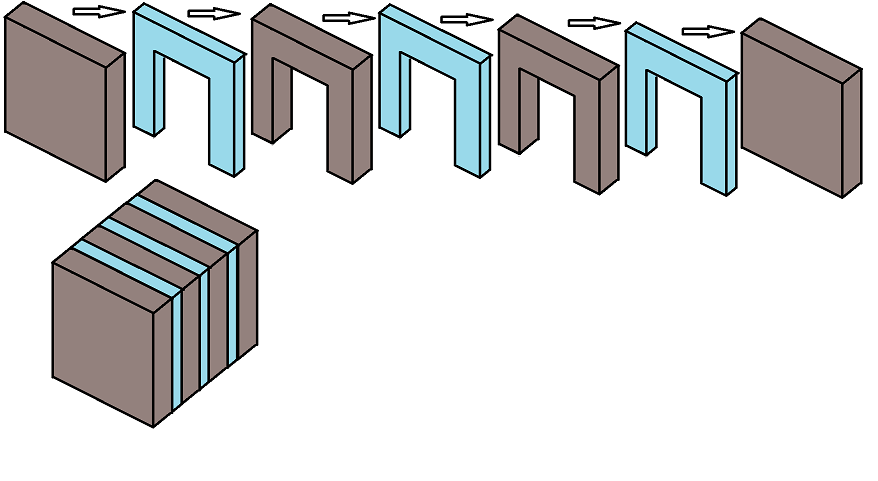
The idea is that I will have a solid piece on each end and the inside will be the hollowed out section where I can attach LEDs, a power supply and the like. I’m shooting to end up with a 4 3/4 inch cube that I can turn on, light, cycle through colors and all the fun stuff you can do with RGB color strips.
I have strip LEDs that I can cut, controllers and all of the electronic bits. I’m just looking for tips on what the best way to mount the LEDs would be to get a uniform glow across all of the acrylic edges without super noticeable bright or dull spots.
Any tips? Tricks you folks want to pass on? I’ll of course update with build progress as I go!
I have found that when the edge of the acrylic is in direct contact with the led (I use flat ones) it will light up much more than when not in contact.
Your MS paint has the end product with a hollow space underneath. A single hollow space.
So if you were going to put this over the top of a single Hue lightbulb, you would then have your glowing acrylic striped cube. With variable color (all stripes the same color at any given moment as all other stripes).
Is your intent with the void to be where the light source sits? Or is that void so you can put something under the box for storage/covering?
If you want multi-color light effects, then you should go ahead and isolate each acrylic strip so that they can all have their own color at any moment. Then you can have “light waves” travel from one side to the other and back.
One light strip per acrylic segment should work fantastically (linked like he did is fine, they are normally individually addressable), just like in the linked video. Cutting the acrylic will be easier for you on a laser. His tip about coloring the inner layers with white is a good tip, that ensures the maximum light transmits through to the edge of the acrylic layers.
With white lining on all of the non-exposed surfaces, and no engraving anywhere, the color will come out pretty reliably even across the acrylic. It is possible the bottom edge will be a little brighter, but likely not to a noticeable degree.
My intent is for the hollow in the center to house the lights and RGB LED control box and the excess wiring.
I was going to cover the bottom with a piece of black felt and maybe add some feet to the corners.
My original plan was to have a sections of 3 LEDs (the shortest you can cut off a strip) on the top, left and right sides butted right up against the acrylic. So in the end, I’d have 27 LEDs on the inside of the box.
I DO like the idea of painting the inside white, however I was thinking I may try to do a screw-less design and use epoxy to tie the whole thing together. White paint MAY make that a little tricky to do.
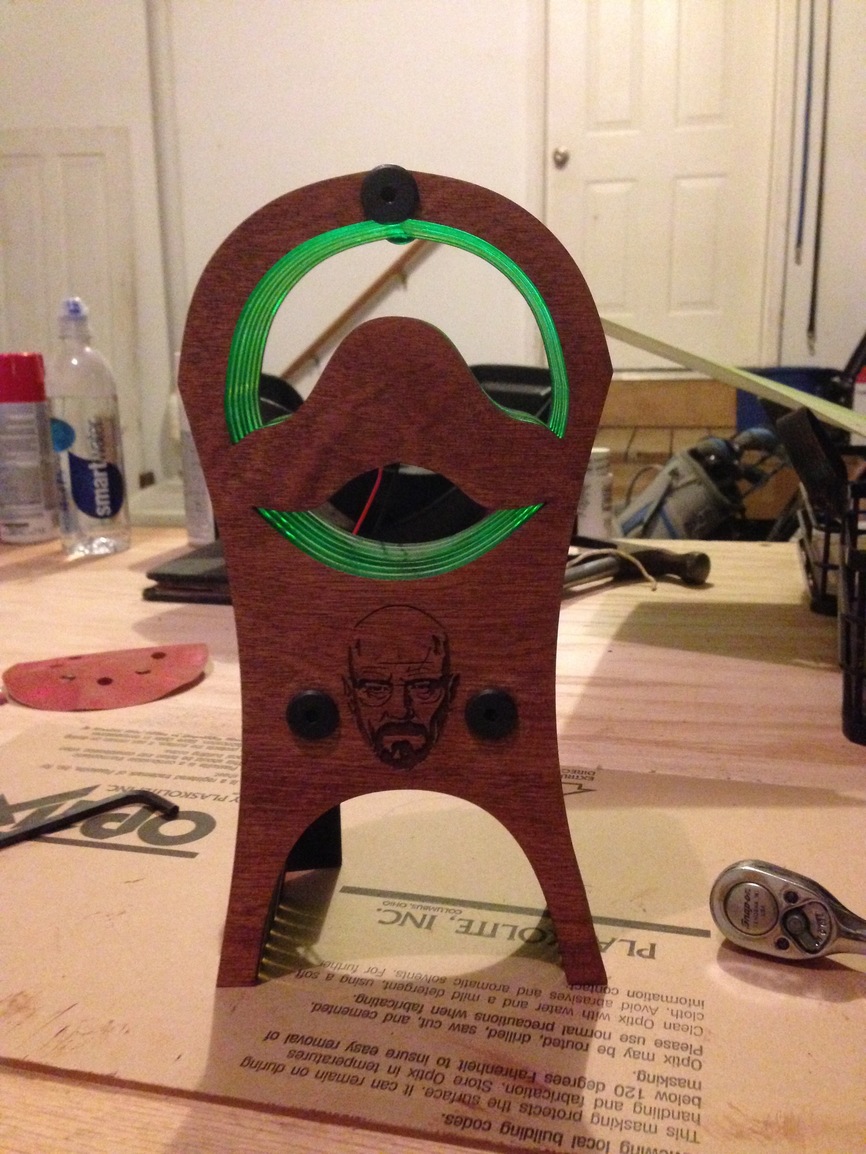
I had bought some battery packs and LEDs off from eBay and built a couple of the headphone stands for some family members. It’s not as bright as the strips but still lit up nicely.
With that large of a void, tossing in a standard socket style RGB light may work better than numerous LEDs. That would lead to having a cord to plug in though, so if you wanted battery operation that route is out the window.
With 3 sets of 3 LEDs on each section of acrylic, you will have plenty of light. I would be suspicious that you can actually see the LEDs themselves though. If this is clear acrylic, then having a straight line of sight to the LEDs themselves would mean having 3 bright spots on each side. So I suddenly see your concern about even lighting.
Right now I cannot think of an elegant way to enclose the control box and wiring while also removing the direct LOS to the LED strips. Possibly this would not even be an issue though. Especially if you do not flame polish the edges of the LED (or sand them to rough up after laser cutting). This would get you a frosted look and make it less likely to see the bright spot at each of the physical LED locations.
If at all possible, get the LED strips and a piece of acrylic of the thickness you plan to use, and see if there is a perceptible difference in light intensity through it. There likely will be, but it is not unreasonable to believe there is a chance this is a non-issue.
Some time in the next week (tomorrow most likely) I’ll be doing a mock up using something a little easier to work with than the bloodwood… something like a nice piece of maple.
I’ve got strip LEDs already and I was going to try a few different approaches before gluing everything in place. I wonder if scuffing up all of the edges with sandpaper will diffuse the light enough to make it shine through even.
The trick for this is I’m not using a laser so I have to rely on the tools I have in the shop. Working it all out seems to be half the fun
The web seems to agree with me that acetone should be good to apply a “frost” probably take a bunch of experimenting, but that was my though also you need something to make for a diffusing interface.
These are my findings for edge lit acrylics.
With alot of colors in stock, none of the opaques work- not surprised
In the transparent stock, the clear is by far the best
Yellow and orange do ok but none of the other transparent colors.
All the fluorescents work
Mirror works.
Frosts and glitters do not
Acriglas makes an LED diffusing white frost but it doesnt edge light.
I have not tested a clear with frosted edges…dont have acetone on hand.
That’s my experience as well. You also get different effects with mirror engraves from the back vs. the front (the former looks better in my opinion). My preferences are the clear and fluorescents.