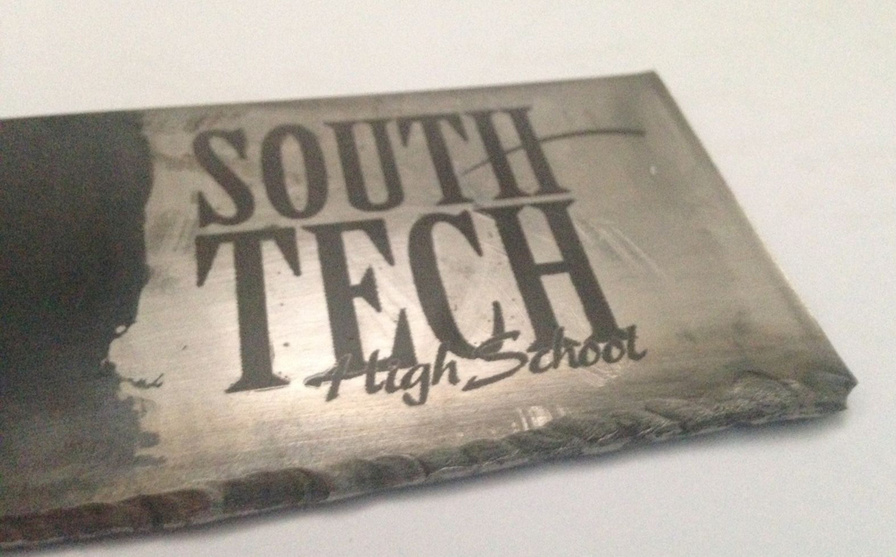
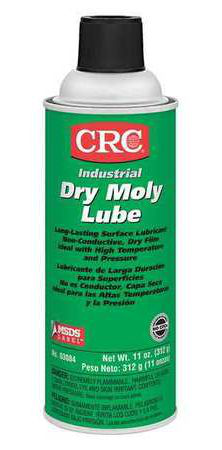
This is a piece of 1/8"t. (0.125") stainless steel from my sons welding scrap. After circling around the settings for a while, we settled on a solution that worked well to mark with a .jpg using the CRC “Dry Moly Lube” product.
PROCESS… Clean steel… pre-wipe with rubbing alcohol on a q-tip… after drying, spray liberally with the Dry Moly Lube product… let dry… spray again… let dry… spray a third time… print… clean off with rubbing alcohol
SETTINGS… Selected “Use Uncertified Material” and entered actual 0.125" thickness… Set Power to 100… Speed to 20… Lines left at 225… Passes left at 1… Focus Height set to top of material 0.125"
Here is that product and an Amazon link to buy.
OTHER QUESTIONS… Has anyone found a way to Engrave, Cut or otherwise print on wood a bit more than 3/4" thick? I notice there are no such thicknesses in the standard materials, and when I entered 0.85" or 0.75" the print system defaulted back to a thinner setting of 0.433". Additionally, and possibly connected, has anyone perfected the “3D Engrave” process? What wood species, thickness and settings were used?
Just for clarity, do you let it dry after the third application? Or does it dry so quickly that it’s basically a given that it’ll be dry by the time you get it into the laser?
We gave about a minute between the alcohol mop down and between/after each application of the Dry Moly and before sending the print. To answer though, yes, it seems to dry to touch almost instantly
The focus range is supposed to be 0.5" but seems to be limited to 0.433" which is 11mm. So for thicker materials than that you need to remove the honeycomb bed and prop them up with something to bring them within 0.433" from the bed height. Then you enter the height the top surface would be above the bed if it was there.
However that is to focus on the surface. If you are trying to cut very deep I suspect focusing half way through might be better. You still need to drop the part because it will hit the air assist if it is much more than 0.5" above the bed.
Interesting… All of the print items I sent to that piece of wood failed, I’m assuming due to the thickness. Though we DID take the tray out and set it there, which also failed to process/send. With the tray out, do you compensate somehow with focus height as it sits farther from the laser head?
You can only focus between the bed height and 0.433" above it. So you need to put something under it so it is within that 0.433" focus range. Then you tell the GF the height above the original bed level. I.e. although you enter a thickness, what it actually means is the height above the bed level because that defines how far from the head it is and thus the focus setting.
I’m not trying to be dense… but if I remove the tray and place say, a 3/4"t. piece of walnut there… how will i know the distance that it’s top is from the head, or what setting to use for focus height? Does the system ping and return an exact distance somewhere within the interface? What is the protocol everyone understands for for the focus height setting? …for engrave? …for cut? etc…?
You have to measure how far the tray is above the base of the machine. That is the lowest point it will focus to when you set the thickness close to zero. Then you need to prop your part so its top is above that and below 0.433" above it. Then you enter how far it is above it as the height. My understanding is that sets up the camera view to be accurate but it can take a measurement of the surface height and come up with a thickness that is not really the thickness but har far it is above the bed height.
@henryhbk posted how to do this. Perhaps he can point you to that post.
In terms of where you should focus I think it is generally on the top surface, and that is where GF puts it unless you override it. For deep cuts, or the second pass and subsequent passes of a multi pass cut you may want to set it deeper.
Probably not if you have coated it with Cermark or moly lube as they are dark and get darker when engraved.
I am not sure about bright stainless steel. It should be safe from a user point of view because the lid is opaque to CO2 light.It might reflect the beam up into to the head. I don’t know if that will do any damage or not.
Copper is an almost perfect reflector of CO2 light. It can be used as a laser mirror. Also it is a very good conductor of heat so you can’t etch it with a GF but you can probably mark it with Cermark, etc. Again my guess would be that would stop any reflection.
Stainless steel is different from other common metals in that is a relatively poor conductor of heat, so it can be etched with a CO2 laser. In a normal laser the head is all metal, so it probably isn’t a problem. I am not sure about the GF. Most of the under side of the head is covered by metal but there are three lenses exposed, as they have to be.
Hey Phil, in your settings you’ve listed setting the power to 100 and speed to 20. For engraving, the lowest speed setting looks to be 100. Should that setting be 200? Just wanting to double check as I’m going to be running my first moly lube test and figured I’d try to go off of your successful settings first! Thanks for sharing by the way!
I had the same problem I couldn’t get it to go to 20 either so i just put it at full power and speed 100 and I tried 270LPI and i believe it did make it better then the 225LPI but my wife said they look the same haha.

 I know there was some concerns over trying to etch copper for this reason.