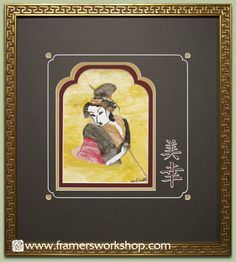
A friend has practiced the art form of taking a siliouette of a primary facet from a work he is matting and cut it into the lower edge/corner of the mat --reinforcing the art work imagery within the mat itself. I think this might be an excellent use for the GF.
I’ve seen those done…they are extremely cool. And pricey if you buy them in the stores. (Planning to do a few myself for some of the artwork around here.)
So I read your words, yet heard Charlie Brown’s teacher. I realize I’m not the brightest bulb in the uh… lightbulb factory, but do you have an image of what this describes? I just can’t understand what we’re talking about here.
Thanks!
- Tom
While his are much more elaborate (silouettes of castles, dragons, etc.) – this will give you an idea –


I see what you’re saying now! Yes… Definitely a very nice effect!
aren’t photo mats cut at a 45 degree angle? Which creates that white border? I didn’t think that was something the glowforge was capable of.
Those are good examples. I usually just see grids and things at the edges.
Not yet. Maybe one day. 
I’m plannng to try it with 3D engraving settings when I get my GF.
Me too…if it turns out the vector gradients work that way.
Not sure about the charring on the mat board though, might be worse.
Of course, black angled edging might look cool on some frame jobs.

that said, it’s not impossible to think of a matting wherein you might laser ablate the surface away to show the white underlayment. it would be different, more minescape than the angled matting, though.
I was just planning to double mat it…cut channels or shapes in the top mat, and let the bottom one (or more) show through.
Wouldn’t be angled though, so if you want an angled edge on the bottom mat, you would need the ability to engrave it away.
Or we might get an angled head one day with the removable head on this thing. Either idea is exciting. 
I had the same feeling, now it is clear 
With the silhouettes in the mat and perhaps several layers of different shades of mat, the bevel just might not be critical here, especially if you use thinner mats.
angled beam would be sweet. Until then,
use the glowforge to make the main cuts in the mat board.
use the glowforge to make a jiggy/tool that holds a razor blade at 45º.
Or buy a Logan Mat cutter. They work very well for straight cuts.
(Hmmmm. Now I’m thinking about making a curved rail for it to follow…maybe a smaller blade.)
Dang…I’m gonna have to start writing this stuff down…
This is brilliant! What a lovely little addition to the art.
I think full bevels will be very difficult to get right with 3D engrave because the inner outline will end up ragged unless the ablation rate is very constant. This is because the taper goes down to zero thickness at the edge.
Possibly a vector cut around the inside will tidy it up and leave a slightly truncated bevel, i.e. a chamfer, which is probably better than a knife edge anyway. Or simply aim for a chamfer to start with rather than a full bevel.
A rounded chamfer is probably more forgiving of poor ablation accuracy.
Since the beam spreads in a cone (or effective V) shape anyway, why not just de-focus the outlined vector cut enough to get the bevel desired? Not sure if you can de-focus it enough to get a properly sized bevel but it’s something easy enough to test. My biggest concern would be the smoke/burn discoloring.
Angled beam… Oh, to dream.