dum question, what settings did you use for the “UnScore” part of this?
3 Likes
For me, in all cases I used identical settings to the default HQ (left side) and Draft (right side) score, but with a manual focus setting of 0.3 instead of the material thickness. I think that jamely mentioned using 0.4 for her “unscore” focus.
3 Likes
Yes to everything except “his”  So hard to tell gender online. It is J(anell) Amely
4 Likes
Sorry! I should have known from the “3 Cat Max” avatar… ![]()
2 Likes
Great share. Gonna check it out!
2 Likes
I think people tend to see “jame” and their brains fill in an “s” automatically. ![]()
2 Likes
Can you explain what settings you use for each test pattern? I’m not sure exactly what I’m supposed to do with them.
1 Like
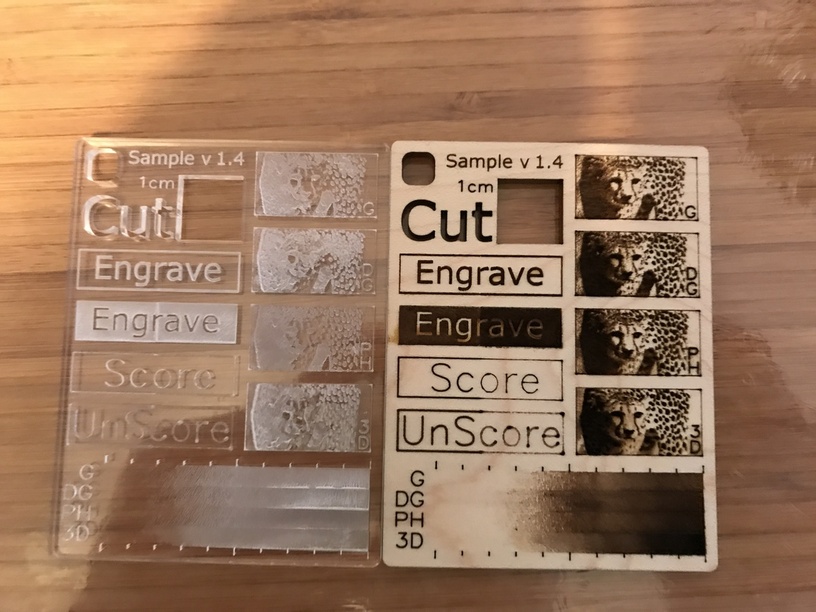
For the expanded one I posted, the order is as follows:
- Cheetah (G) = Engrave - Graphic
- Cheetah (DG) = Engrave - Dark Graphic
- Cheetah (PH) = Engrave - Photo
- Cheetah (3D) = Engrave - 3D
- Gradient (G) = Engrave - Graphic
- Gradient (DG) = Engrave - Dark Graphic
- Gradient (PH) = Engrave - Photo
- Gradient (3D) = Engrave - 3D
- “Engr…” Rectangles = Engrave - Graphic
- “…rave” Rectangles = Engrave - Dark Graphic
- “Sc…” Rectangle = Score - High Quality
- “…ore” Rectangle = Score - Draft
- “UnS…” Rectangle = Score - High Quality - then set Manual focus
- “…core” Rectangle = Score - Draft - then set Manual focus
- “Cut” = Cut
- Outside border = Cut
(Some of these also do double-duty by engraving or scoring labels and borders elsewhere on the test chip.)
For the manual focus (“UnScore”), the idea is to purposefully set the focus “wrong” to get a wider line. I used 0.3 in; jamely used 0.4 in.
Once you set all of these, you can print one, then swap in a different Proofgrade material and everything will adjust itself automatically. (Or you can manually choose various Proofgrade materials and the settings will adjust themselves.)
17 Likes
AWESSSSSSSOOOOOMMMMMMEEEEEEE! Thanks!
On a related, though someone side note. Did you scale these up from the original file size? Yours look a lot bigger than the 3"x3" the file prints it at.
2 Likes
If you mean that my pictures look larger, I just took them from really close. ![]() My printed size for these is about 2 by 2.5 inches.
My printed size for these is about 2 by 2.5 inches.
2 Likes
Had some time to try this out. Mine are around 2 1/2" by 3 1/8". I was going to try it on some plywood, but there is no 3D engrave settings. So I will move onto some draft board and see what that looks like. I have some more PG material coming latter this week and will make some more out of that. Thanks for sharing this file.
9 Likes
Yes; a few of the Proofgrade materials omit specific settings, such as maple ply not having a 3D engrave. For those, I tried some manual settings and wrote the details on the back.
5 Likes
3D engraves are supported for solid materials only now - plywood is a layered product (although the inner core is the same MDF that PG Draftboard is made of - go figure).
4 Likes
Whoa! Thank you for sharing this, and sharing the settings. I downloaded the simpler set, but didn’t go over and confirm the settings, so it cut out things that should have not been cut out. LOL.
2 Likes
With a recent update, changing from Proofgrade to Manual no longer seems to carry over the default Proofgrade settings, so any Unscore settings need to guess at the power and speed of the Proofgrade version. 
It would be really great if we could select the Proofgrade setting for, say, SD Engrave, and then do relative modifications, e.g. ‘1 step darker’ or ‘Defocus by 0.2 inches’.
1 Like
The preservation of PG settings should still be preserved when going from PG to manual.
2 Likes
Yup, they should be. They were when I got my GF last month, but some time between then and now that functionality has gone away (Chrome/Win10).
1 Like
working for me just now. I’d restart both the app and the  .
.
edit: Chrome/win10
3 Likes
Click back on Proofgrade to reload them. Then when you go to Manual the settings have repopulated.
3 Likes
It quite often happens that you have to do it twice. I’m not sure what makes that happen, maybe it is the order that you select the material, but if you choose Manual you sometimes get 500/1 or 1000/1 depending on cut or engrave. When that happens if you select Proofgrade and then back to manual it usually clears it up.
4 Likes