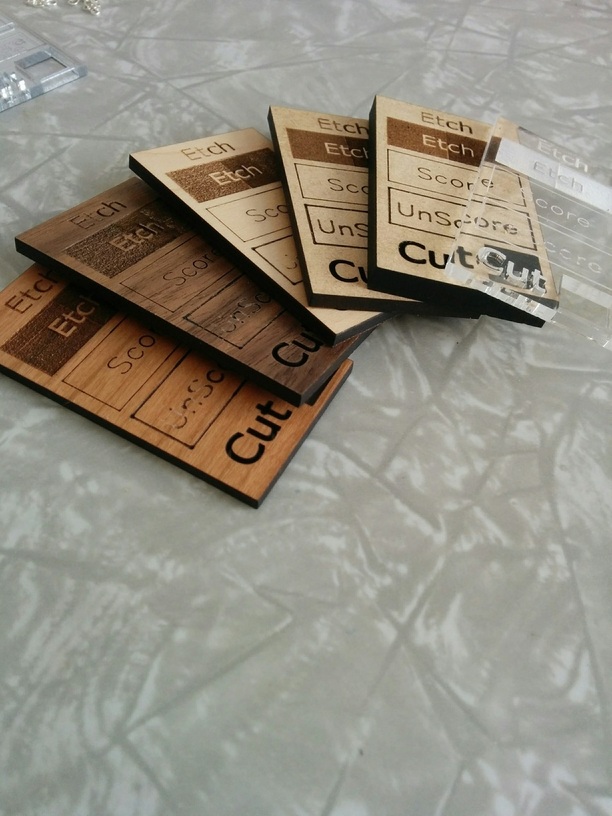
There are many options in the proofgrade settings, and I would find that I would often not know which one to choose because I didn’t know what it looked like. For example, do I want to use the draft or high quality score, or the graphic or dark graphic engrave?
So I whipped up this SVG file to make sample chips to reference. Each section is split into two parts to show the two options. There are a lot of different colors/layers because there are a lot of different settings. I cut these out before the newest settings, but the picture can help give you an idea of what to expect.
You will have to go through and set each one to the desired setting in the GFUI. The outside cut is a different color so that it is last.
For UnScore, I set the focus for that color/layer at 0.4". It is an unfocused vector score to see if a slightly fatter line will work well on a specific material.
I posted a couple of calibration templates I use. I looked at the Thingiverse ones and made my own instead. You have 4 control parameters (5 if you count # of passes) you can change for engraves (more really when you get to bitmaps with the various rendering options). The Thingiverse one is letting you vary power and that’s it. It doesn’t do anything about speed (it’s fixed for the sample test), LPI or focal point. For my calibrations I don’t touch the focal point (test it all “in focus”) and just vary the other 3. Since the speed scale is not linear, you can’t presume that twice as fast would be 1/2 as dark for any given test like the Thingiverse one.
Similarly did the same thing for the cut calibration template. Vary power & speed if you want to do multiples but my rule of thumb is full power and change the speed to match so that I’ll end up using the fastest speed that I can cut through something with some power factor - I want it finished faster at full power than throttle both back to take longer at some smaller power factor.
The multi-pass engraves and cuts are outside cases as is the defocused laser so I don’t create any calibration samples for those factors and just learn by doing when I’ll go lower power multi-pass or when I might want to do a defocused engrave or cut.
I do a cut and an engrave test for each material I normally use. It also gives me a way to test kerf on each as well as the boxes I use for the cut calibration are fixed sizes.
They’re out here in Made on a Glowforge or Free Designs but I can’t look for them easily with my phone. Should pop out on a search - sometime after the beginning of April and likely before June. I used @marmak3261’s color sequencing to make it easier to use them.
Thanks for mentioning about keeping the speed the same. That does make sense, especially if you are running a business and faster == earning more per piece, or charging less. Interesting to note that the latest GFUI proofgrade change (on etching, anyway) goes from full speed more/less lines per inch to half speed, double the lpi. Makes things take a lot longer to engrave, although it does help to clear the little jaggedy forest that you get on a full etch area when running at a lower lpi. Time to cut’em all again, possibly throwing your file into the mix
Based on jamely’s excellent idea and example, I created an expanded version. It’s actually only about 50% larger (50 cm x 65 cm), but it adds comparisons for the various raster settings.
I had to use the cheetah pic, because 1) it’s a challenging image with good detail, and 2) my youngest adores cheetahs.
I learned a bunch just making these, both in terms of using Inkscape and about how the Glowforge handles various Proofgrade materials.
For example, until this project I didn’t realize that the Proofgrade engrave settings sometimes – but not always – differ for vector and bitmap graphics. (E.g., “Graphic Engrave” might have a different speed/power for vector vs. bitmap, within the same Proofgrade material.)
Haven’t been motivated enough to make the Thingiverse version for all the reasons @jamesdhatch mentioned. I’d been pondering something for the new photo settings, so these are perfect! Thanks, @jamely & @jtbarrett !!!

 Good thing you can change the file for yourself and make as many Comic Papyrus examples to keep around as you like
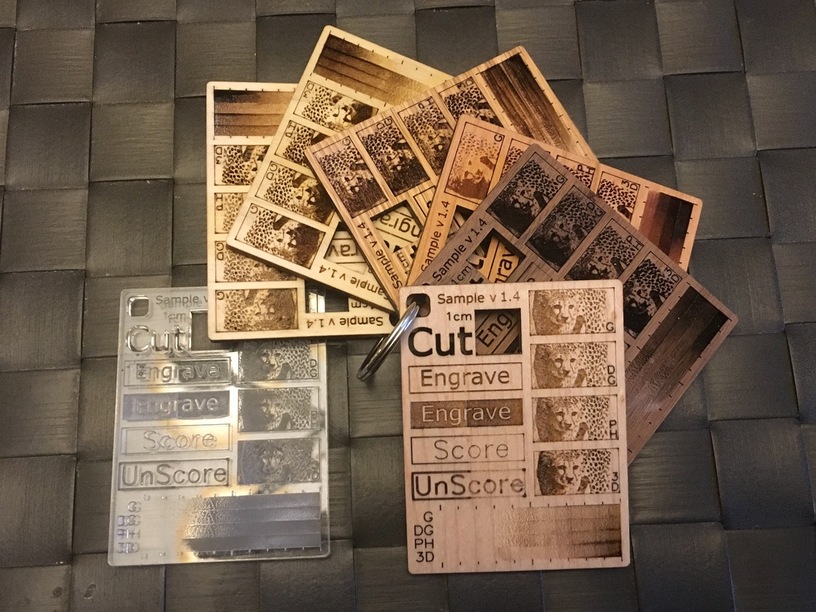

