I’m not having good results at all cutting. Can’t say the engraving has done great either.
I’ve been trying to cut project on 1/4 maple. That was not working so I went and got some Burch which is supposed to be softer.
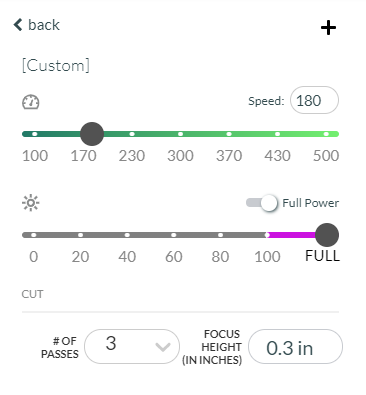
6 passes at 180 speed Full Power. Have tried Focus heights between .30 and .20 and width of custom material I set at .25. It seems that when I set material height the focus height fills in the same.
Results, after 6 passes it finally cuts through, but I’m left with a stinky charred mess.
First time posting so don’t know if this image will show.
I sent email to support this morning about my troubles. Haven’t heard back from them. How long does support usually take? Hopefully not as long as the sales side took to get back.
Any advice would be appreciated. I’ve been trying for about 3 weeks and doing test cuts over and over and have not been getting good results.
Support will need you to print the Gift of Good Measure on Proofgrade material using Proofgrade settings to evaluate the performance of your machine. In my experience, most things don’t require more than one pass, and certainly not 6. Also, the speed of 180 seems too high. Finally, you should be using set focus or entering precise measurements taken with a calipers.
Support generally can’t help people to determine what settings are to be used on non-Proofgrade materials, since they don’t have that material on hand, and there’s not the same level of uniformity in woods from other sources.
So we generally need to do a couple of simple tests to determine the best settings for each new source of material that we are trying to cut. Fortunately, that’s simple.
First thing to do is determine how thick the material is. 1/8th inch thick is considered Medium. 1/4" thick is considered Thick. (Don’t try to cut materials thicker than 1/4" until you understand what changing the speed and power does when you are cutting. Discussion on how to work with Manual Settings here.)
Once you have determined how thick the wood is, choose a similar thickness wood from the Unknown Materials dropdown list. Most people use the maple plywood settings for birch plywood, just be sure to select the correct thickness. (And if you are using hardwood instead of plywood, make sure to select the hardwood option.)
Then use those settings as a starting point. Cut a small (1 inch) square out of the material. If it cuts through completely, great, you can use those settings. If it doesn’t cut through completely, lower the speed by about 5 to 10 points and try another cut. Keep lowering the speed in small steps until it cuts all the way through in one pass. Those are the correct settings for that wood. If your design is complex, you might need to tweak it down once more (by a few points) but that should get you pretty close.
dklgood, Thanks for the reply. So, I should not set the material thickness using the “Use uncertified material” thickness setting?
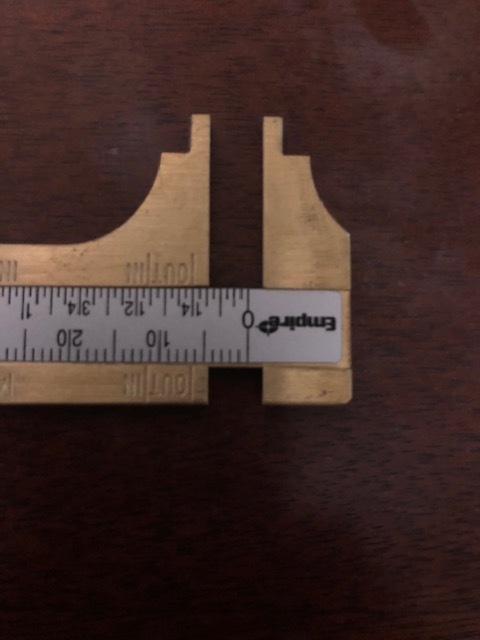
Also, I just opened my calipers. I’ve been using a tape measure, which measures exactly 1/4 inch on both sets of wood I am using. Does it seem odd that my calipers do not start at zero? In otherwords the zero is about 2 millimeters into the measurement. That gives me a reading that is 2 millimeters off. I bought these at Northern Tool Supply, so I expected they would be sufficient.
Sorry, I meant to attach the picture of the calipers. No, they are not digital. I didn’t feel like I would need to spend the extra $15 for digital, but now I’m wondering. Here is the picture of the calipers. Can you see how zero is offset? Is there a logical reason?
Go digital for laser work, it’s much more precise.
I have this cheapie HF model that works just as well as my $50 one.
And I’d rely more on set focus than entering your own material measurements unless you’re doing an intentional defocus. (I use the calipers for designing slots. )
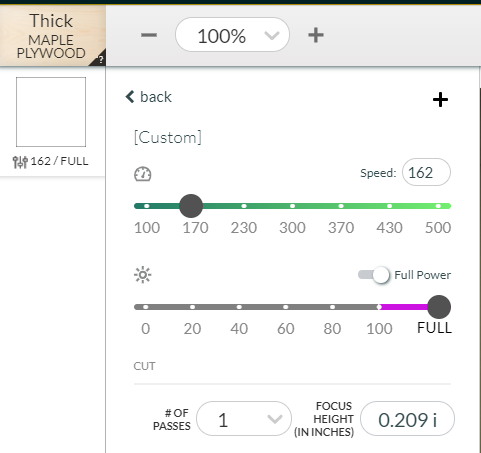
Jules, Thank you for the advice. I’m having some luck, but not all luck on your method. First I used the original wood I had which was 1/4 inch maple plywood. I selected Thick Maple Plywood and used its default setting for cut and I got a real good cut that barely went through. Dropping from 162 speed to 152 it went through better. The edges were dark, but were not charcoal like and didn’t have the awful smell. I’m confused however by Focus height .209 in when my material is .250 in. when measuring.
Now, I was under the impression that the burch plywood was softer than maple. I started again from the default settings for Thick Maple Plywood. 162 speed, dropped to 152, dropped to 142, then 132, then 122. I never got through cutting a new square each time. Then I tried changing to focus height .249 in and it still didn’t cut through and started flaming while cutting.
I have no idea what to do for the burch now, but I’m encouraged that the maple finally cut in one pass.
It sounds like the sheet of maple that you have is machined a little thicker than the Proofgrade, and that can have an effect on the settings as well. (I forgot to mention that, so my bad.)
Try setting the Focus Height in the settings to the exact thickness of the wood that you are cutting. A focal point right at the surface is going to give you the best penetration.
jbmanning, I think what you are saying makes sense. The maple finally cut pretty good on my test squares. (have not had a chance to go back to cutting my very detailed file yet, but I suspect it will have better results.) When I look at the cores of the two plywoods (maple vs. burch) , all of the layers in the maple look like solid hardwood, while the burch has every other layer that looks like a more fibrous layer. It’s hard to describe, but now I think I’ll have a better idea what to look for while at the lumber company. The person a the lumber yard suggested the particular burch because he had a customer that was using it extensively for lasering. It might be that it is working well for engraving instead of cutting. I’ll keep experimenting with it when I have time since I now have a bunch of it that cannot be used right now.
They could also be using a much stronger system. For example, the Trotec 120-watt in the shop - for 1/8”, it could care less about any voids, glue pockets, etc on Baltic birch. I don’t think I’ve seen a single miscut with it yet on that stuff; 1/4” will occasionally fail depending on what it hits; 1/2” is a PITA - if it hits a void, that cut is trash. Wood can be pretty fickle, especially when it’s plywood.
You might want to do a search on the forum for wood sources. There is a wide range when it comes to quality for plywood and you will definitely have issues trying to cut through many 1/4" plywood. Save yourself a huge headache and start with good wood. Many of us use the Columbia Forest PureBond plywood that you can order online from Home Depot but there are also many other sources of plywood that will work well. Unfortunately many (most) off the shelf 1/4 inch plywood is doomed to be more hassle than it is worth.
I see that the community has provided some good advice on the next best steps. I’m sorry to hear you are having issues with printing on non-proofgrade material.
Since this problem is being seen on materials that were purchased from another company, we can’t offer support for prints that don’t come out as expected. Materials may vary widely from piece to piece, even if they’re created by the same manufacturer. I’m going to move it to Beyond the Manual so other folks here can help. Should this happen with a print on Proofgrade materials, please open a new ticket in Problems and Support and we’ll help you right away!
Pearl, that’s perfect. I’m ordering this today. I have been ripping them down to this size myself in the garage because the lumber company would only cut to fit in truck, not to size I needed. I was looking around for some of these the other day.
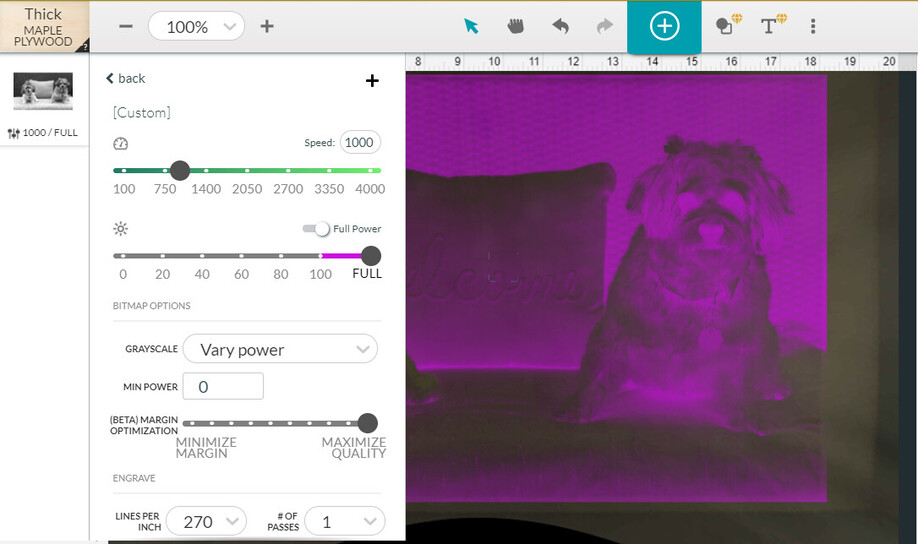
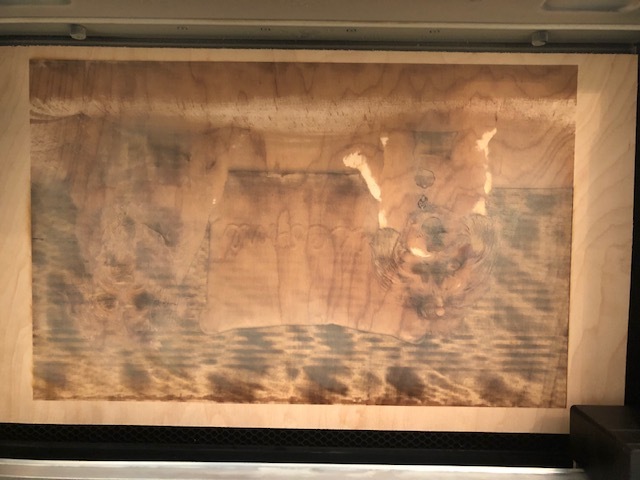
After I was able to get that good cut using the Thick Maple Plywood setting, I decided to also try a previously failed attempt at engraving a photo last night. When I added the photo, I kept everything default except I switched from draft photo (I already did a smaller draft photo that looked alright) to HD Graphic. HD Graphic was going to take 18 hours to complete, so I tried SD graphic and it was a little over 2 hours. So I let that run. It didn’t turn out well at all. Here is original photo, picture of the result and the settings that were used. When I ran it, I recall it did autofocus as my material was already in there. 1/4 maple plywood again. Any recommendations for this? The engraving seems to be a whole different beast. I’m about to start up my original cutting project as well to see if it turns out better with the advice I received last night. (Much appreciated by the way.)
I’m hoping to get this working as a Christmas present for my sister.
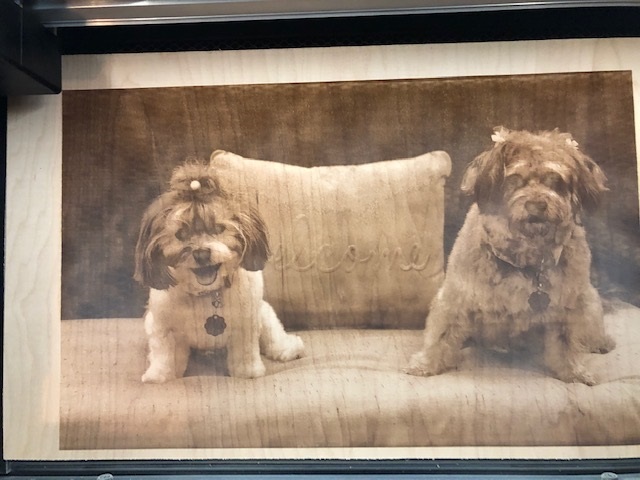
Use a convert to dots method rather than vary power. Engraving is a bit of an art, but more like witchcraft (and a ton of luck) to get the vary power engraves to work properly on a picture - since they are really intended for relief type engraves that require an actual 3D depth map (that’s flattened).
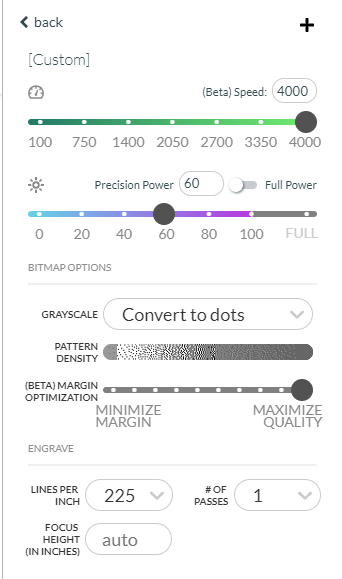
I ran this again with the setting below and I used set focus this time and changed to Convert to Dots. This looks much better, now I just need to dial it in a bit. Should I just do a second pass with the same settings to get more clarity, or try something different from scratch? This took about 2 hours and 20 minutes to run the first time. Should I be moving the Pattern Density to the right more? I’m not sure what that does. Also, I’m not sure what the difference is between auto focus and Set Focus. My suspicions are that they are the same.