Not cutting all the way through Draftboard or acrylic

I clean my lens and blow out ALL of my fans after each cut.
I am noticing tho that as of lately, Things aren’t cutting all the way through.

On acrylic, 1/8th and 1/4" I am getting a small piece at the top of each thing I cut where it is not cut all the way through and its leaving a little nub of a piece that I can break off, but it never used to do this. Sometimes the pieces are a little difficult to remove from the acrylic as well and they normally just fall out.

On draftboard I am noticing everything cut on the upper section of the board either falls right out or comes out with a slight push on the pieces, but as the cuts move towards the bottom of the sheet(towards the front of the laser), the pieces are not cutting all the way through at all. There’s faint cut lines on the back of the piece, but I cant even push the pieces out without breaking them.

I checked my laser, it is level. The honeycomb is seated properly. I’m at a loss as to what is causing this all of a sudden. Ideas?

1 Like

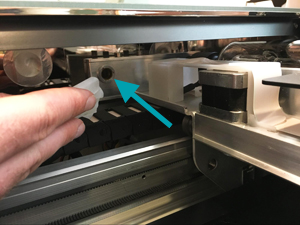
There are 5 lens areas that need to be cleaned - that loss of power in the lower area is almost always the one under the left side of the machine beyond the gantry belt. If you’re not sure what I’m describing check out the “Things that need wiping” section at support.glowforge.com :slight_smile:

4 Likes

Yes, I know how many lenses there are. As I stated, I clean ALL of them after every use because my cuts can sometimes be 6-7 hours long.

1 Like

I was looking really close at the under side of the print head tonight, could it be this lens?


It seems to be cloudy on the left side? This isn’t a piece I can take off and clean is it? Please let me know if this is maybe what is causing my issues.

Whatever it is, its on the inside of the housing.


Get Outlook for Android


Attachments

Also, these are the photos of all the lens etc that were requested via private message? Or email? However that works.


Get Outlook for Android


Attachments

1 Like

There are a few things you can do…

That can frequently happen due to natural variations in the thickness of the wood, (humidity causes the fill to swell as time goes on), or a slight warp/twist can develop in the wood. (That sheet is older, I can tell from the sticker.)

  1. Always make sure the sheet is pinned down completely flat. (That eliminates warp problems.) I use the honeycomb pins for every cut…it’s just the first step of prep.

  2. Buy one of these:

(Best $7 investment you can make for this machine. Use the pick to attempt to lift out the cuts after the first pass, and if they are still stuck, send a second pass of just the Cut. Set any Engraves to Ignore. Do not shift either the design on the screen, or move the material on the bed… It will line up exactly if you don’t move anything trying to match the screen shot. You can use a very high speed for the second cut, and it will finish the cut perfectly.)

Or you can double up some tape and try to lift the cuts out, but the tool is very handy, and you don’t wind up with tape all over the place. :grinning_face_with_smiling_eyes:

  1. For designs that have the potential to be problematic…like any designs that have tight angled direction changes (frog and lizard toes in the corners), understand that it might not cut perfectly with one pass at the default settings, and slow the cut speed down by about 5 or 10 points up front. That will probably cut all the way through in one pass. If it doesn’t, you can resend the cut after checking with the pick.

  2. Or for tight cuts that you think might be a problem, you can set up for two passes in the Settings, and save a little time. I usually don’t because it’s not always necessary.

I tend to get the incomplete cuts in the front right quad too, but I think it’s caused by a slight twist along the long axis on the material…humidity does that here. I use the tricks listed above to keep from wasting time and material, which has frankly gotten too pricey to waste.

I’ve had my machine for five years now, and I still do these preparations for every print. Completely flat is critical, but sometimes you just have to account for Mother Nature too.

As far as cleaning after every cut…that might be overkill. Cleaning has the potential to damage the machine in a multitude of ways…smearing the lens and windows, wearing off the protective coatings, getting moisture somewhere it doesn’t belong, bending the wires and causing flex stress. You can run the machine for much longer than 40 burn hours before the lenses will need to be cleaned, and much longer than that before needing to blow out the fans. Not to say that it shouldn’t be done periodically, but cleaning the lens and windows is not the answer to every problem. (It’s just one of the most common for people who never clean the lens and windows.) :grinning_face_with_smiling_eyes:

Anyway, try one or two of those tips…it might save you some material.

3 Likes

Thank you, I appreciate the tips, but they have nothing to do with the problem.

Since you’ve got that covered, all that’s left to try is for you to print the Gift of Good Measure in that quadrant on PG material using the default settings so Support can evaluate the results. (Standard test, and post pics of front and back.) They can pull the logs and see if there is anything going on with your machine.

5 Likes

Do you work for Glowforge?

If you only accept input from those who work for glowforge then you might find your creativity will be limited. These forums are a gift horse, its the readers choice to look it in the mouth. The printing the Gift of Good Measure is a really good first step and helps with getting a better idea of what is going on.

THIS!!! Soooooooo true!!! This is what often is my problem when cutting doesn’t work out. Tends to be a little bit of material stuck in the feet of where the crumb tray sits.

4 Likes

It sometimes feels that way, but not for pay.
Call it a badly misplaced love of humanity. I’m working on shedding it. :grinning_face_with_smiling_eyes:

4 Likes

Not quite. There is no photo of the lens under the left side of the machine.

2 Likes

Hi there. I’m sorry to see that you’ve run into some trouble with prints not cutting all the way through material recently. I’ll gladly work with you to get this resolved, and see that you have also received some great advice from fellow Glowforge owners already.

I was able to review the photos posted of the optical parts of your Glowforge and didn’t notice anything that could create the cut trouble you are encountering. As a next step, I’d like to go ahead and have you run our Gift of Good Measure test print. This is the best tool to help us gauge the current performance of the Glowforge under controlled conditions of the design, material and settings. Based on the results, we can decide any next best steps to help you get back up and printing.

Also, @beerfaced had a good catch by noticing there was no photo of the silver laser window on the left interior of the unit.


Feel free to send over a photo of that part along with the results of the Gift of Good Measure test print, and we can figure out the best course of action to take from there. Thank you!