Saturday night I ran my laser and after that run I tried to do another run and it gave me an orange button. It didn’t tell me what was wrong on the goowforge app and now it won’t run. The machine is a new replacement and only about 4 months old.
I haven’t heard back from Glowforge and I’m pretty frustrated here. I need both of my.machines up and running. Been with Glowforge about 4 years now. First time I’ve had this problem with nowhere to start diagnosing.
My name is Mercedes and I’m part of the Technical team here at Glowforge.
Could I have you confirm your printers serial number for me so I can extract some logs and better determine what is causing the orange light to appear?
The serial number can be found on the back of the Glowforge, printed on a sticker near the AC adapter on the right-hand side. It will look something like ABC-123-4.
Once I have this information, I’ll follow up with the next steps.
I extracted the logs from your Glowforge to investigate, and it looks like the orange button is appearing because the Glowforge is having trouble communicating with the printer head. There are two key connections I’d like you to check for me.
Could you please do the following?
Turn off your Glowforge.
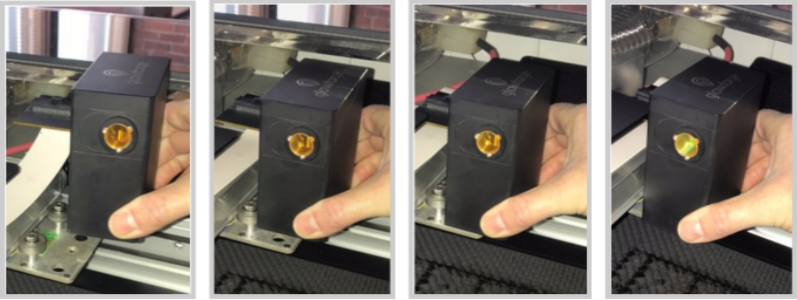
Holding only the finished black surfaces, grasp the printer head as shown. Pull gently up and back to disengage the magnets and remove the head.
There is a small tab in the center of the wire ribbon. Push down fully on the tab to release it, and gently pull the wire ribbon plug from the printer head.
Pick up the printer head and wire ribbon. Make sure the tab on the wire ribbon is facing up. Slide the ribbon back into the head until it clicks.
As shown, lower the printer head over the metal plate so that it rests next to the two round posts. Then push it gently away from you – you’ll feel a “click” as magnets pull the printer head until it sits snugly atop the metal plate.
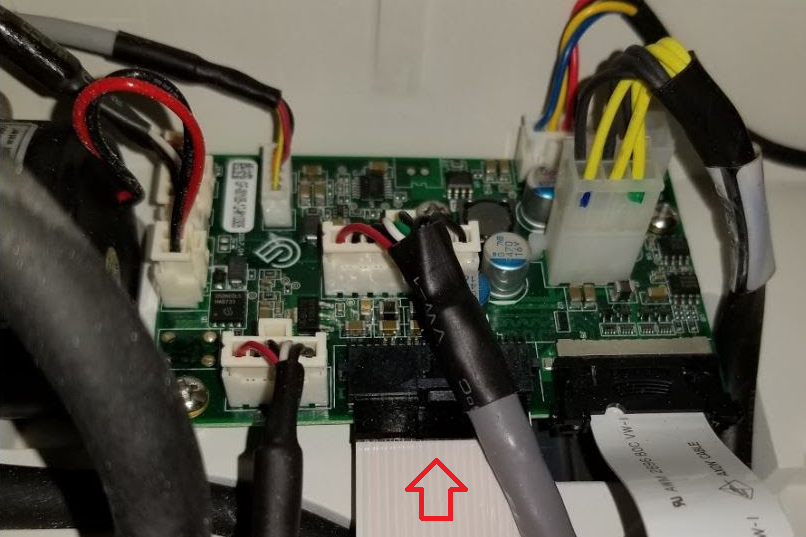
Take a photo of the circuit board. If the cable I’ve indicated above with the red arrow appears to be loose, please reconnect it and try printing again. This cable should ‘click’ back into place.
With the issue still ongoing, it’s possible that this may be an issue we can’t resolve remotely, so I’d like to move our conversation over to email so we can be ready to talk through specifics on that if necessary. Please keep an eye on your inbox, as I’ve got another item or two I’d like to check on first just to make sure we’ve covered our bases.