on my last 2 prints I have had orange light fault.
1st print failed after a few seconds with error message on dashboard of machine bumped
I turned machine off and waited 30 seconds. turned back on and was able to make the next pint
on the next print … 2nd print seemed to finish the print with out error but as printer head returned to its home spot the orange light came on and would not let me complete another print. there was no error message on the dashboard other than print failed to complete. I assume maybe able to power off and on again to clear the fault. But I dont want to add to a problem if there is one.
any help in trouble shooting would be very helpful thanks
I suggest turning the machine off and double checking that the cable to the printhead is securely seated. If it wiggles loose, you will get the orange light.
I’m sorry for the trouble you’ve run into with an orange button during and after prints. I apologize for the delay in getting to your request.
I extracted some data from your printer’s logs and see a few different errors that indicate the lid camera was having trouble taking pictures. However, I see that you have been printing successfully for a few days now. That’s great!
Could you let me know if you run into any further trouble with this, and please include the time and date (including time zone) of the trouble you experience so I can investigate further?
We are still having random issues. The latest was today at about 10:00 am central time. Print seemed to finish with our issue but orange light came on at the end. We had to turn the machine off to clear the fault then ran some test prints.
Hi @charrdtx. I’m sorry for the ongoing trouble you are having. I want to get you back to creating amazing things as quickly as possible!
I extracted the logs from your Glowforge to investigate, and it looks like the orange button is appearing because the Glowforge printer is having trouble communicating with the printer head. There are two key connections I’d like you to check for me.
Could you please do the following?
Turn off your Glowforge.
Holding only the finished black surfaces, grasp the printer head as shown. Pull gently up and back to disengage the magnets and remove the head.
There is a small tab in the center of the wire ribbon. Push down fully on the tab to release it, and gently pull the wire ribbon plug from the printer head.
Pick up the printer head and wire ribbon. Make sure the tab on the wire ribbon is facing up. Slide the ribbon back into the head until it clicks.
As shown, lower the printer head over the metal plate so that it rests next to the two round posts. Then push it gently away from you – you’ll feel a “click” as magnets pull the printer head until it sits snugly atop the metal plate.
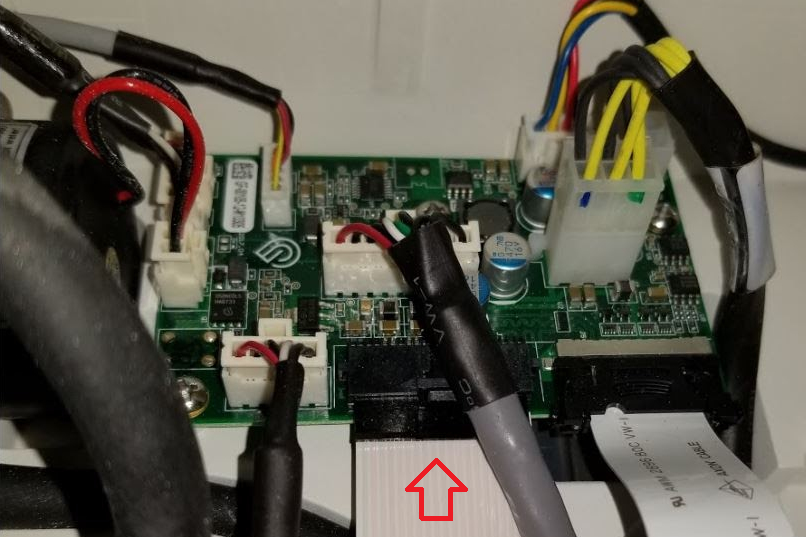
Take a photo of the circuit board. If the cable I’ve indicated above with the red arrow appears to be loose, please reconnect it and try printing again. This cable should ‘click’ back into place.
Turn your Glowforge back on.
Send us the photos you took in step 4 and step 9.
I look forward to getting these photos from you so I can investigate further and follow up with the next steps.