I love this so much and I’m definitely going to do the same when I have something with lots of small parts to build.
The 3d printer is pretty neat too, I’m eyeing that myself. ![]()
I love this so much and I’m definitely going to do the same when I have something with lots of small parts to build.
The 3d printer is pretty neat too, I’m eyeing that myself. ![]()
Completely assembled. Just so neat to see all the parts first together. First time ever handling 3D printed parts like this. The detail and precision is cool.
Downside of all black printed parts: so much harder to see all the little details during assembly. The orange would definitely be easier as a background to all the nuts and screws and zip ties. So tempted to fire it up but it’s late. I have tomorrow afternoon free for the setup and first print.
Lookin good! Can’t wait to see your prints tomorrow. 
Take the startup and calibration slow. Make sure you have the PINDA probe set correctly and that you set the Z height live. Run 4-5 prints before you let the Z height go and then you may still need to adjust it from time to time. The lights I added to mine are so you can actually see what is happening at the nozzle.
I saw that Tom Sanlanderer just posted about adding lights. Good suggestion. With the black brackets and parts, it’s hard to see anything on this. The startup and calibration will be interesting to go through. I’m so eager to get this thing going. If I can print anything like the 3D printed parts that came with the kit, I’ll be thrilled. There are so many little bits of plastic that break. I already got an order for new wheels for a baby doll buggy!
One thing to keep in mind is that video is made on a RAMPS board, not the RAMBO Mini that is shipping with the MK2S. There are no spare pins that I could find on the RAMBO. I tied directly into the power supply, pulled off two additional 12 VDC wires, and ran them into a switch box with two independent switched channels and three plugs. One of them runs to the four 3VDC LEDs that shine on the nozzle itself. The others are unused for now, but I have the idea that I would like to add a fan when I get an enclosure built and then possibly some additional lighting.
I believe Josef prints all his parts on a farm of the same machines so you should get the same print quality.
I control lights on my 3D printers with the Raspberry Pi that I use to run them with OctoPrint.
I feel like I’m doing this with some very powerful guardian angels looking out for me. Thanks for the help!
Once you get some experience, you should be able to better the quality. The Prusa parts are pretty rough, printed for strength and speed and not quality. I replaced a couple of them with parts printed on my Robox units and the quality difference is easily visible. Now that I finally have my Prusa calibrated and working right, it is putting out some really nice parts.
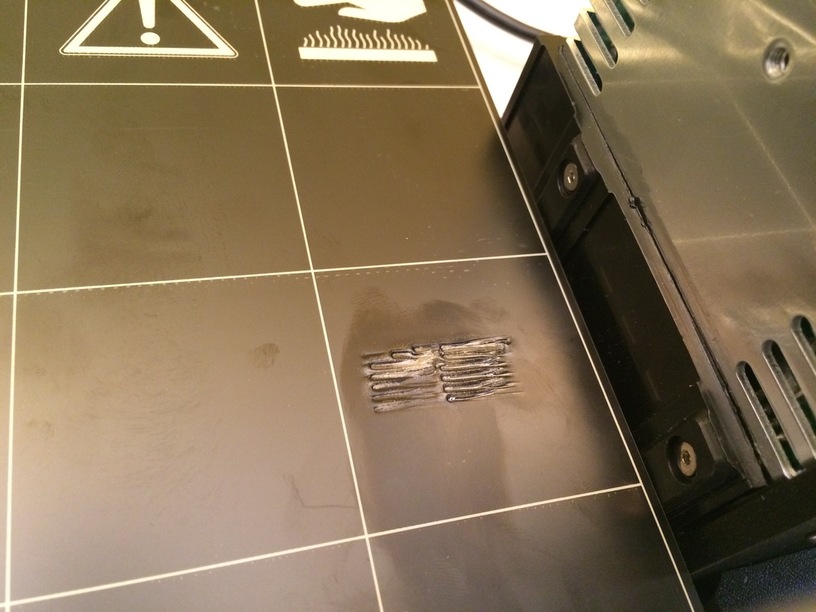
First major mistake. During the bed calibration it got stuck on one of the calibration points. It grabbed the paper and dug in. I didn’t know the fail safe and panicked until I thought to power it off so I gouged out a mess in the surface of the bed. So many warnings about this but I didn’t quite picture it. Lowered the PINDA and then it found the calibration points perfectly and no crashes.
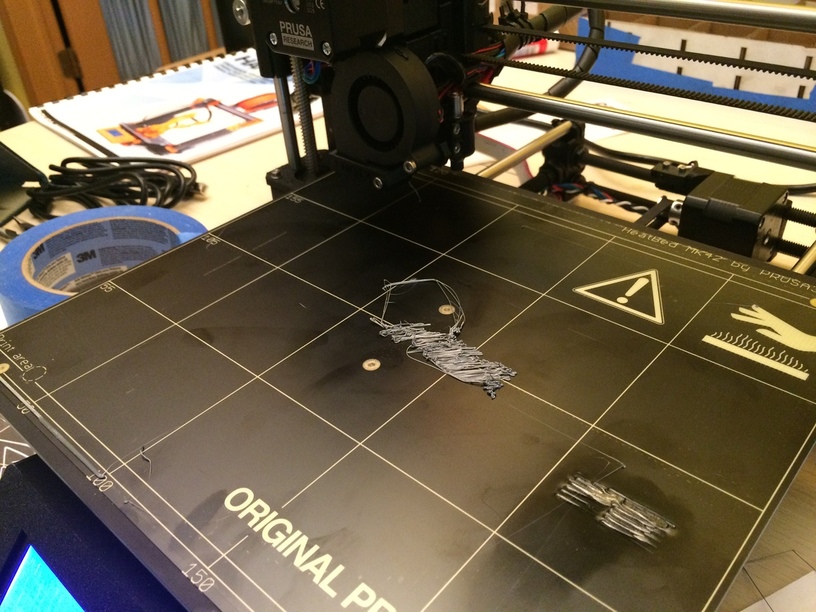
Attempt at the logo. A mess.
Trying to get the first set of thin lines in a stair step to adhere all the way. Adjusting the bed level on the left. Might be an issue with temp. I have an air conditioned vent overhead pointing down at the printer and it might be an issue of cooling off surface. It’s mainly left and front so I think I can adjust a bit. It’s getting better.
So back to the stair step and getting that uniform and sticking.
Don’t know if this will save you any time or not - but the nozzle appears to be just a little bit too far away from the bed for the first layer.
The gap between the nozzle and the bed for the first layer is critical - you want to lay down a thread that is not rounded, but is slightly squished into an oblong shape, in order to give correct adhesion to the plate and the next layer.
Your threads are rounded. And you wind up with air printing on subsequent layers as a result.
Since I have no idea how you adjust for that with that particular machine, that’s probably of limited use to you. But we are talking a very small adjustment to be made here - on the order of .02 - .04 mm. You need to get the nozzle that much closer to the bed for the first layer.
I have a spare PEI cover if you end up needing it.
Don’t bother with the stairstep, you don’t get enough time to see what is happening. Do the live Z adjust with an actual print. Start the print and drop it pretty quick as soon as you can see material coming out on the print itself. Mine ended up being something along the lines of -.750 before I was really happy with the results. You are going for a first layer that is thin and unbroken. Once you get to the thin, unbroken layer, you can adjust up and down based on your material and print.
Thanks for the feedback @Jules and @ben1. My orientation for the Z wasn’t quite set in my brain. I was thinking positive adjustments in terms of bed height. It’s negative adjustments to drop the nozzle! At least, that’s what I think you are saying. So plus increments raise the nozzle above the bed. Negative increments lower the nozzle toward the bed.
Yes, that is correct. The bed level is zero Z and up is +Z. Moving the nozzle down is a -Z movement.
I’m acquiring one of these in the near future as well. Let us know of your assembly adventures!
Finished a print. Still having an issue with getting the first layer down perfectly without anything sticking up to impede the next layer but this one went through the whole process. Seems a little squished so trying to back it up a little bit.
At least the initial calibration all went well. The only hiccup with the initial self test was the Y stop not working. I installed it upside down so the part on the bed that knocks against it was missing it. Couldn’t figure it out at first because it looked close. So that was just a couple minutes. Everything else checked out level and square. All electric connections were good to go and the controller board and LCD readout is great.
Makes me glad that the Glowforge is easy to set up.
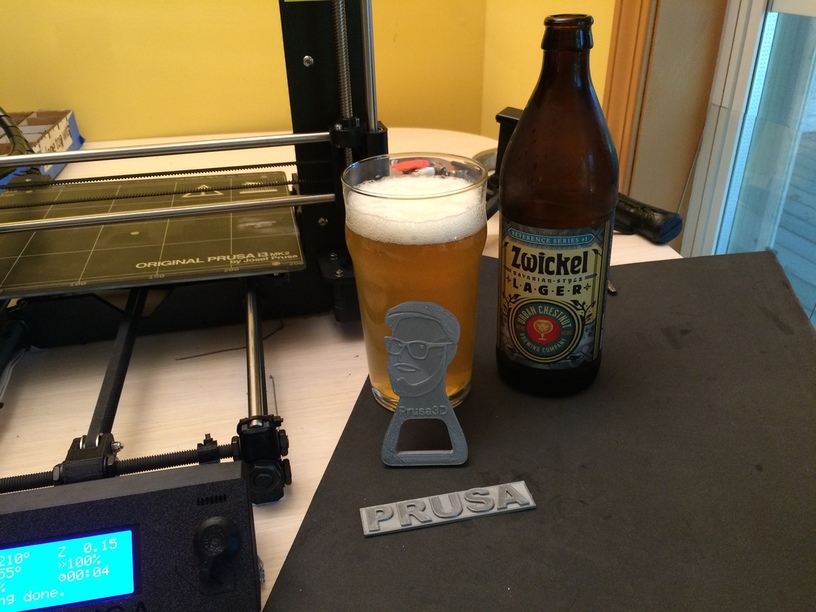
I’ve done a direct print from Windows and that worked, except still hadn’t gotten the Z dialed in. My goal is to print the bottle opener. Want to print the opener for the celebratory beer!
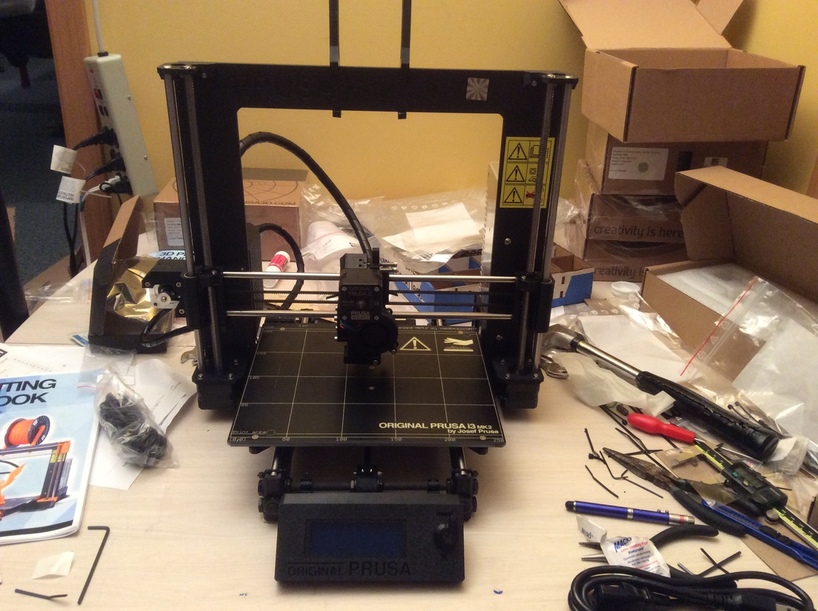
Initial feedback from the build: this is made of quality parts. It feels solid and sturdy. Everything just fits together well. The way the build instructions and kit is laid out in steps is excellent. Hardware needed is measured out, but there are spare parts as needed. I didn’t lose anything along the way and only had zip ties left over when finished.
The tools supplied are enough, but if you have some T-handled hex wrenches, that would be a plus. If you know a little about circuit boards and micro controllers, that would be helpful to feel confident that you are plugging everything into the right spots. The pictures are color coded and they match the board, so you have a good chance of getting everything in the right spot.
Biggest challenge is orientation. I would lay everything out so it looked just like the pictures. When I tried to just figure it out by looking at it, I would miss something. So that means turning things around and upside down and whatnot.
The cabling is neat and robust. There are 2.5 mm thick lengths of filament that are used for stiffeners in the cable runs and there are cable wraps. Pleased with how neat it all looks. Definitely better than most of my own homebrew concoctions.
I was a bit worried about the extruder assembly. It looks fairly complex and is something that I had no experience with. It’s got a bunch of stuff on it. I’m pretty impressed with the design. It’s compact and neat. Amazing that it has two fans, a heater, a motor, a motion probe, the nozzle, a bearing and a gear all in a package about the size of my fist. When it all comes together and the cables get wrapped it works just fine. I stuck the filament in and went through the loading routine and that worked fine right off so the feed is just works. No messing with it. Just getting that nozzle height precise.
The LCD controller board works fine. I stuck in the provided SD card and followed directions from the manual. It worked right off. Coming from the old days when there were interrupts to set and any peripheral needed lots of tweaking and setting to work, it’s nice to have software that just works.
A word about zip ties: they are an essential fastener for this project. When I first noted that as I researched the kit, I was somewhat put off by them. Zip ties are amazing little things. I wish I had them when I was growing up, but they seem to me an ad hoc solution and don’t display permanence and strength. Well, once they are are zipped up and trimmed, they look just fine and they work very well.
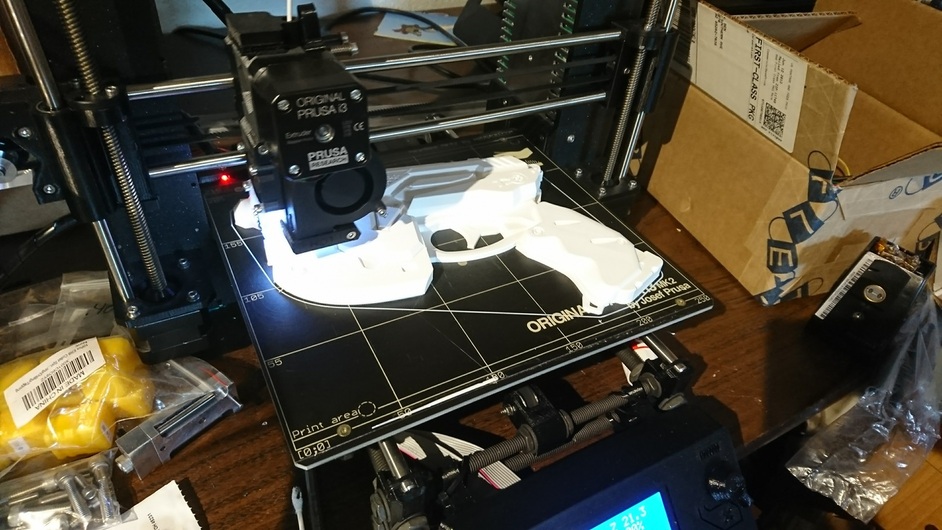
I’m printing the bottle opener at the moment and everything looks precise. Steppers, belts, pulleys and gears are doing their thing. The sounds are fascinating. An hour print. That’s a long wait for the beer!
This is one half of a project for a customer. This is currently at 28.5 hours with a predicted 1 hour remaining. The material is white nGen CO-PET from Colorfabb, printed at 100 micron layers. I had to adjust the filament cooling settings slightly to keep the quality up.
Wow. That’s looks impressive. 28 hours. Wow. Here is my first practical print. The bottle opener. Should have had a Pilsner, but only had lager on hand. I’m excited that this things works. The bottle opener works great. The print still has a little smearing on the surface. Will need to read up some more on what’s going on. The settings are just absolutely endless in terms of what you can tweak and I have no idea yet on most of what it means. Chears to Josef Prusa and all the folks making a great product and the open source community behind it all!
Smearing is usually caused by too much material or material buildup on the nozzle. Make sure your nozzle is clean. I use a q-tip with the nozzle hot. I also bought stainless low-friction nozzles since I print a lot of PET.
I just realized that I have the same mark on the right side of my bed, just not as deep. My PINDA probe was too high also. I asked Prusa where it should be and they ignored me. Oh well.
You may need to calibrate the extruder to solve the smearing.
Also, you might be interested in the Prusa Control software. It is in Beta but simplifies things.
I have their Slic3r and Pronterface. That seems to work very well. The Windows interface was less agile. I couldn’t figure out how to cancel the print. So I’m doing the Prusa stuff. Working on update my Linux server down here to have it hooked up for Octoprint, although with my laptop, it’s fairly easy to control here.
Definite plus for the Glowforge wireless setup. It really enables mobility while your are working.
I just had a garble on the tree frog front left foot. I’ll check out the extruder. I’ve been trying to clean it but not sure what clean means for it. I’ll look up extruder calibration. The bottle opener is basically fine except for some funky spots here and there with snagging. Having some success with that is nice. I was a little worried!