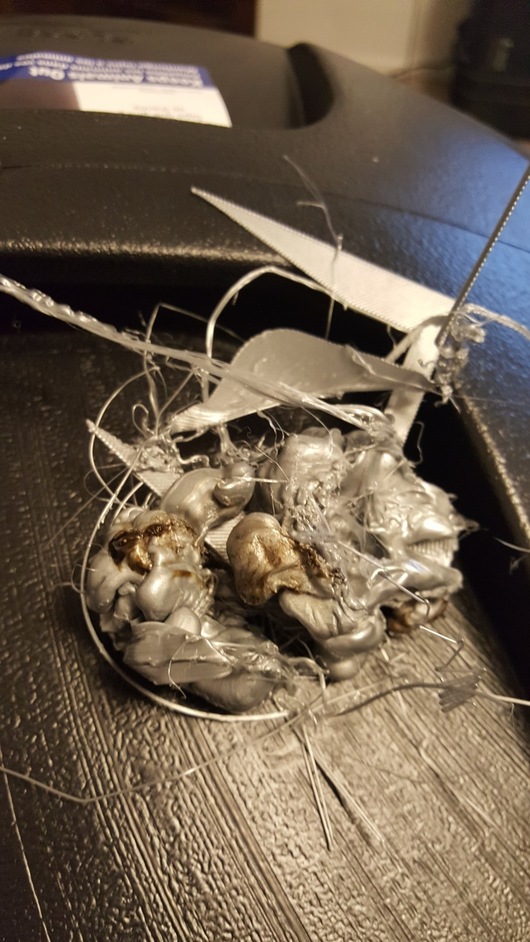
A keen observer may notice that this is not a dust boot for a Shapeoko3. I started the print, got the first layer down, then went away for a few hours to go to the gym. I came back to find that the first layer had lifted, gotten caught by the extruder, and generally kept the melted plastic from going anywhere but up and around the extruder, fusing itself to the extruder’s plastic components. In my attempts to separate the two, I broke several pieces from the extruder. I also managed to destroy the extruder thermistor.
Two weeks later I have the replacement parts from eBay ($20) and I cobble the thing back together to print. Everything is going great until I try to feed filament into the machine, and the stepper doesn’t move. Trace the problem to the stepper itself, which has come apart because I apparently skipped a step during assembly. The back pressure on the extruder pushed the stepper apart, shorting the RAMBo. $80, 45 days and some cussing later, the Prusa is back together and I’m just about ready to print.
Just as soon as I find the source of the new “Bed Thermal Runaway” error.
Yeah, but you gotta do it sometimes. If I do a full plate build for an eNable prosthetic it can take 20 or more hours. Need to sleep. It does mean I occasionally wake up to an air print but filament is cheap and I really don’t want to have to stay up all night to babysit a print
I regularly have three or four running unattended, either sleeping or even not in the house. Mine are very reliable because after every failure in the past I improved the design to fix the reason for failure. I never have things coming unstuck from the bed.
Agreed. Once my UM2 was dialed in and I fixed the extruder cooling issue (creeping heat up the stack is a killer), I became comfortable with leaving it running. There’s no way I could (would) have watched 3000+ hours of prints (so far).
For a while I used a wifi webcam to keep an eye on it and had a Belkin WeMo switch that I could use to shut it down if needed – naturally, after setting up the WeMo, it never failed again.
The WeMo, otoh, would shut off the UM2 at random times, so I threw it away (and cringe when I read about folks using them with their GF). I totally get that their experience has been better than mine, but not willing to risk it . YMMV.
I’m fessing up to leaving it running while I go to the bathroom (although I do keep a shelf of snacks within reach of the GF station ). As @dan once said, it’s my house I’ll burn down
The other lasers have pause functionality and I sometimes use that (or not - depends if I’m feeling safety minded or not). But I don’t laser stuff that’s prone to burn uncontrollably.
Hey @marmak3261, I just watched this OnShape tutorial for designing maker coins for 3D printing–thought you would enjoy. The guy uses them as swatches for the different materials he uses in his printer.
I met Angus at Maker Faire and started following him. He’s super. I think his videos pushed me over the edge to finally buy one. I’ll have to try this. Yesterday I did my fisrr design from scratch to print of my own version of a bottle opener. It turned out good except I didn’t have the text on it set up. Too fine of a font and only the larger text showed up. The body was good. Thanks for the encouragement!
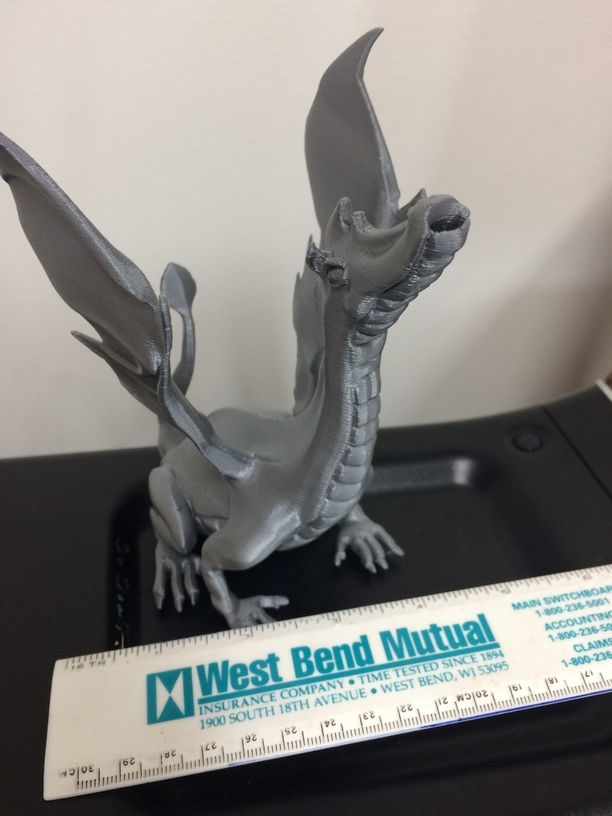
The magic continues: Here is an 8 hour print. It’s still hard to believe how this is done. The detail is extraordinary. A few stray threads and waves here and there, but fundamentally a perfect print. Imagine the technology behind this, the history of the programmers and engineers, artists and tinkerers working together to make this happen. This dragon’s name is Analinda and is one of the files included on the SD card that comes with the Prusa.
This was the first print I started and monitored from Octoprint, which I got working on my Ubuntu server last evening. The Raspberry Pi B was just a bit underpowered for what I wanted to do. So with the print server connected, that allows me to monitor the print or send the print from another device and not have to have it connected.
Still working on the webcam stream. So close, but don’t have the permissions all figured out yet. Always an adventure to load new Open Source programs (motion is the software used to serve the webcam images to a browser).
I took the print to the office today and some parishioners had their high school aged grandaughters with them. They were freaking out and so badly want a 3D printer of their own. They never get to use the one at their highschool since it is reserved for whatever else.
For the dragon, and all the others PLA. I just used whatever settings were put in the gcode file on the SD card as it was presliced. For the other prints that I did from STLs, I just used the medium settings on Prusa’s Slic3r. My own bottle opening that I did with OnShape I just exported the STL as text and then opened it in Slic3r. No fiddling with numbers.
It seems to work pretty well if put together correctly without much messing with. Granted, these are all files that have been optimized, but still. It’s not as bad as I ever thought.
Biggest issue is getting that first layer to stick. Once that is holding, I let it go and the prints finish just fine.
One thing though, don’t try t reconnect with a computer with the USB cable while a print is going on. Stopped a print doing this. And then I had to reboot my server while updating something and it totally takes over and borks whatever is going on. Will have to learn some more about this.
I too have a PRUSA. I have had great success with getting things to stick with using the ‘rough’ side of a dish sponge, with a bit of alcohol to wipe away any oils. If that doesn’t work you can ‘draw’ a copper wire brush across the surface which puts micro-scratches and makes for a great stick…try the sponge first.
I have had two PINDA probes and both of them are effected by heat. If you calibrate your unit when its cold (because you have to) then the probe will read higher than when its hot. Put another way, if you leave the probe over the print surface, and you pre-heat for ABS there is a good chance the nozzle with drag against your printing surface, causing damage.
To fix this I move the print table to the rear and the print head all the way to the right. the PINDA does not hang over the heating area.
BTW, you can also stop the printer by hitting the X button under the control dial. This is handy if you fear your probe is about to dig a hole through your print surface. Typically I move the paper back and forth and will kill the Z calibration if it begins to catch-drag on the paper. Its really a feeler gauge/protection against the wrong height.
Enjoy your printer, and check out the filastruder if you want to make your own filament. It has saved me quite a few $$$.
For others if you can’t quite see yourself to spending the money on a PRUSA I would suggest checking out the CR-10. Its a massive printer and can be put together in less than 30 min. I know I enjoy mine and while the print quality isn’t quite up to the PRUSA it’s half the cost.
Thanks for the advice. I roughed up the surface a little bit and have been keeping it clean between prints. I also seem to have success by doing the first layer of a small print and get everything up to consistent temp and there is less likely hood of warp caused pull away. Waking up and running downstairs to look at the dragon was like Christmas morning. I was just flabergasted by it.
Spent Wednesday and Thursday trying to get motion running and accessible from a networked device. I just kept chipping away at the configuration file on each setting and reading posts and checking the logs. Very late nights but the webcam is now streaming away and I can monitor anywhere in the house.
I’m going to have to fire up the Glowforge. I think MakForge is feeling a bit neglected.
Next issue is slicing models I download from Thingiverse. Air print spaghetti. I haven’t read any tutorials on slicing yet so it’s new. Weird though Slic3r did my own OnShape bottle opener STL perfectly and it printed. Doing the default gear box now. Printed the whistle. It’s perfect. And loud. Have to remember to pause it next time and slip a pea into the whistle for the trill. PLA tastes yucky!
The next rabbit hole for you is nozzles. I just put a 0.15 mm nozzle on mine to print some tiny little things for a customer. It took about four hours to get the settings the way I wanted them, but the detail is amazing. Now I have to figure out how to keep the print from moving during the print - it is basically a 2 mm diameter tube.
I tried to put some text on a bottle opener and it didn’t turn out well. I have to get a sense of proportion between the nozzle size and size of text possible. Downloaded a great feature script for OnShape, Surface Text. It works very well. Trying it again on a maker coin designed after Makers Muse’s tutorial.
The problem is that designing in full 3D for these shapes is totally different head space than flat surfaces on the laser bed. Need to get some lasering back in my life. I guess I can look up enclosures and use the Glowforge to make the panels.