Hi everyone,
I’ve just -finally- received my GF and managed to set it up and I’ve already printed the ruler.
I’m still struggling with all the settings though.
I want to print mostly on standard copy paper and very tiny projects. I’ve already found some setting browsing through the forum, but I’m still afraid to try it. First of all: can I damage the tray if I use the wrong settings?!? I’ve seen I need to specify the thickness of the paper. uhm, I have NO idea how thick this is, esp. not in inch (Germany uses meter).
Holding down with magnets: are the magnetic waves able to damage anything if the magnet is too strong? Or do you use a cutting board underneath and the paper somehow glued to it?
And the next thing is, I wanted to upload a PDF file of tiny leaves. Every time I try, they say “sorry not working”. Is there a general restriction to pdf files? I thought I’d upload my image and well, print? I’ve made the design in a program (Vectorworks) not able to export in .svg files. Any other ideas?
REALLY missing a regular Manual!
Guess these questions were asked 100times before, but I’m really stuck atm and frustrated…
Paper is tricky for a few reasons. First things first, for help with stuff like this a sample file really assists us in offering advice. That being said here are some general tips:
Be careful of flare ups on very intricate cuts with paper.
Tiny pieces can blow around with the air assist, some people advocate using a sticky mat to hold your paper in place.
Thickness of standard copier is nearly zero. 0.01” is fine.
Sorry about the lack of metric support. As an American, I feel as though I can sincerely offer that apology
Google is your friend for converting, try searching for “.1 mm in in”. It’s a really great unit converter.
Settings are tricky because paper varies so much. Generally you should test and write down your settings. Searching “paper settings” in the forum will give you lots of starting points. Be aware that if someone says “full power”, it is important to know if that’s pro or basic. 0-100 power should be the same on both.
Beware that paper is particularly prone to overburn on corners. There are threads on this too, try searching “paper corners”.
Hmm not sure what more to tell you. Paper can be a great material to lase, it can also be frustrating. Have fun and post pics, I can’t wait to see what you make
Thanks for your replies already!
GF wants me to insert it in Inch, so if I use 0,01, that will be fine? (I’m really nervous to break sth, this is my first OWN laser, worked with usual ones at university and that was a LOT different).
Btw, I do have a GF Basic.
I won’t have the problem of pieces flying around, as the cut-outs shall not be entirely cut out but remain a little “stem” to the paper. It’s easier to paint them this way than having thousands of mini leaves flying around…
I’ve added the PDF I was trying to use earlier, maybe that’s easier to understand what I mean I’ve saved it again with a resolution of 600 dpi (I usually have 1200dpi) and now it seemed to at least upload to the app. Might that be the problem? And can I add more leaves to the original file or is it better to copy and paste the ones I have it in the app?
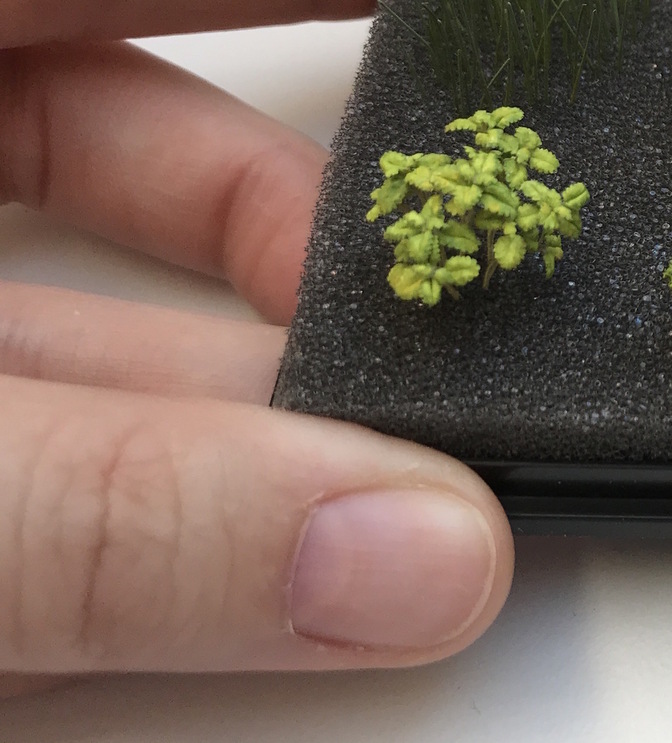
I’m a miniaturist and I want to save lots of time with the GF^^ Usually I cut every single leaf individually by hand and assemble them to a plant (In this case, it’s lemon balm, a herb). So this is what it SHOULD look like in the end
Holy teeny-tiny cuteness! That whole plant is the size of a thumbnail!
One thing to keep in mind here…you are burning the paper, not cutting it, the idea with a laser is to burn in a spot and move away from that spot quickly to keep from igniting the whole thing. And those leaves are very, very small, so they would concentrate the beam while cutting in one place…something tells me you’ll wind up with ash. And they might crumble too much at the edges for what you are doing with it.
For something that tiny, you are going to probably want to engrave through the paper rather than trying to cut it. Use a low power, high speed, and multiple passes to keep from charring it. That might work out a little better. And since those are SO tiny, make sure you account for the width of the beam. (Called kerf adjusting.)
Lol, I’ve produced lots of ash by now.
I’ve tried lots of different settings now, ending up on engraving but I still can’t capture the details… I know it’s possible to lasercut tiny leaves like these cause there are several people doing them in the “miniature world” and I was so hoping this would work out with the GF! I’m really disappointed right know, this was the main reason for me buying one in the first place I actually thought the beam would be small enough, the engravings on the ruler are kinda thinner than the ones I produce right now…
It is possible to do them, you’ll just probably need to adjust your file for it - and the people doing them in the miniature world by laser are probably doing just that.
Kerf adjusting can be very easy - which drawing program are you using?
Yikes! Okay, I’m now officially blind after trying to work that small.
I don’t know if this is going to work or not, but I’d like for you to test them a couple of ways, and if one of them works, I can tell you what you’ll need to do to your files.
Honestly, these are so small, you really should anchor them on something slightly sticky, like @jamesdhatch suggested, to keep them completely flat and stable, and get clean cuts at the edges.
I can’t test these for you, my machine is temporarily down for prints. It’s possible that changing the engraving settings, the power, or the speed will make a big difference in cutting it and keeping the detail.
I made a slight kerf adjustment to the file, simplified the excess nodes which would cause too much burning, and exaggerated the scallops.
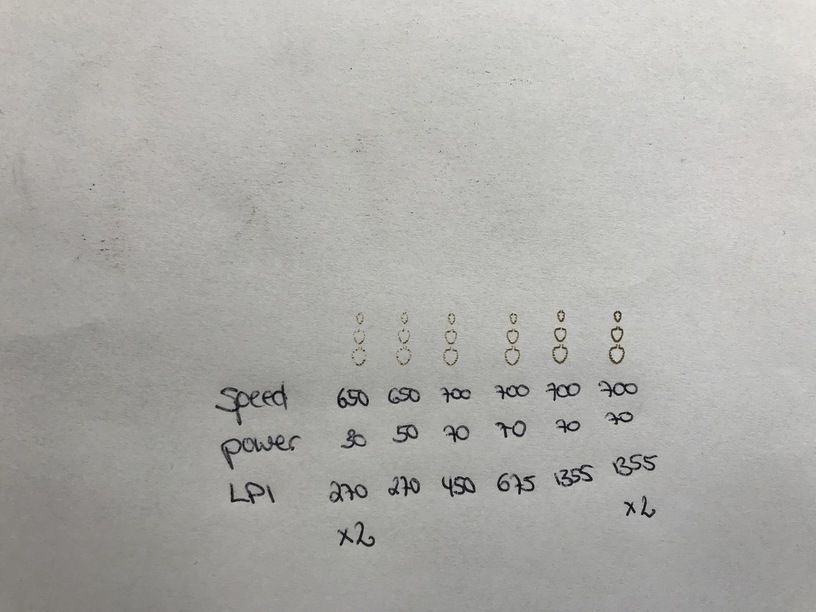
Try this one as an engrave using speed =625, power=30 and LPI =270.
Try one pass first, and if it doesn’t cut cleanly through, run another pass without moving the material at all.
Because cutting tiny stuff in paper is the main purpose for which you bought your Forge, I’m going to recommend spending a bit more money and getting a Seklema mat, which is a self-healing sticky mat specifically made for lasers. I’ve found that I get MUCH better results with paper on my Seklema than with other methods. They come in a number of sizes and can easily be cut down to fit the Forge’s bed. I bought mine here: https://www.johnsonplastics.com/seklema-12-x-24-engraving-table-hold-down-mat
AND, important tip: If you buy one from Johnson Plastics, once you order, they will not automatically send it to you! Their system has a glitch regarding this particular product, and you have to contact them and talk to a real person to remind them to send it. I learned this when my partner bought me one of these, and then I bought another for much smaller projects, and neither time did they send it without us calling them up and asking where our missing orders were. When I text chatted with them about the second missing one, their salesperson told me about the stupid glitch.
@Jules I’m working on such tiny stuff all day long
Tested some settings again with your file but need to stop now, already pretty late here and I don’t want the neighbors to complain on the first day
I used some spray adhesive to keep it flat on draftboard this time.
Best results were with highest LPI, but still the highest LPI lasered twice was not cutting through entirely, some minor nodes are still attached to each other, but can be separated without damaging them. But best would be of course if I don’t have to rework them. I’m a little afraid that if I raise the power again it will be too much… But I might try it tomorrow.
@morganstanfield This mat looks quite interesting! Do you think there’s a supplier for it in Europe? I have to check that out, maybe of a different brand…
Oh great! You can actually see the details on that. (Wasn’t sure you would be able to.)
I’ll load the other file here and you can test it tomorrow - this one will look just exactly like the other one, but you will need to Score it.
Scoring is going to be a lot quicker, but you might see some overburn in the corners of the file…I want you to see if you like it better than the engraving results.
Use these settings for scoring to start with:
Speed 400
Power 10
If it doesn’t cut completely through in one pass, increase the power. If it burns too much, increase the speed.][[[[[[[[[[[[[[[[[[[[[[[[[[[[[[[[[[[[[[[[[[[[[[[[[[[[[[[[[[=l=l=l=l=l=l=l=l=l=l=l=l=l=l=l=l=l=l=l=l=l=l=l=l=l=l=l=l=l=l=l=l=l=l=l=l=l=l=l=l.6y7u


 I actually thought the beam would be small enough, the engravings on the ruler are kinda thinner than the ones I produce right now…