Oh no, I’m sorry to hear about the trouble @stephen1.
First, I’d like to clear up a few workflow questions. There are two ways to have the printer measure the distance between the printer head and the material. You can use Set Focus to choose where the red dot lands, otherwise the autofocuser will choose a location based on where your design is placed.
When you use the Set Focus feature, that only selects the location of the measurement but has no impact on the actual measurement itself. The printer will use this measurement to set the focal height of the lens, unless the measurement is over-ridden by selecting a manual focus height at the bottom of the print step menu.
With that being said, you can absolutely run Set Focus between slice attempts, but only when the manual align option is selected. Otherwise, your Autofocuser height will be the default measurement.
Next, while reviewing the logs from your printer, I looked closely at the images being captured by your lid camera. I noticed in some of the recent Pro Passthrough prints included a section of material held down by strong magnets. Sometimes, if the magnet is too strong, it can interfere with the lens in the printer head. Could you please let me know if you notice the print slices not cutting through are the selections with the magnets?
It is very important during a Pro Passthrough print to keep the material as flat and level as possible. It may help to use alternative options to hold the material during the print such as bracing it from underneath outside of the Pro slot. It may help to use alternative options, such as hold-down pins.
To help us investigate further, could you run a standardized print for us? The design we use has some known dimensions built into it and it will help me extract logs afterward to take a closer look.
Here are the steps for the test:
Load a sheet of material into the Pro Passthrough slot and ensure that the portion sticking out of the printer is supported so the material lies flat on the crumb tray inside the printer.
Double-check that the material is completely flat against the crumb tray. A quick way to do this is to press gently on the material where it rests on the tray and feel if it moves. If not, you’re good.
It can help to use pins to hold the material flat against the tray.
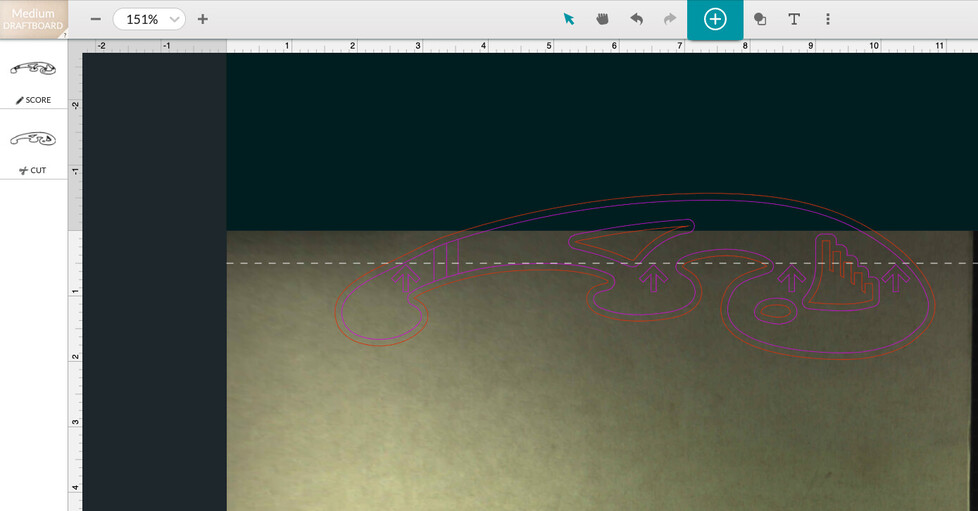
Open the Smooth Curves Stencil from your design library.
Turn on the Pro Passthrough feature in the menu bar.
Select the entire design, and arrange it so that the dotted line at the top of the work area is at the tips of the arrows in the design
Click Print and run the first section of the design.
After the first section completes, move your material through the Pro Passthrough slot so the printed area is more than 3 inches (7.62 cm) away from the front of the Glowforge.
Follow the prompts and run the 2nd portion of the test print.
Photos of the front and back of the finished print.
The date and time you ran the test along with your time zone.
A photo of the bottom of your print head showing the lens and both windows.