It looks like this question is not specific to which material or settings are being used, so I’m going to move it (back?) to problems & support. And since the team doesn’t get notified when that happens, I’ll ask someone to take a look.
Oh no, I’m sorry to hear about the trouble @stephen1.
First, I’d like to clear up a few workflow questions. There are two ways to have the printer measure the distance between the printer head and the material. You can use Set Focus to choose where the red dot lands, otherwise the autofocuser will choose a location based on where your design is placed.
When you use the Set Focus feature, that only selects the location of the measurement but has no impact on the actual measurement itself. The printer will use this measurement to set the focal height of the lens, unless the measurement is over-ridden by selecting a manual focus height at the bottom of the print step menu.
With that being said, you can absolutely run Set Focus between slice attempts, but only when the manual align option is selected. Otherwise, your Autofocuser height will be the default measurement.
Next, while reviewing the logs from your printer, I looked closely at the images being captured by your lid camera. I noticed in some of the recent Pro Passthrough prints included a section of material held down by strong magnets. Sometimes, if the magnet is too strong, it can interfere with the lens in the printer head. Could you please let me know if you notice the print slices not cutting through are the selections with the magnets?
It is very important during a Pro Passthrough print to keep the material as flat and level as possible. It may help to use alternative options to hold the material during the print such as bracing it from underneath outside of the Pro slot. It may help to use alternative options, such as hold-down pins.
To help us investigate further, could you run a standardized print for us? The design we use has some known dimensions built into it and it will help me extract logs afterward to take a closer look.
Here are the steps for the test:
Load a sheet of material into the Pro Passthrough slot and ensure that the portion sticking out of the printer is supported so the material lies flat on the crumb tray inside the printer.
Double-check that the material is completely flat against the crumb tray. A quick way to do this is to press gently on the material where it rests on the tray and feel if it moves. If not, you’re good.
It can help to use pins to hold the material flat against the tray.
Open the Smooth Curves Stencil from your design library.
Turn on the Pro Passthrough feature in the menu bar.
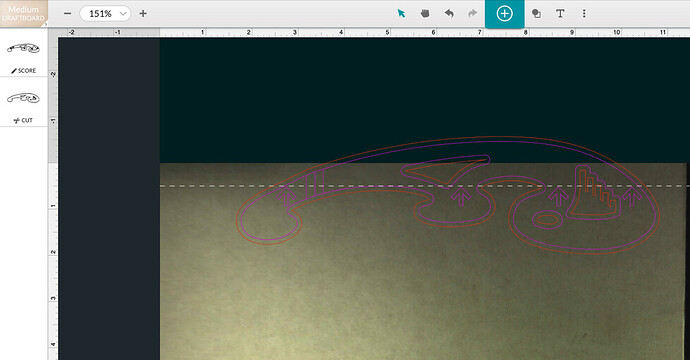
Select the entire design, and arrange it so that the dotted line at the top of the work area is at the tips of the arrows in the design
Click Print and run the first section of the design.
After the first section completes, move your material through the Pro Passthrough slot so the printed area is more than 3 inches (7.62 cm) away from the front of the Glowforge.
Follow the prompts and run the 2nd portion of the test print.
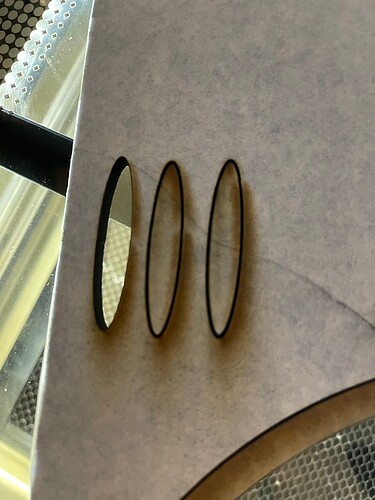
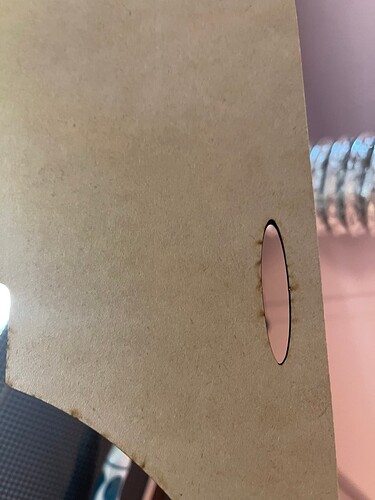
Photos of the front and back of the finished print.
The date and time you ran the test along with your time zone.
A photo of the bottom of your print head showing the lens and both windows.
So as I mentioned. I actually worked with support yesterday and with his assistance we were able to see that there was a problem based on his words not mine with the backend. The logs showed him that set focus’s measurement was somehow getting lost in between passes but only when you used a saved setting (even though that setting was set to auto). I’ve been able to cut successfully after we realized that by simply using a “manual” set of settings (not to be confused with manual focus height - that was still auto). By using manual settings but set to the same values as one of the saved cut through perfectly. Even with the same magnets. (I can understand the magnet argument but it doesn’t seem to be affecting my issue as we tested without magnets and he saw the issue- but I’ll keep that in mind when using higher material).
There should be some service ticket in your backend to review the backend issue as to why saved settings are behaving differently than when you manually enter. They said they would email once they look into it and I’ll update this when they respond.
Right now I have a workaround and it’s been working great so far. The workaround is to not used saved settings and instead just type in my values manually for the pass through run. Minor inconvenience but easy enough to do.
P.S. if you need the extra run through you mentioned even after my support chat yesterday just let me know. I’m assuming you just didn’t realize I had done tests with chat support already.
Again right now my problem seems fixed as long as I use manual settings. Even with magnets and my other process. I will try the pins again but didn’t have good luck with them before but that was a long time ago. But yes we mainly used the magnets to hold the last cut flat as the outside props weren’t 100% level with the bed. But the prints prior to using the magnets (ie steps 1 and 2 out of 3, wouldn’t cut through and step 3 is where we used the magnets mostly).
I had that issue caused by the magnets before quitting using them. The most noticeable is that if you can detect the field with a lightly held screwdriver at the height of the printhead, then every time the printhead is near, the head fan behind the gantry can no longer work. The primary result is a candle-like flame that has soot all over and will not cut near as deep. If you see soot-marks that are not pointing sharply to the front of the machine then that is diagnostic. You may also get a yellow lite and the machine stop and will not restart as long as the field is there.
As mentioned in the most recent Latest Improvements post we recently made some changes that should help with this.
I’d love if you could help me test.
Since you have manual settings that are working as you expect, I’d like you to try to re-save those as new saved settings, with a new name. That way we can isolate the older saved settings.
Please let me know what you find out, and thanks for your help!
Awesome. Do you know what date that fix was applied?
I’m away at the moment but will try later this week and update.
Rita’s post linking to it was posted Oct 14.
The latest improvements includes the notice: "Changes may take 24 hours to appear."
Awesome! Let me know what you find out.
Unfortunately it does not seem to be fixed. I tried just a few minutes ago (on Oct 19, 21 around 1:00 pm to 1:50). I tried 3 passthrough cuts - a small oval but placed high to allow passthrough. Each totally separate cuts. The first was the manual settings (127/Full/1pass/Auto), the second with my previous saved settings (called “MDF - 1/4 - GS2”), and the third I made manual settings from 127/Full/1pass/Auto, and saved them as “MDF - 1/4 - BUGFIXED”. For each I made sure to toggle a different setting first, then back to the setting I wanted (just to make sure nothing was cached), used the “Set Focus” on the area of the oval, and did the automatic pass through alignment wizard. All were set to material of Thick Draftboard (but I wasn’t using any passthrough settings, so I don’t think it matters in this case). This was a piece of the exact material that I had issue with previously, the material was completely flat, and no magnets or any other elements were used that could have affected it.
The first cut through just fine, the second and third both failed to cut. All of them should be on the same settings theoretically but are still not cutting through when using saved settings.
Below are the images of the front and back:
is the material really flat? could there be something jammed into your crumb tray that is moving the material up somehow?
Yes the material is absolutely flat. No elements are pushing it up. The issue is proven to be software not only with my results but based on backend data the support rep was able to see. It’s something with saved settings. They are still looking into it but the latest fixes don’t seem to have made a difference for this specific issue (the issue they list sounds totally different as well).
well crap. just a thought. hope it get resolved quickly
Thank you so much for running those tests.
I’ll update the investigation and let you know when I have more.
Quickly checking in to say we’re still looking into this. I’ll update this thread when I have any new information, or again next week… whichever comes first.
Thanks. The workaround is still working for now.
We’ve made an update that we believe addresses this. This should apply to all saved settings, old and new.
Can you run a test and let me know if the change has fixed this issue for you?
To be clear, this is just the issue regarding manual vs auto focus applying as expected to saved settings.
I’m still looking into the other issue you’re seeing with the apparent discrepancy between manual and autofocus settings.
Thanks again for your help investigating this!
I can confirm that my original issue is fixed by this update. I tried brand new manual setting, an old saved setting, and a new save setting. All seemed to work just fine, all cut through completely.
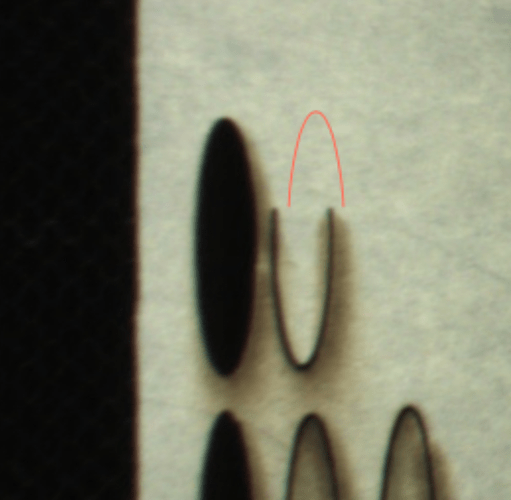
However, there is a new bug (although less concerning), the UI when going between cuts of the passthrough are mis-aligned. However, if I trust it, and continue, it cuts perfectly. So the machine is being told the right alignment, but the UI shown is off. Below is an example, but it cut just fine even though it was largely off in the UI. (Note, it originally used to show just fine and my machine doesn’t appear to be misaligned based on other recent cuts.)
Thank you for confirming that settings update worked for you!
I checked into the logs for that print, and it looks like the head was bumped between the two prints which contributed to the preview in the app being incorrect. In most cases, that would have affected the print alignment as well, but interestingly, even though the head was bumped, the print still printed with correct alignment because it was a passthrough print.
In a couple different cases, the preview in the app does not work as expected, even while the prints come out well. We’re seeing that too and we’re looking into it.
If you have other examples of the preview being in unexpected ways, I’d be happy to include them in the investigation.
Ok. I’ll try it with a new cut soon. Thanks for all the help.
This topic was automatically closed 30 days after the last reply. New replies are no longer allowed.


