Passthrough Slot Remaining Cut Trouble

Hi Everyone,
This is my first time posting, this community has been great at answer all our other questions, but I can’t seem to find an answer about a problem we are having with our Glowforge using the Passthrough slots.

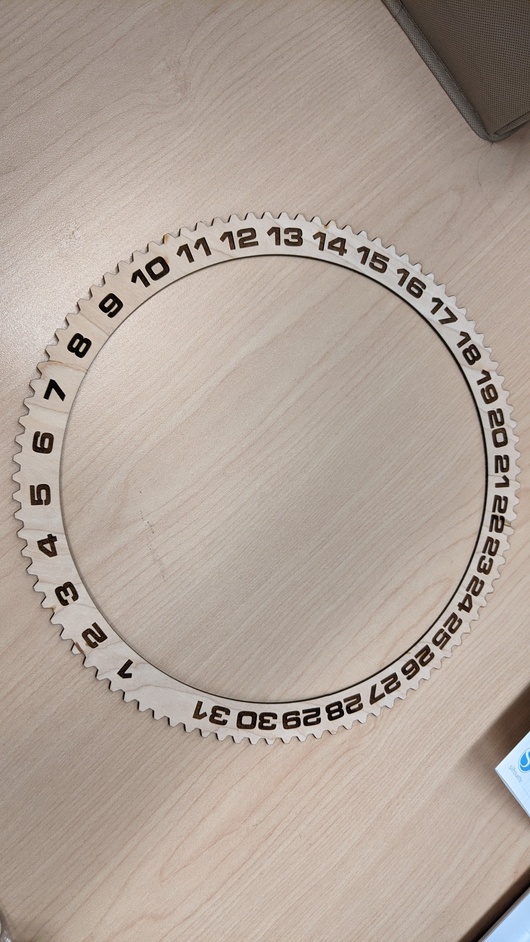
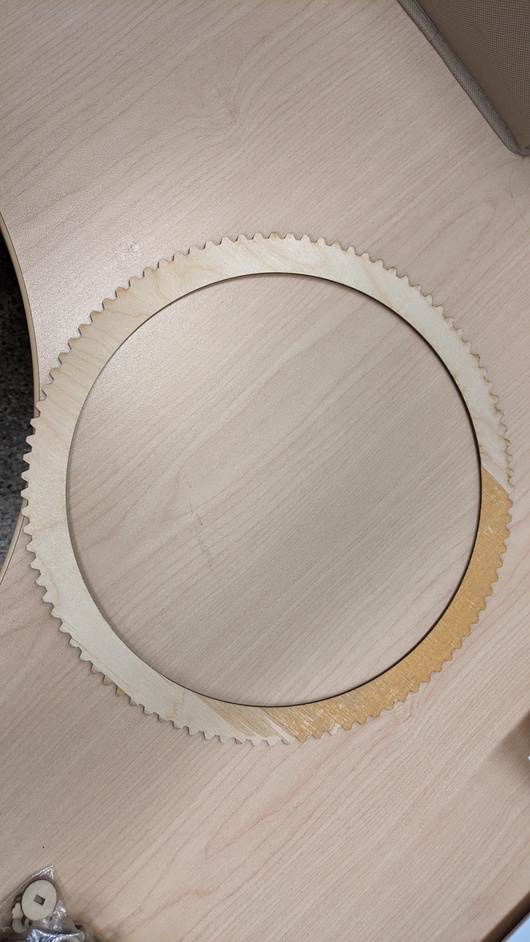
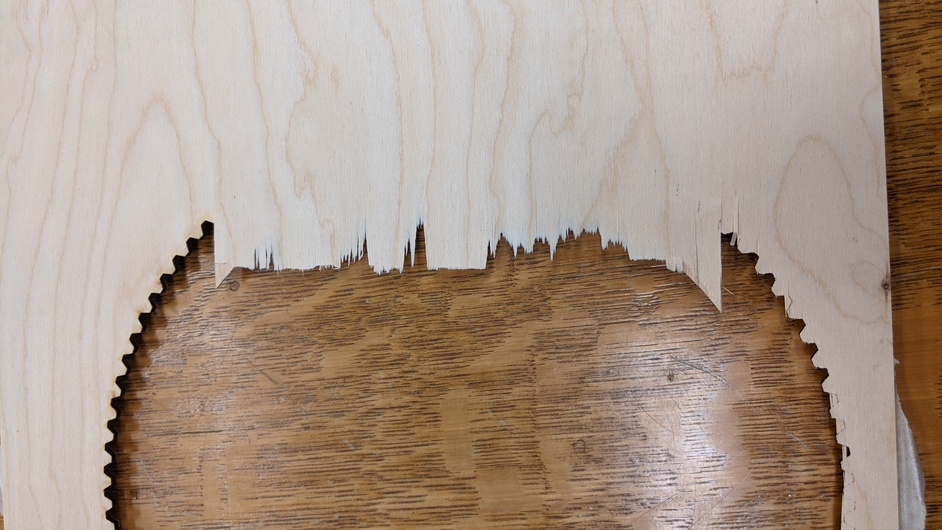
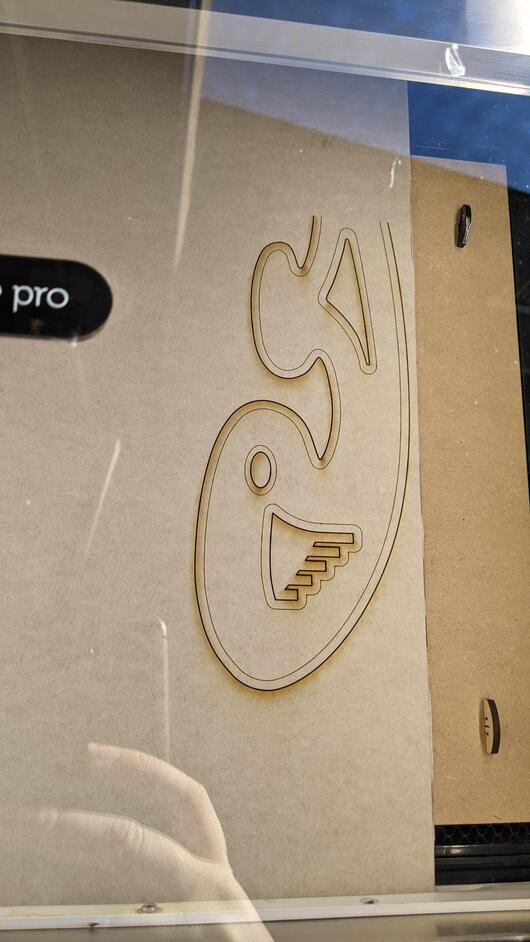
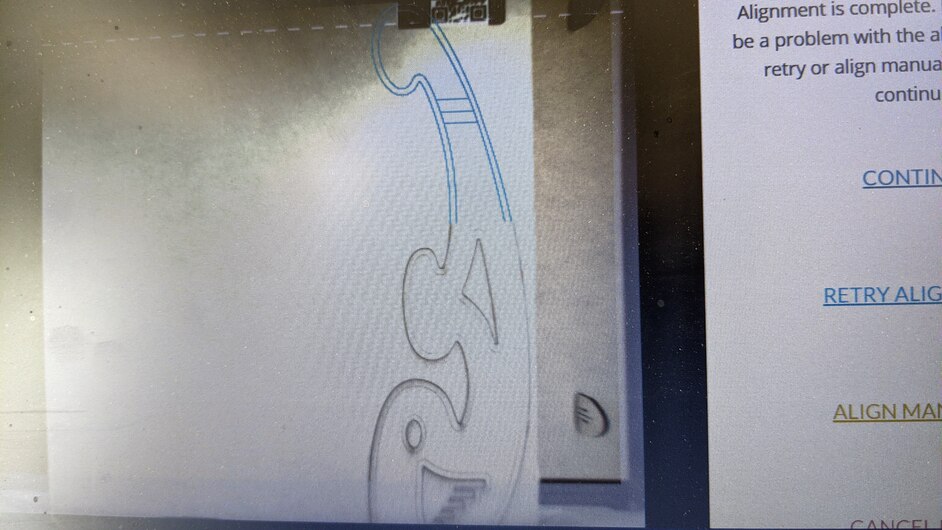
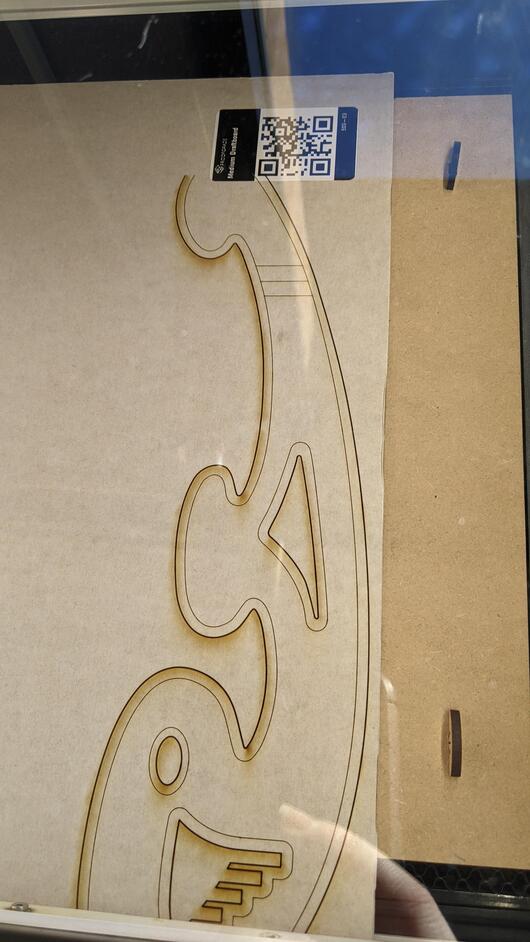
We signed up for the Beta and tested it out to create signage for our library - we discovered an issue with the second cut when the Passthrough was toggled on the dashboard - basically, when we did the “remaining cut” with the auto-align, everything looks as if it was operating normally, but when the material was pulled out of the machine, it didn’t actually cut all the way through.

We tested it several times, and it worked if we did manual alignment, but as soon as we used the auto-align, no through cuts. We tried acrylic and wood of various thicknesses, both proofgrade and wood purchased elsewhere. Everything else on the machine works fine, it cuts straight, it cuts through under any other circumstance. Looking at the community suggestions, we’ve tried all of the following:

-Shutting the machine off and restarting
-Using the passthrough slots with the “Passthrough” option untoggled
-Cleaning the lenses and the camera and inspecting for damage
-cleaning the entire inside of the Glowforge
-examining for damage - no spots on the lenses, no cracked wheels, no physical issues of any kind
-triple checked the material matched up with the correct cutting specifications

I just cannot get material to cut that second time! Even telling the Glowforge to do multiple passes. It’s fine for engraving and scoring, it just won’t cut unless we manually align, which is frustrating because the auto-align is perfect, while my manual alignment is always off. I contacted the company about the issue while it was still in Beta and was told there was nothing to do at the moment, so we stopped using the Passthrough in the meantime. I have a cool project I’d like to finish to promote Glowforge and laser cutting to patrons, but it doesn’t look fantastic with the manual alignment.

I feel like I’m missing something huge, the machine operates wonderfully otherwise. Any suggestions would be helpful! Thank you!

Oh no, I’m so sorry to hear that you’ve hit a snag.

Can you try the following troubleshooting steps and let us know how it goes?

  • Run Set Focus a few times and place the focus area on the material, so it’s not near an edge. Then watch to make sure the red dot hits the material. If the app displays an error message, please reach out to our team and let us know.
  • Ensure that, for each section of your Pro Passthrough print, your material is flat against the crumb tray inside the unit, and that any portions that stick out through the Pro Passthrough slot are supported to prevent the material from bowing.
  • If your design is very simple, such as cutting out large text or making a large, basic shape, auto alignment may improve if you draw a few symbols on your material near the areas where you plan to have Pro Passthrough split your print.
  • If your design has sections which are cut out, leave them in place when moving your material for the next print. Removing cut out sections could interfere with the auto alignment process.

If the advice above doesn’t resolve the issue, please send us the following information:

  • A copy of the design you’re trying to print
  • Photos of how your material is supported on the outside of the unit
  • Photos of how your material is set up inside the unit
  • A detailed description of the trouble you’ve run into

This information will help us to investigate the trouble you’re experiencing and follow up with next steps.

Thank you for the response! I will try those solutions ASAP, in the meantime, another staff member asked for pictures of what happened when I tried the auto-align with my print. I’ve included the pictures to see if that helps. The wood is a little warped, so we use the community created pins to help keep everything snug on the crumb tray.


This is the piece I’m trying to cut with the auto align, it’s larger than 12 inches so I’ve had to use the passthrough. It aligned perfectly and engraved nicely. It’s part of a perpetual clock design.


Unfortunately, when I pulled it out, the piece didn’t cut through, so I had to snap it from the wood.


You can see where the second cut didn’t make it through, while the first cut did. The entire top side was the remaining piece. I had to break out the gear and it splintered.

Hi @eepperson. Thank you for sending the photos of the print result that failed to cut through. To help with troubleshooting, can you send us a copy fo the design file when you update us with any results from the Jeremy’s suggestions? We can use that to review for any next best steps to get this resolved. Thank you!

Perpetualcalendar-v12lasercut.zip (7.8 MB)
Here is the zipped file with a few options - I used Illustrator to turn each piece into a separate .svg for the Glowforge since I couldn’t print it all at once. I used the clock for my latest try with the passthrough - I don’t have the original designs I tried for signage back last year when the problem initially presented itself in the Beta.

I apologize for the delay in information giving those steps a try, I can only operate the machine on a limited basis since we are a public library. I am going to try ASAP when I’m here before or after hours.

Hi @eepperson. No worries at all about the delay getting back, and completely understandable since the Glowforge is in your public library.

I reviewed the design file and didn’t notice anything that could cause any cut trouble. I reviewed everything with a Senior Technical Engineer and the most likely cause was a combo of the warped wood, as well as the Proofgrade settings being used for non-Proofgrade material.

With non-Proofgrade materials, including masking, unexpected print results can occur if there is any warp, or variances with wood grain and textures. However, I do have some suggestions that may help you get the desired print results on your material. In addition to using hold down pins, you can test manual settings with Proofgrade settings as a starting point.

To help you view the Proofgrade settings, you can do the following:

  1. Open app.glowforge.com
  2. Open a design
  3. Choose the material
  4. Click a step in the left-hand column of steps
  5. Choose Cut, Engrave or Score to determine which setting you’d like to see
  6. Then choose “Manual” and you’ll see the default settings for that operation.

Note that materials vary widely, and the settings we use for Proofgrade material might not be safe or effective for a material with a similar name.

Since we can’t support material from other manufacturers, I also suggest posting for advice in the Beyond the Manual section of our community. Note that advice in this section is unsupported and is not reviewed by Glowforge.

I’ll leave this thread open for now since you’re still working with Jeremy’s suggestions once you’re able to access your Glowforge. Thank you!

Hi @eepperson

It’s been a little while since I’ve heard back from you. I hope that’s because everything worked out! If not, just let me know and we’ll get it solved.

I apologize, I finally got a chance to try out a sample. I work at a public library so I can only run the Glowforge under certain circumstances, mainly when there aren’t patrons in the building. I’m going to try some things ASAP, I just don’t have the access to creating things as freely as I would if it was my personal laser cutter. Today was the first chance I got to try the recommended stencil, I took pictures of the process, and will include them, but it looks like a combination of too light of support and slightly warped wood was the culprit. I will give it another try on my own design. Thank you for your help!


Here is my setup, I use the smaller piece of wood to keep the other wood straight as it slides through the passthrough. I’m using Medium Draftboard Proofgrade to try out the design.


Here is the design in the dashboard


The first cut, I didn’t open the lid to move the wood, just very carefully slid it down for the next cut


Here is the alignment for the second cut, it lined up nicely.


Second cut finished, I had to do a small third cut, but I didn’t take pictures


It missed a tiny bit at the end, but it fully cut out the second time.

Thank you so much for providing these additional details! I’m glad to hear that you were able to cut through using the design we provided, and narrowed the trouble down to a material problem.

I’ve reviewed the log files from the test print you performed, and everything does appear to be working within specification. I know it can be difficult to narrow down trouble with materials that are not Proofgrade, but I’m glad you were able to complete a test print. I’ll close this thread for now, but please don’t hesitate to reach out to us directly at support@glowforge.com if you run into any more trouble. We’re here to help!