I have made the rulers proposed by takitus and by dave1 (thanks for the designs!). I found the holes in dave1’s design a wee bit small for the 3mm-diameter magnets I was using. The diameter of the holes in takitus’ rulers was perfect but the magnets slipped out when I jostled the rulers. Gluing magnets to acrylic is difficult. I’ve read that some have success with thick cyanoacrylate glue, but CA doesn’t always work. I tried Goop, which is my go-to adhesive, and made a mess, though the magnets stayed in place.
Someone suggested cutting rulers in fluorescent acrylic, which inspired me to get a small slab of green-glowing acrylic at TAP Plastics and cut a set of dave1 rulers with resized magnet holes.
After a couple of untidy gluing failures I found a simpler solution: clear tape. Scotch matte Magic Tape is not the answer – it makes the acrylic less translucent. But its glossy clear MultiTask tape holds the magnets without fogging the acrylic. I put a strip on the underside of the ruler, press the magnets in place and trim off excess tape with a razor.
For mine the majority of magnets stay in place via friction. The holes, while the same in the design don’t always cut the same so one of the magnets would fall out. I used gel consistency cyanoacrilate around the outer edges of the magnet and then slid it in from the underside. I left the masking on while doing this, but if no masking you can use acetone to clean off any spillage. (Carefully though, acetone eats acrylic if left on)
in the dropbox link I changed mine to you’ll find my updated design - will hold the 8mmx3mm magnets nice and tight, consistent every time. Your original design looks like a scan or outline/trace of some other original - mine is built from scratch as vectors so should be more consistent. I also did a set of test cuts of circles at 7.5mm to 8.1mm in 0.05mm to settle on the size of magnet holes that were tightest but also had none from my batch of magnets that failed to fit. yeah - I had a lot of free time that day.
Nope. Mine was built from scratch. The only thing I imported was the ruler marks. All the circles are 100% consistent. You can see that the measurements for the holes are exactly the same. It just so happens that sometimes during the cut it’s not 100% consistent.
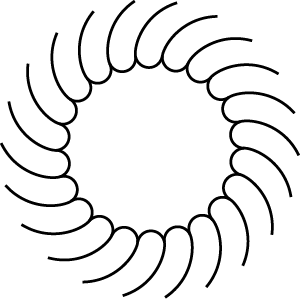
I created it with Inkscape’s clone tool, then smoothed out the 24 paths. I’ve already resized this to fit my 8mm magnets and used it on a set of rulers. The fit is quite snug yet doesn’t stress the acrylic.
Works great for me. I tried your ruler today on a small bit of scrap Baltic Birch Ply and it cut exactly where I hoped. Incidentally, I also discovered that you can copy & paste extra parts after the Magnet scan, snugging them up to the pre-existing parts, then print.
Yeah I use that quite often! I cut a lot of. If batches of things, so I often just put the alignment ruler on the corner of the material and arrange everything based on that. Sometimes the image is a 1/4” off, but I know everything is correct as long as snapmarks are working.
It’s a huge load off to know it’s just going to work
Spent the weekend helping my youngest build and test her catapult design. Pass-through plus snapmarks to the rescue! Perfect cuts of two 10x30 (outline) side plates, followed by normal cuts of struts, gears, etc.
Then to the decorations, color printed on paper, snapmark-cut to cover the curved sides and avoid gears, holes, etc, sprayed with sticky tack and pressed on. Easy, fast, and professional looking!
Edit: Hah, sorry, thought this was the general snapmark thread… Just cruising along through my stack of unreads. I’ll just leave this here anyway. Haven’t printed your universal tool yet, but I will! I’ve needed it in the past many times.


 , but I still havent heard any word about Snapmarks and my GF… im waiting patiently, nervous but patiently:wink: