Really nice. How can I also get snapmark @dan
1 Like
Dan has stated it’s outside of his control if, who, and when somebody gets the feature. There is a specific team that does all of that. They’re rolling it out slowly based on some methodology.
3 Likes
These are great! I’m starting to grow my own little collection of fiducial rulers! Haha
1 Like
Who tests Snapmark?
Short answer: we’ll roll it out gradually. Some customers may not get it for a long time based on technical considerations, and we may cancel it before everyone gets to try it.
Long answer: Each Glowforge goes through a rigorous calibration process at the factory, where we take measurements of each major sensor system. To enable Snapmark on a machine, we process the calibration data through new server software so the Snapmark measurements can be made precisely.
This process takes a long time, and some units take much longer than others. The calibration software is still being developed, and some units have noisy calibration data that won’t process without further work. Testing Snapmark will speed development of Pro Passthrough and other forthcoming vision features by providing real-world calibration data.
We’ll roll Snapmark out to the easiest devices (Basic, Plus, or Pro) first. If all goes well, we’ll add progressively harder ones over time. The full process may take weeks or months to fully deploy (we’re still learning)! We may also decide to change plans and modify or remove the feature before we roll it out, so not everyone may have a chance to test the feature.
If Snapmark had been rolled out to your machine, you’ll see this button on your toolbar:
1 Like
Ok thank you for the explanation. So I have not way to know when my glowforge pro will recieve it. What do you mean with easiest devices?
2 Likes
The ones their calibration tests before it left the factory show are easier for the Snapmark algorithms to handle successfully. The others likely need to benefit from the continued tweaking of the algorithms to handle more & more cases of base misalignment or camera skew.
I had Snapmarks on my original order not and had to have it replaced. It hasn’t come to my new unit so I’m sad but can still do what I did before Snapmarks so I’m not really out something but I did taste the chocolate once and I miss it ![]()
5 Likes
I have made the rulers proposed by takitus and by dave1 (thanks for the designs!). I found the holes in dave1’s design a wee bit small for the 3mm-diameter magnets I was using. The diameter of the holes in takitus’ rulers was perfect but the magnets slipped out when I jostled the rulers. Gluing magnets to acrylic is difficult. I’ve read that some have success with thick cyanoacrylate glue, but CA doesn’t always work. I tried Goop, which is my go-to adhesive, and made a mess, though the magnets stayed in place.
Someone suggested cutting rulers in fluorescent acrylic, which inspired me to get a small slab of green-glowing acrylic at TAP Plastics and cut a set of dave1 rulers with resized magnet holes.
After a couple of untidy gluing failures I found a simpler solution: clear tape. Scotch matte Magic Tape is not the answer – it makes the acrylic less translucent. But its glossy clear MultiTask tape holds the magnets without fogging the acrylic. I put a strip on the underside of the ruler, press the magnets in place and trim off excess tape with a razor.
4 Likes
Thanks @petej.
Really curious to hear if anyone else has a different strategy for holding the magnets in place
For mine the majority of magnets stay in place via friction. The holes, while the same in the design don’t always cut the same so one of the magnets would fall out. I used gel consistency cyanoacrilate around the outer edges of the magnet and then slid it in from the underside. I left the masking on while doing this, but if no masking you can use acetone to clean off any spillage. (Carefully though, acetone eats acrylic if left on)
10 Likes
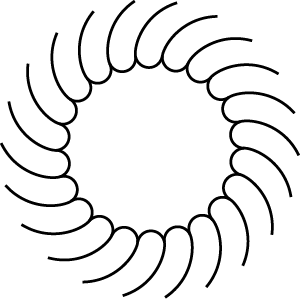
in the dropbox link I changed mine to you’ll find my updated design - will hold the 8mmx3mm magnets nice and tight, consistent every time. Your original design looks like a scan or outline/trace of some other original - mine is built from scratch as vectors so should be more consistent. I also did a set of test cuts of circles at 7.5mm to 8.1mm in 0.05mm to settle on the size of magnet holes that were tightest but also had none from my batch of magnets that failed to fit. yeah - I had a lot of free time that day. 
Nope. Mine was built from scratch. The only thing I imported was the ruler marks. All the circles are 100% consistent. You can see that the measurements for the holes are exactly the same. It just so happens that sometimes during the cut it’s not 100% consistent.
1 Like
I use this design to pressure-fit bearings into acrylic for fidget spinners - you might be able to adapt it for magnets.
41 Likes
Ah that’s a great design! I will definitely try this out! Thanks dan
1 Like
very cool. i like it.
Here is an svg file of Dan’s acrylic fidget socket Dan Acrylic Iris.svg.zip (3.8 KB)
I created it with Inkscape’s clone tool, then smoothed out the 24 paths. I’ve already resized this to fit my 8mm magnets and used it on a set of rulers. The fit is quite snug yet doesn’t stress the acrylic.
14 Likes
Ah excellent! I’ll have to check this out when I get home
Pics would make this way easier to understand…just saying.
Whatcha needs pics of? Were the ones in the original post not clear enough?
I meant of the petal design @dan posted…
Too much skipping around for me…lol. I must remember context…lol
2 Likes
Ha yeah the reply buttons get ya sometimes
1 Like