I run quite a few photo engraves through my GF. I usually have pretty good results. I went on vacation last week and since coming back, none of the photo engraves have been turning out well.
I cleaned all the lenses this morning, tried again, and the photos just aren’t coming out as before. I even tried a photo I engraved before my vacation, using my saved settings for photos, and it came out awful compared to the first time I printed it.
Have any settings changed? is my speed of 1000 the same as before. My photos are coming out WAY darker than before, so I am wondering if GF has changed what the speed/power combos are doing. is 1000sp/90power still the same as it was a week ago for a plus unit?
Here are the settings I use
Speed - 1000
Power - 90
Greyscale - dots
Pattern Density - 3-65
Margin - Max Quality
LPI - 450
Passes - 1
Focus - Auto
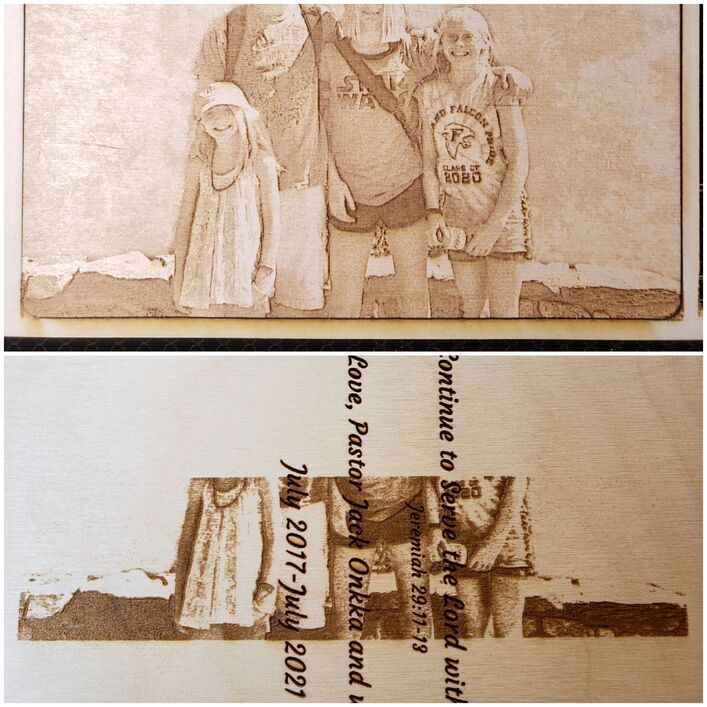
I will attach a photo with the difference between two prints, the only difference being one was done before my vacation and the other was done after I got back. Using the same image (that I edited in photoshop) and put into my inkscape template for a 5x7 photo. loaded into the webapp, used the above settings to burn.
Any help is appreciated. Currently I am running a multitude of tests with other settings trying to get good results, to no avail…
Yes - I do brush them off, but for comparisons sake, I showed an image of both of them straight off the forge, before any cleaning was done.
Same material - Baltic Birch - but not the same exact piece of wood that the original was cut from.
Based on my history, I change the Pattern Density + or - 5 points based on the editing and wood coloring for each particular piece, but the difference has never been this horrible.
I usually run a small scale test to dial in my settings (2x2in sample square from the photo) before running the full print.
I’m guessing you’re already doing this as part of your testing but my next steps would be take a small section that includes the background and run it in each of the default options - even if you “know” they’re not right.
CtD, CtP & Vary Power on each:
Draft Graphic
SD Graphic
HD Graphic
Draft Photo
HD Photo
The difference between your old and your new looks suspiciously like your min/max was seriously adjusted - that there is no grey to the left and right of the kid’s on the bottom one is pretty indicative of that.
The likelihood that your laser’s power supply has gone wonky is small, but if it has that would mean a return to the mothership and a full repair and/or replacement, so checking every other option first is definitely in your best interest.
I would also suggest running the Gift of Good Measure - because there are hundreds of photos of what that should look like and if your power is wildly strong the engraved sections will be noticeably deeper. Plus, if you finish your testing and decide you need to contact support you’ll already have the photos of the GoGM and the time you ran it noted.
Forgive me for not understanding, but what use would testing all of the default settings be when I’d have nothing to compare them to, since I never use them for anything?
I ran the gogm file on some draft board and here is the result…
So the good news is that your Glowforge is obviously working perfectly as this item cut/scored and engraved flawlessly.
Now comes the hard work of figuring out what could have gone wrong with your photo engraves. To my knowledge, nothing has changed with regard to power and speed adjustments for manual or proofgrade. Perhaps there is a focus issue or something has changed with the material?
If you have the premium subscription you could try a “past print” to see if that engraves the way you remember. Were both efforts masked before engraving or unmasked? This is, indeed, a mystery.
all were fine, until trying to raster engrave the photos.
I do not have premium, but did try loading the previously correctly printed image with the above results. I have tried multiple combinations of speed/power/density settings and nothing has come out right so far.
I have turned the laptop and GF off, unplugged and going to wait an hour or so before turning everything back on and try it all again. I have once again performed the cleaning ritual on all lenses/mirrors. I will see what happens when I test everything later.
I don’t know much, but what I do know is that at 90 power/450 LPI, I’m surprised that anything was that light before. In the past, I’ve had to drop down to 1 or 2 power at 675 LPI because of how deep it was digging above that…
Try lowering the LPI. (A lot, if you don’t want it darker and deeper.)
The Draft Photo setting gives a nice even-toned (not charred) photo engrave at 170 LPI. You’re using a High Definition LPI setting. It burns much darker and deeper.
Jules, I understand that. Those are the settings that I have used with results that I have liked. It’s just weird that they all of a sudden look different than ever before. I have found some settings that are giving me some decent results. Will have to run more prints to see if they will continue to be good enough.
So, I have been doing some testing over the weekend. I have come across an odd scenario. In the attached image, I have engraved the two photos with the exact same settings. The only difference is how I put the settings in.
For the top picture, I chose the HD Graphic preset, and changed the settings to
speed 1000
power 90
greyscale - dots
patten density - 0-85
margin - max quality
lpi - 450
passes - 1
focus - auto
For the bottom picture, I used the same settings but used my custom named saved settings.
When I choose my own saved settings, the picture comes out way different than if I adjust the settings of a GF Preset, or if I even use the manual option and enter everything for each picture I want to engrave. I have tried creating a new custom saved settings with a new name, and the image will still engrave differently (like the bottom photo in my attached image)
Is there anything that anyone can think of that would cause this to happen?
That is very odd. I would run the test again taking screenshots of the settings and noting the exact times you send the jobs as you go, and maybe try doing them in the reverse order. See if it’s a memory issue or something else!