As anyone who has etched paper knows you can only push it so far before you burn through. So what do you do, back off the power but then your image is just shades of brown. Well I wanted to come up with an easy and reliable way of getting high contrast photo engraving with paper since it’s so easily available, doesn’t really give off a smell or make smoke, and comes in a huge range of options. This has been my best result so far.
the one on the left is a normal image converted to dots and the one on the right is the one I modified in Photoshop. If anyone else has a way of getting this level of contrast on paper I’d love to hear it. I had to convert the image to halftones in Photoshop and the trick is getting the dots in the halftone to be small enough to show detail but big enough that they didn’t just make it look like a normal image. I also had to make some special paper so I could engrave through the white and show the black without engraving the black in the process.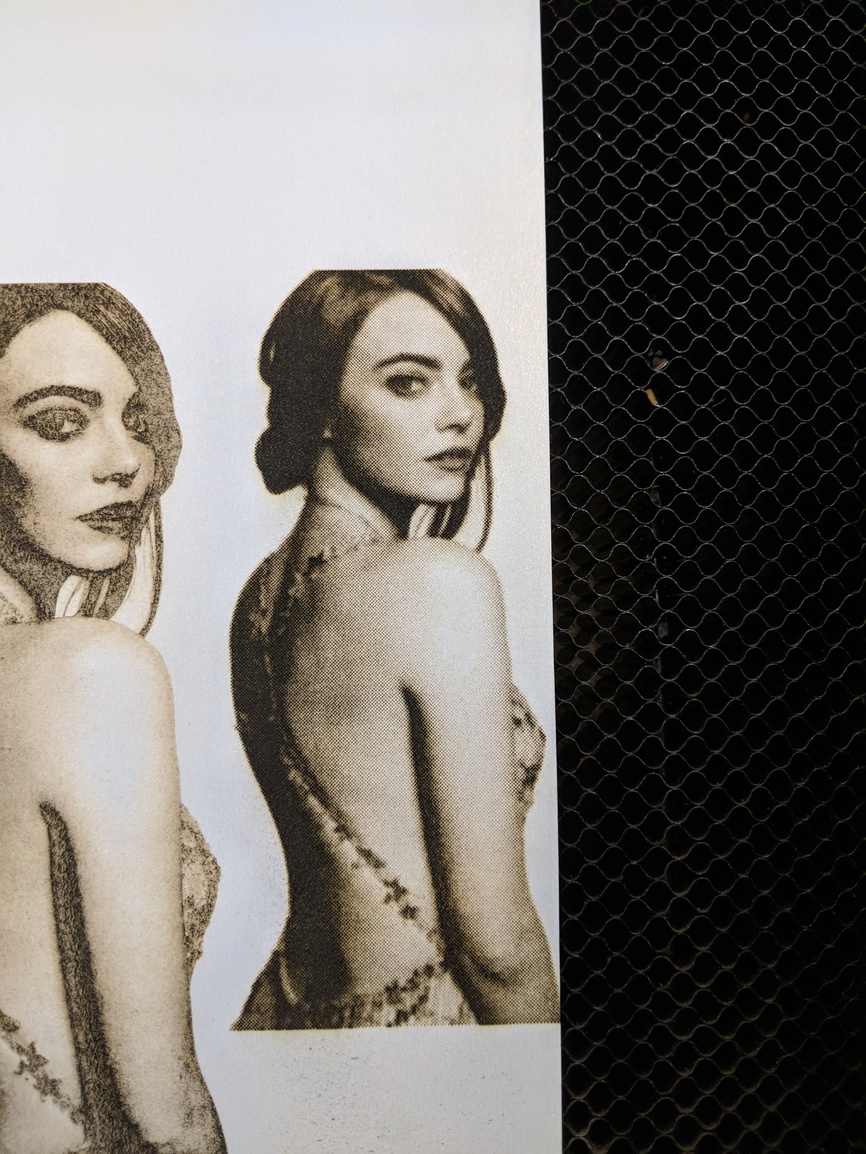
I’m just curious why you wouldn’t use a printer to print on paper.
4 Likes
Mostly the same reason artist’s draw portraits instead of printing. It’s just a different look, also this is just a precursor to some 3d paper stuff I have planned with multiple colors and tones. Also don’t have to pay for ink so that’s a plus.
7 Likes
Spending several grand to avoid a $25-50 item is not exactly a geico moment. (just joking).
I wondered the same as Chris, because to me you were going backwards.
I draw on paper, then print it on wood, plastic, whatever will burn.
In your defense → paper burns too, so…
Gorgeous! I’d love to know more about the process. As a paper crafter, I could see use cases for it.
3 Likes
The answer is always “Because I can!”.
14 Likes
Basically I just brought the image into Photoshop and in this case it was already black and white but if it wasn’t id convert it. Then up the contrast and I also used the brightness to bring the brightest highlights all the way up to white. After that I converted the image to half tones using the pixelate filter. If you want I can give the settings for that but they will depend heavily on the image size of the image being engraved. The paper I got at Michael’s it’s a bit thicker than regular printer paper but not quite construction paper.
2 Likes
i think it may be worthwhile to experiment with different papers. just like wood, papers have different composition to them. not as extreme, but there will be differences. using, say, a textured watercolor paper vs a heavy coated cardstock should give very different results.
1 Like
I agree and I plan to try out more paper types. I just had a lot of this from a different project and it turns out to work pretty well. The paper is made of two layers and I’m curious if changing the bottom layer will make any difference.
you can engrave through to the bottom layer if it’s a two-tone sheet. whether you can get a clean burn on the color below… that’s another question. i’ve cut through two-layer paper, but i haven’t tried to engrave it. maybe i should try. i have a bunch of different colors of the neenah columns duplex paper.
2 Likes
That’s what I did the top is white and bottom is black so at it’s darkest points in the engrave it let’s the black show through. The trick was getting the image to come out clean which is where converting it to halftones comes in. You can see on the left what a normal engraving on the two tone paper looks like.
2 Likes
that makes sense, especially with black. but there are duplex card stocks with lots of different color combos. i have red/white, green/white, black/white, black/tan, and probably a few more. so the thing to test is would the engrave still leave it black with char? would it show some color, but with black char mixed in? or could you get it clean enough to show color neatly (i doubt it)?
1 Like
It’s worth a shot. I don’t know how big a different it would make but I actually made this out of two different sheets spary glued together. If you see it in person the fact that it has a full papers worth of thickness to the top sheet gives the engraveing a 3d effect so I want to try more layers or paper thickness on the top layer and see how that does.
1 Like
If you’re sticking with 2-play, would it be easier to just engrave the top ply, and then adhere it to a bottom ply afterwards? Seems like it would be way less time finagling settings to get through the top ply and not impact the second ply?
It took a few trys but I got there, atleast for the paper I was using. Full speed, EXACTLY 53 power. The power is very important too low and you don’t get enough black and the image looks washed out. Too much even a little too much and it burns the black paper underneath or removes too much white too early and you loose a lot of detail in the darks. It’s basically like finding the correct exposure on a camera.
2 Likes
this could work with simple shapes. but once you have a shape inside of a shape, that doesn’t work any more. think about the letter “e”, for example.
1 Like
That’s exactly why I just glued the two pieces before hand. In a halftone image as the gradient shifts darker the dots grow bigger and more concentrated, this means that there isn’t any of the top sheet attached to anything around it which means that if the top layer didn’t have anything holding those dots in place they would just scatter or fall off the bottom layer. When I get home I’m going to set up my camera with my macro lens and take some really close up shots to help show how the halftone works. Or you could Google it.
1 Like
i would look into some of the duplexed card stocks. it’s not always easy to get small quantities, but you wouldn’t have to use adhesives and that may actually help the engraving process be cleaner.
http://glodan.com/ is a good place to find smaller quantities. you’re at the mercy of what they have in stock, but they have a lot of things that normally are only sold in press sheets (25x35 to 28x40) or are normally only sold in large quantity (or both).
1 Like
Actually that’s pretty good. I had wondered about using photoshop of the halftoning myself.
TBH I’ve never been tempted by engraving photos up because I always thought they were a poor way of showing an image, but your technique really ups the quality.
Good experimenting, I look forward to seeing some more
2 Likes
it really depends on the image and the substrate. some photos (generally high contrast with lots of good black and good white) are better than things with tons of gradient grays and/or lots of mid tones.
really good photos on the right substrate can look very cool. some of the phototile stuff has been great. that that buffalo photo someone else engraved on wood here recently was really cool, too.