thats why I do my test grayscale engraves with a masked and unmasked section 
5 Likes
I’m sorry I was right, but as you see, we’ve been there.
Just random thoughts on masking - I’m starting to get a feel for different materials requirement for masking. Specifically, it seems things that produce “sticky smoke” need it.
For example, softer woods will have a horrible residue, especially with 3d engrave (but not always, like when just cutting)…
Harder materials - harder wood, acrylic - seem to not only produce less sticky smoke, but it’s less likely to stick, or can be easily removed.
I’ve been working with some canvas, which is pre-primed for painting. The primer is effectively chalk, and although it produces a ton of smoke residue, especially when doing a deep 3d engrave. When you pull the part out, however, you can literally just blow it away.
My biggest disappointment so far was committing a whole sheet of leather to a design I thought would be amazing, but I had not tested the engrave settings because I needed the whole sheet and didn’t have other pieces to test on. The (mask on) result was exactly what I had hoped for, but when the masking was removed, the lack of detail effectively meant I’d wasted the piece.
… how emotional we get over a few $$ of material. I think for me it’s more the disappointment in myself for making such a stupid mistake.
6 Likes
So take solace in the knowledge that the more mistakes you make, the more scraps you have to let you actually test first without being worried about wasting $0.50 on “virgin” material!
5 Likes
Heh heh.
We need a ‘groan’ icon between the heart and the link.
1 Like
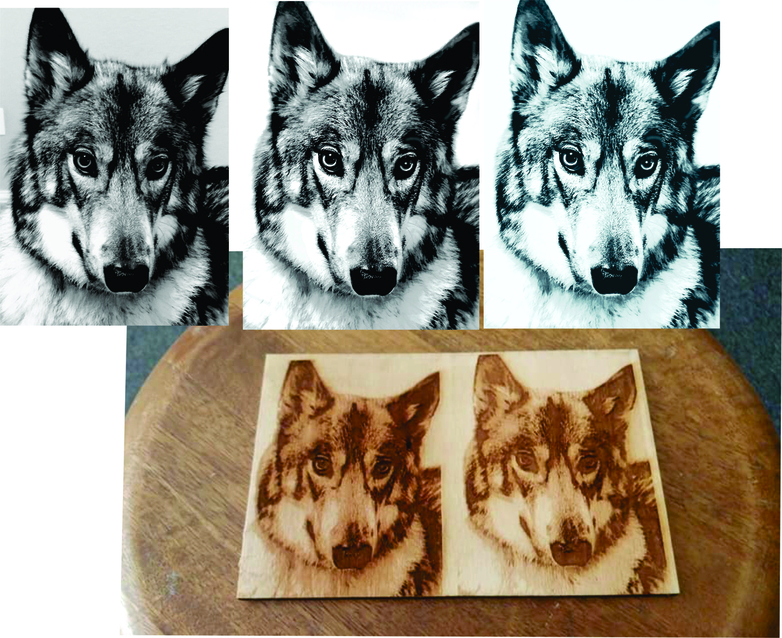
@ej.james I played around with your image a bit just to see what I could come up with. (Hope you don’t mind?) It took about 5-7 min of fiddling to get a different look than yours. (I actually like yours better, but it shows what just a little adjustment can do.) I removed that background then used a brush to selectively up the contrast then brighten and sharpen specific areas. I made a second version with less contrast and a bit lighter overall mainly becasue two of them fit the piece of scrap I had sitting around lol. I used vary power to get more of a 3D effect, but the photo/halftone setting would probably look better. No masking.
I have watched most of the videos in that list you posted at least two or three times each ![]() I found this one below especially helpful.
I found this one below especially helpful.

7 Likes
That was very good, Thanks!
1 Like
and yet some materials don’t fit that description. the south american walnut I have engraved very dark and the masking was covered in sticky residue. And it’s a fairly hard wood. you really need to test if you haven’t used it before (or don’t have good examples online to go from).
2 Likes
I think a lot of this has to do with the resin content of the wood.
And one may have to test on repeated occasions. Different batches of wood can certainly have different resin contents. Even time of year that it was harvested can make a difference.
1 Like
yup. it’s always best to do a little testing whenever possible.
3 Likes
Sorry, it was a generalization, both “will” and “it’s” should have probably been “sometimes”, my point being that you have to get a feel for what works with and without masking.
1 Like
completely agree. i always hate trying to cut or engrave the “only” piece of anything, especially if i’ve never tried it before. you never know how a material might react.
1 Like