I highly recommend the GF-provided instructions at
Especially the step-by-step for GIMP and Photoshop at the end.
I highly recommend the GF-provided instructions at
Especially the step-by-step for GIMP and Photoshop at the end.
There are a couple of very good tutorials for it in the Raster Programs Matrix. I’d give you the link, but I’m on iPhone and not very good with it. Just check the first Topic by Dan in the Tips and Tricks section of the forum, it contains all the links to the various spreadsheets for the Matrix.
Here’s the link Jules referenced…
There is software specifically for auto-processing a picture to laser engrave and it isn’t particularly cheap… so I don’t think they would sell it is it was quick to do in the programs everyone already has
The truth about engravings…
Engravings can be really subjective depending upon the audience.
Some people don’t even like laser engravings.
Some people like tons of contrast.
Some people like kind of an ethereal feel.
Some photos/images just don’t lend themselves to engraving at all.
You’ll develop a feel for what will engrave well.
You’ll also develop a feel for how to edit the photo to get the effect you want.
You’ll also develop a feel for how to adjust the settings to get the effect you want.
You’ll want to be able to identify pure white in your image; pure white will not engrave. It will be entirely skipped by the laser. I tend to take pure white out of my images* because it’s typically a blown highlight and I think it feels funny to have that raw untouched wood - especially when using proofgrade settings which are pretty aggressive on engraves (back to the high contrast, ethereal looks, etc.) * backgrounds are one thing as pure white, but, I typically just entirely erase those pixels/isolate what I want.
Oh - and before you start a full blown engrave… it’s worthwhile to just take a crop out of the image - an area of importance… or an area that has a large range of values, and just engrave that little cropped area. It will give you a good idea of how your edit is going to look, it won’t take nearly as long to render/process, etc.
I have gotten somewhat picky about photos to use.
Prime concern for me is a lack of shadow elements, especially if a face is concerned.
Frontal or side, no difference, just as long as the lighting was such that it eliminated harsh shadows across the features.
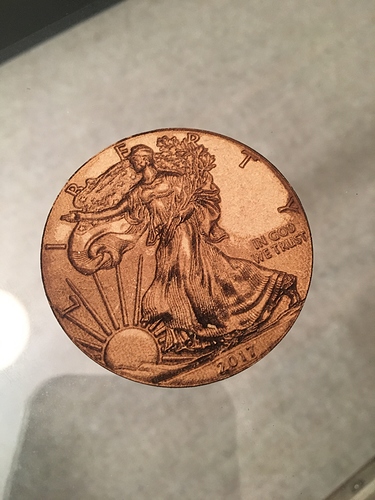
I think you got a pretty decent result actually and your pic is a good candidate for engraving. Personally, I would back of the contrast a bit as you lost some of the mid-tone greys and detail, but you are about 90% there and the effect you got is pretty cool. If you applied sharpening to you pic it would give a very different feel to the soft, ethereal look you got too.
@jbmanning5 is right though, it’s so subjective and depends on the effect you want and there’s really no right or wrong. It’s one of those things you just need to play with to get a feel for. For practice I will make several copies of the same pic and apply different effect like contrast, sharpening etc. to each one and print them out side by side. It’s a very good learning tool.
Oh yeah, don’t forget the golden rule too. Garbage in, garbage out  The quality of your image can make a big difference.
There is a setting for that. When setting up the engrave you can set the minimum cut to be zero (the default) or any other power. If the surface is polished or similar you can set that to say 5 and that will be the cut for pure white.
As noted some images do better than others. To do a deep engrave that image is a terrible choice as all the different shades represent pattern and not dimension so depth of cut can be unintelligible to the eye.
That leaves only the dot pattern density or square pattern to try and make up the gray scale in the picture and neither favors the texture of the photo.
The are many links in other discussions to web pages that helps you convert to other pattern systems, or you can use Gimp to make a bicolor of only black and white and that too works better in some designs and not others.
In the end it is what it is and the difficulties are always there for those who have yet to learn their way around the system. It is a Glowforge and not a Polaroid but even a Polaroid needs so learning and thought to get the best results. This can can be annoyance or adventure depending on how you approach anything new.
… or halftone. Or custom pattern fills. Or posterizing. Or…
There are lots of ways to go about this, engraving is maybe the biggest rabbit hole we have.
Am I really the first to have to comment on the masking?
Can’t wait to hear what he comes back with when he peels that off…
Not poking fun, ej. We’ve all been thru it. I’ve been focusing my time on other techniques but engraving is part of why I bought my GF and I’ve got a project lined up on the table now…
As stated, you will start to get a feel for what will look good - on a particular material - and then it gets easier to adjust your image.
You’ll also come to recognize images which aren’t suitable, or will be more trouble than it’s worth to mess with.
If you understand the concepts of distributing the “color” over a good range (again, for a particular material) you can quickly adjust an image using the levels/curves in that software - so I feel it’s worth spending time understanding that. I’ve got 20+ years of casual photo and video editing experience so that part is easy for me - and it’s still frustrating at times!
That’s for 3D engraves/vary-power. But it still doesn’t impact pure white (255, 255, 255). If it is pure white in a raster image, the laser is not firing. And will not fire.
Really? Huh I always assumed that meant “white is x power”. I guess it’s a masking compensator then.
I don’t use that setting, but I do put the top end of my curve just lower than white for the same reason. It makes the pure white areas look less blown out.
Curve trick used here:
Perhaps they have changed this but I’m pretty sure they haven’t.
Here are two engraves. Both were engraved with a min setting of 5; one had pure white, the other I dropped the levels down so white wasn’t pure white.
Have you done on tutorial on that JB? (And if not, why not?)