Those look amazing! Fantastic job!!!
1 Like
You have really mastered photo engraving. Could you show the PhotoShop adjusted picture that you used? 
Those turned out fantastic. Very nicely done!
Nice work on all! The high resolution makes things so much easier!
2 Likes
These are gorgeous! I guess I should spend some time figuring out settings.
All are very well done
Thank you.
2 Likes
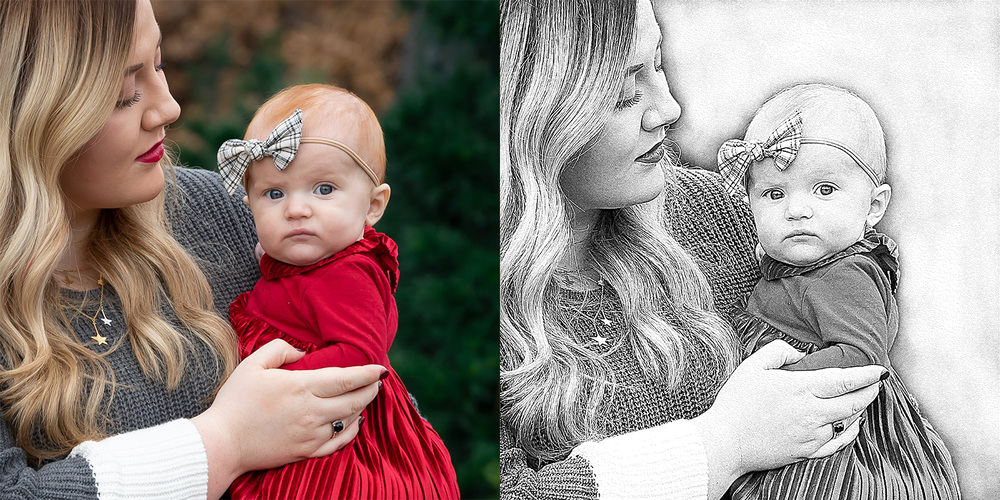
Striking. Thanks for showing the original and edited pictures side-by-side. The matching frames pull them all together!
5 Likes
That fuzzing out of the background makes a huge difference…I’m now thinking that some photos that I rejected might make a comeback!
<3
3 Likes
WOW! Thank you, Dan!!
1 Like
Yes, meant to mention this. A great job of dropping the background without a true isolation, @chrichelle.
3 Likes
Thanks for the side-by-side. I’ve been trying to wrap my head around what type of edit I’m going for. This helps a lot! And completely agree on the background.
2 Likes
This is very cool to see. For the Photoshop noobs (myself prime among them—though pretty facile with Illustrator), can you offer any summary of the tools or effects you used in Photoshop to get to this point? Techniques or steps specific only to this photo would probably be less important than general tips on the order of “try using a light pass with the ______ Effect” or “make sure to fiddle with contrast before applying _______.”
Very inspiring in any event — thanks for sharing!!
1 Like
WOW! These came out fantastic! Would you mind sharing your settings?
3 Likes
Per forum rules, non-PG settings (anything outside of standard PG settings on PG materials, or any settings on non-PG materials) were used, they can’t be discussed outside Beyond the Manual. If you head over to that section you can find a number of posts discussing engraving settings on various materials. 
2 Likes
Thank you!
2 Likes
This is the article I used to prep the photos: https://www.instructables.com/id/How-to-Laser-Engraving-Photo/
The key is removing as much of the background as you can and really playing with the brightness and contrast for the black and whites. I found that too much gray made the photos look really muddy. Hope that helps!
6 Likes
Thank you so much!
1 Like
Can you please provide what settings you used to get the quality of engraving you got?