Platform 9¾ Clock

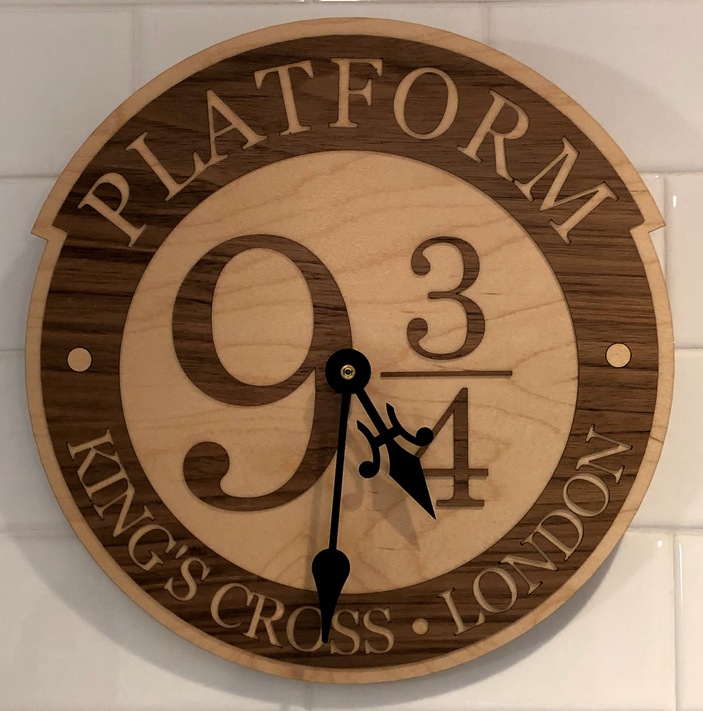
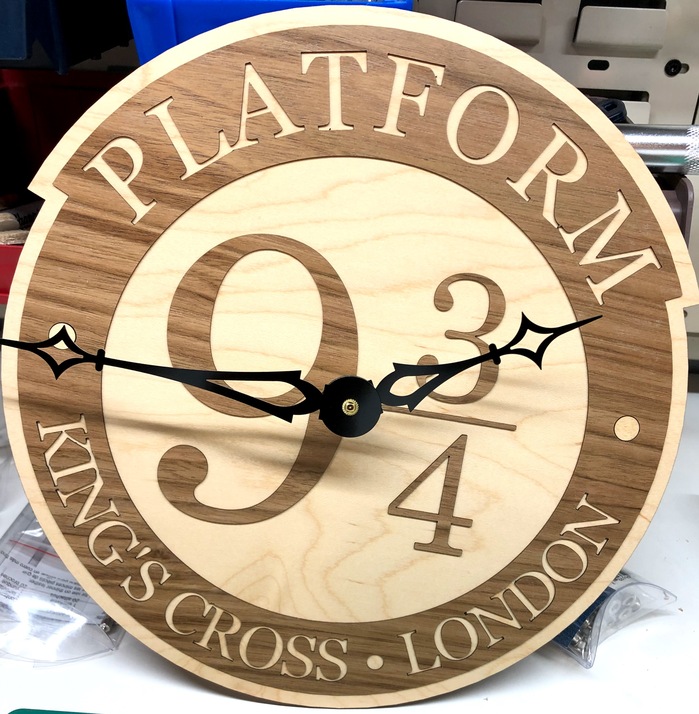
Inspired by images on Google Image search, especially this one, I decided to make my daughter a Platform 9¾ clock.

The 99% finished project:

And the SVG file (right click to save to your computer if interested):

PlatformClock-Paths

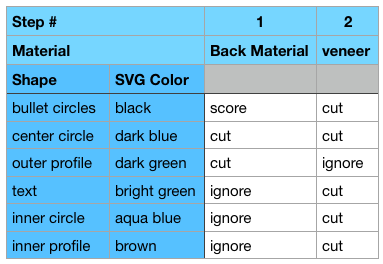
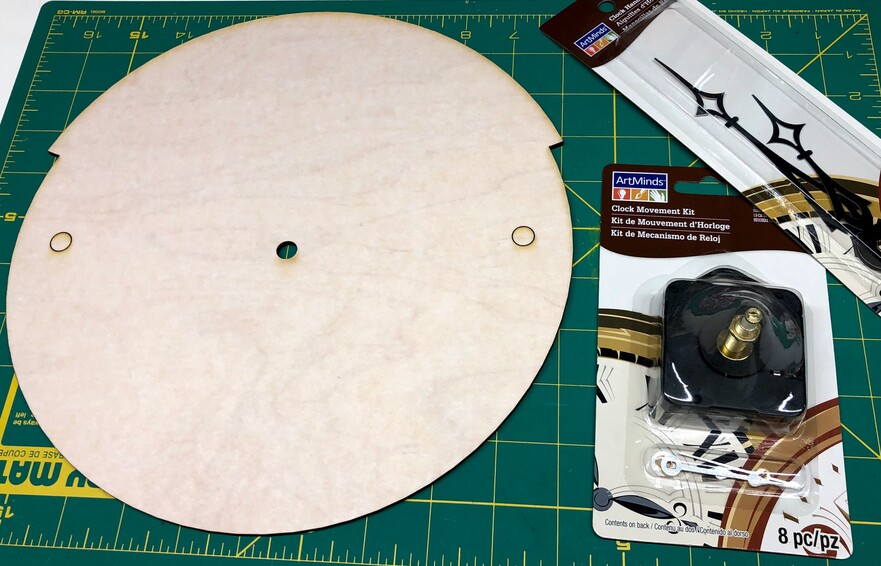
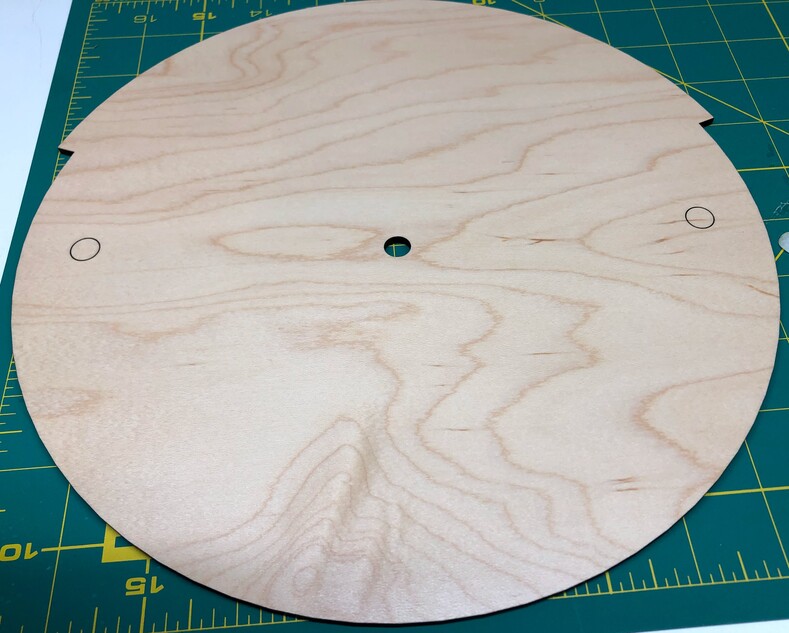
First step, I set the bullets at 9 o’clock and 3’oclock to score, and the clock movement hole and larger outline to cut to create the base of the clock, and trial fit it with the movement to ensure my hole was the right size (3/8" is the standard for the typical clock movements you find in craft shops, like this one from Michael’s):

Then I loaded up walnut veneer and used magnets to secure it directly to the honeycomb:

If I wasn’t cutting such a big thing I’d probably put magnets under too, because the honeycomb tends to burn through the backing on the veneer making it harder to weed and maybe reducing adhesion, too. But for such a large piece I was more focused on ensuring that it lay flat for the cut. I reordered the cuts so that the hole cut first, then the text, then the inner circle, then the outline, and set all other elements of the design to ‘ignore’.

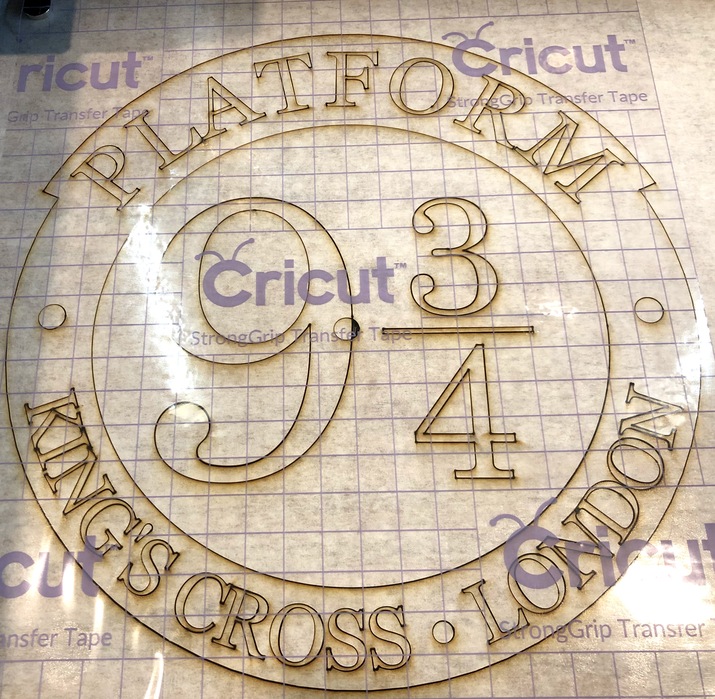
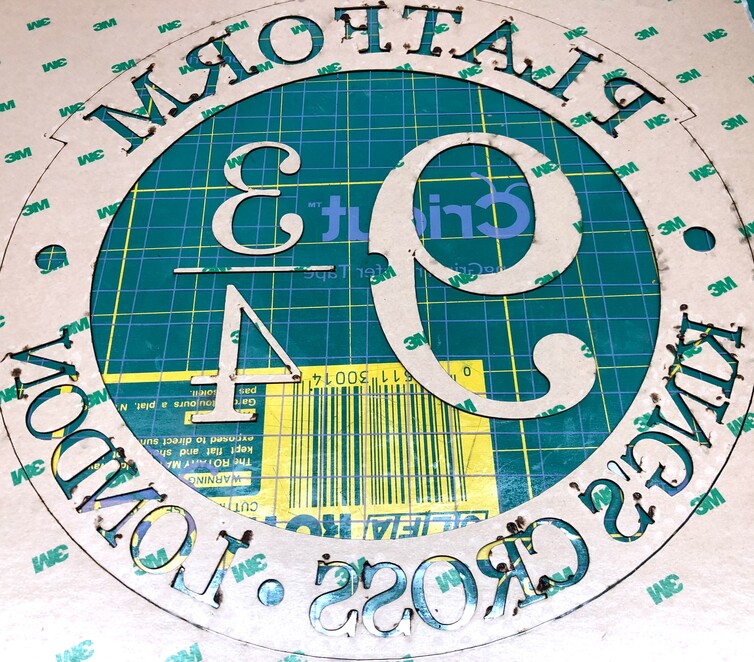
Then, I applied standard Cricut Strong transfer tape to the front of the veneer while it was still held in place by the magnets, pressing down to ensure that I would pick it all up as a unit:

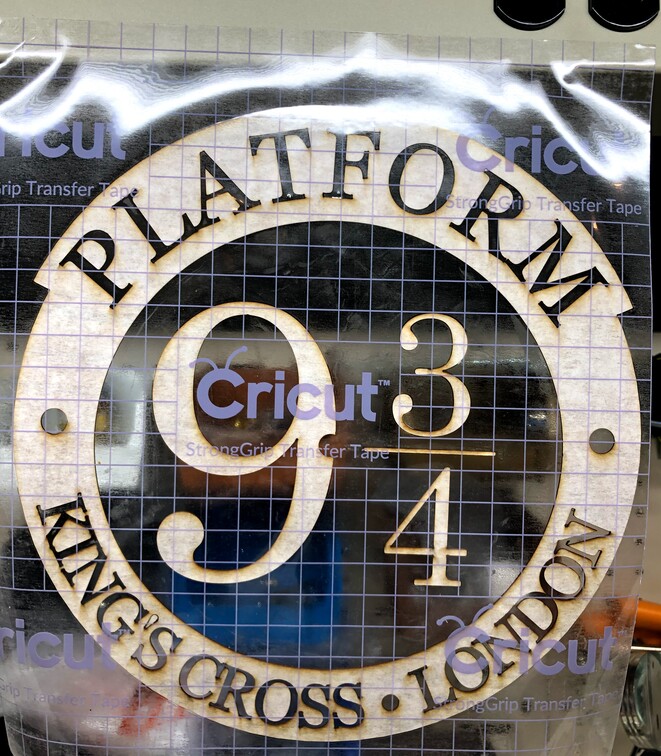
Weeding was a bit more annoying than expected. Turns out, it’s easiest to hold the piece vertical so that the natural flex of the veneer works in your favour as you extract all the fiddly letters while ensuring their holes stay in place and well adhered. I had an old plastic spudger from some touchscreen replacement project lying around that worked well to get between the veneer and the transfer tape. Two views of the weeded product:


Then, using the score marks as a guide, I secured the veneer to the project:


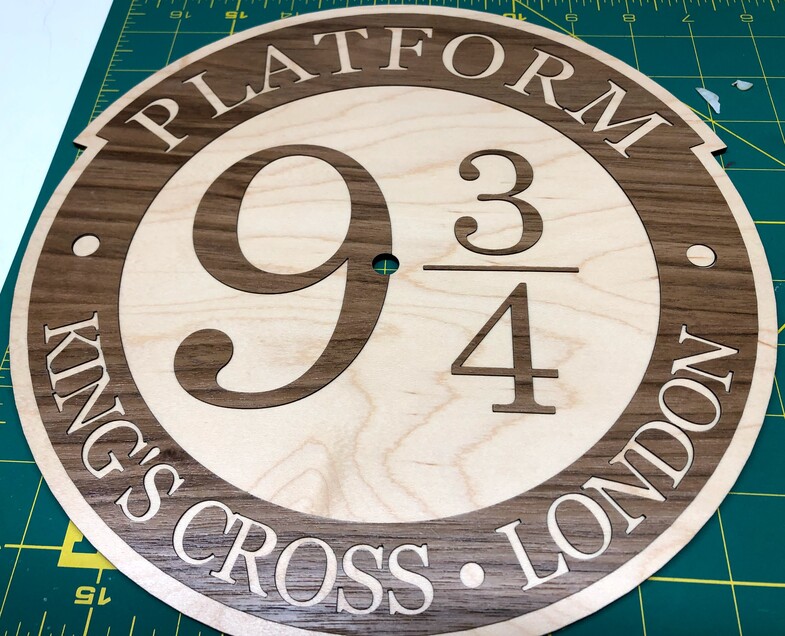
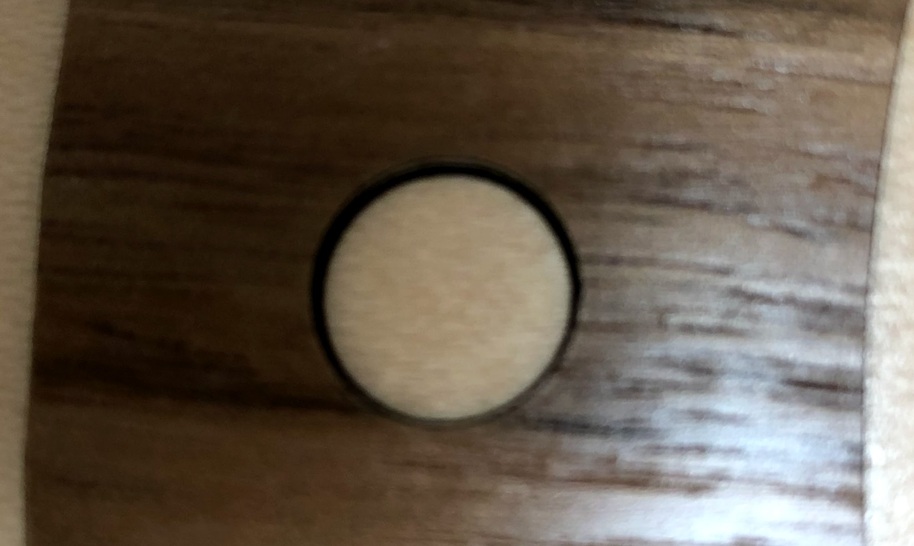
Unfortunately, while it looks OK at this angle, I only got the leftmost circle properly aligned, and the right side was off. Not by enough to matter, but by enough to make it look ugly when viewed straight on:

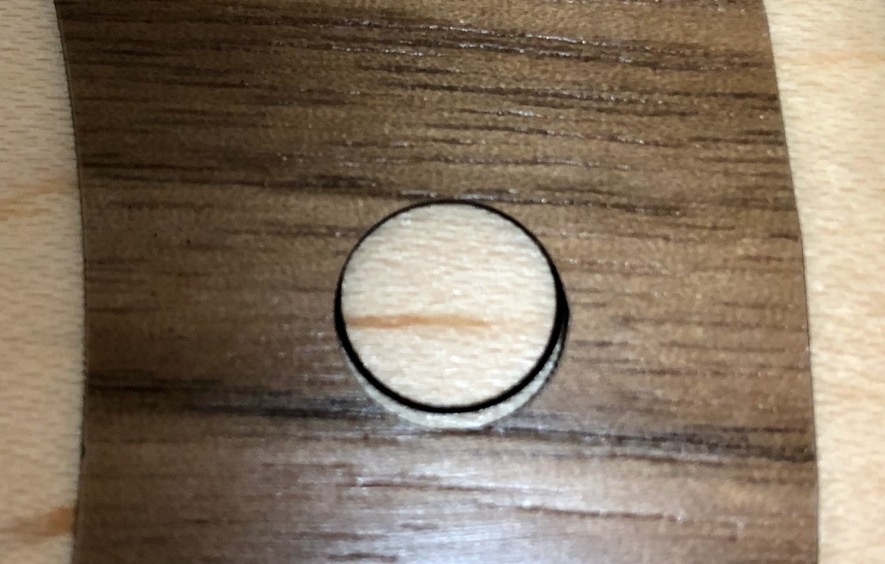
Even the aligned side is marred a bit by the black score line:

So I cut two plugs of maple veneer and inserted them. At a distance, or even when I asked my wife to inspect it, the defect is no longer noticeable:

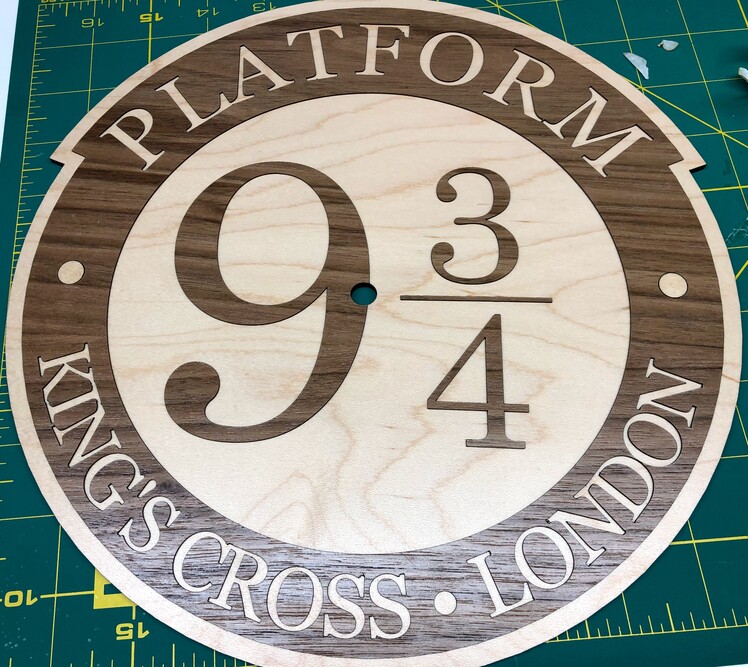
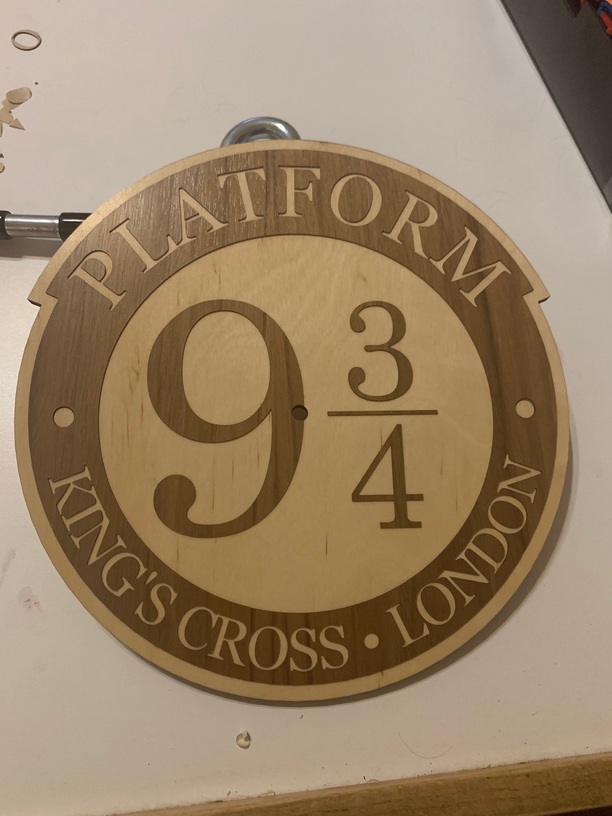
The one remaining issue is that the clock movement is intended for much thicker clocks ( ¾" thick, amusingly enough) and I need to buy a new clock movement because I think the hands look silly so far from the surface of the clock. Overall pleased enough with the result.

45 Likes

Cut small draftboard spacers to go between the movement and face so that your hands don’t stand out so far?

4 Likes

Yes, I wondered about that, but then the whole clock will hang pretty far out from the wall. I am pretty sure Michael’s carries clock movements that stick out less, I just picked the wrong one off the display. At about $12 CAD each, 40% off typical at Michael’s, it really seems like a quick outing is the answer unless none are in stock.

1 Like

Very nice - I bet your daughter just loves it. Thanks too for the walk through, always handy to learn from other people’s oopses that come out looking great.

1 Like

I’m a big fan of seiko brand high torque sweep second hand movements. They’re more expensive and you usually have to order online, but they’re silent and smooth

If you can’t find what you’re looking for I’d search for that.

6 Likes

Oh, this really looks sharp! She will love it.

1 Like

Thanks for the suggestion! I did already find the clock movement in the right size, and the final clock is ready to go:

16 Likes

Wow, it was great before, but the new hands make it just awesome. They really finish it off.

2 Likes

Ooh, I really like how that came out!

1 Like

If she has a favorite house, you could paint the hands in house colors to add just a touch more pop.

4 Likes

Perfect! I’m still hoping to plan a clock project soon. My daughter, HP fan, would love this.

1 Like

Thank you for sharing your work, and doing such a nice write-up! It turned out fabulous!

Made one for my daughter and son-in-law for Christmas. They have a Harry Potter theme in their game room. Thank you again for the file!

7 Likes

I love the fact that with machines like these we can just share a file and see the same object pop out in totally different parts of the world! Thanks for posting your pic!

4 Likes

My daughter was thrilled, so, thank you!

I’m gearing up to make this, and have a few questions.

First, on the SVG.

The text is all black fill with no stroke. This signifies an engrave, but it really needs to be changed to a cut, right?

There are also 2 semicircles in yellow (underneath “platform”) and light green (under “kings cross”). I assume these should be ignored, and were probably just used to create the text on a circle.

The hole for the movement is nearly invisible in an editor, but does show up as an individual step in the GFUI. This hole is not a pure circle, and is not aligned with the “bullets”. Were these intentional?

The svg comes into Inkscape and Affinity Designer as 20"x21", which is way too big. If I scale the whole design to get the larger dimension of the central hole to be 3/8", the overall size is about 10.75x11, which seems more reasonable.

Finally a question on process. When cutting the veneer, I would like to use magnets but am now unsure on if magnets are recommended anymore. I’m also not convinced that the hold down pins would work as well and the magnets because the magnets can get so close to the cut line.

The text should be cut, as you say. Since you’re going to cut the veneer in one go and the clock itself in a different pass, it’ll pay to quickly double check the settings for each step and you may also want to reorder the steps; I didn’t work to make the SVG come out in the right order.

The semicircles are indeed for placement of the text and should be ignored.

If the hole for the movement isn’t round, that is an error. It should be centered relative to the inner circle of the clock face.

I don’t recall how I positioned the bullets. I probably just eyeballed it and you should feel free to adjust to your liking.

For the scaling I must have gotten lucky, because it all fit perfectly for me but I don’t remember having to scale the design inside the GFUI.

I don’t know of any issues with using magnets to hold the veneer down, I use magnets in my GF all the time and just make sure the laser won’t hit them.

Good luck with the make! If you fix the file do post it back for others to benefit.

1 Like

Thanks for the reply. The hole for the movement is centered on the inner circle. It’s the bullets that are off. I can adjust. I will reload a version once I complete.

I asked about the magnets since I have read that they can interfere with the fan speed, and the newest SW reads the fan speed and interprets the slowdown as a problem. This may not be as much of an issue with veneer as the thinness of the veneer keeps the magnets further away from the fan.

I also use strong magnets without issue, but only for materials that need them - like veneer that has some warp, light cardstock, paper. For ply/hard wood or acrylic, hold-down pins.

I just finished my version. It came out great. Not sure I like the hands that came with my movement, but that is easy to change.

Here is the updated svg.
platform 975 clock

Here is a list of what I changed:

  1. Scaled the clock to be 275mm wide, which is nearly the widest that can be cut on a basic or plus
  2. Rotated the design so it will come into the GFUI as I will cut it
  3. made the center a circle 7.9mm in diamanté’s (check your movement)
  4. made the bullets 10mm and aligned them to the center hole
  5. removed 2 semicircles that won’t be used in the fabrication
  6. applied GF colors so the shapes show up in a useful order

The larger back piece needs to be 275x285, so I cut my board at 280x290 and had enough margin.

I’m playing with ways to make sure I don’t screw up the GF steps, so I made up this spreadsheet:
Screen Shot 2020-01-25 at 9.29.55 PM

2 tips that may help people in the future. First, I was able to use an M8 bolt to align the central holes when applying the veneer to the larger board. This makes alignment a 1 dimensional problem (only need to worry about rotation). Second, if you think carefully about the positive and negative spaces, you don’t have to do all the weeding – you can leave the masking on the sticky side of the veneer pieces and then you don’t have to remove them from the transfer tape. These pieces will simply pick up when you pull the transfer tape.

I scaled the above SVG to make the largest clock I could, but it does not make good use of PG sized sheets, as you can only get one clock from each sheet. So, I made a version that I scaled down so you should be able to get two clocks from each sheet. I did go back and resize the central hole to be 7.9mm (and reentered because I haven’t figured out how to get Inkscape to maintain a hole’s center when changing size). I have not actually made this design, so proceed carefully.

platform 975 clock, smaller

7 Likes