Poofgrade mess

I had been fighting for much of the day with some non Proof grade acrylics discovering that some of them must be extruded so I throw my hands in the air and look for a proof grade purple to just hand the job to and not think about speed, passes, or any of that.

The design had been revamped so there would be almost no waste except around the sides so a few places lines half overlapped for a millimeter or so but every sharp corner was replaced by a curve.

At the top it looks great, but on the bottom only those short overlaps made it to the other side with nothing else showing. I tried recutting and it was about a half millimeter off so I did not even finish it.

I go back and apparently it had reset and was not showing what it was, nor did it show that the purple was the last thing I cut. The logo thing was still visible but I just found the med purple in the pull down and ran it again with exactly the same results.

I just ran the proof grade again on the same location and burned it a lot but it just barely made it through to the paper in back and a 5"x7" chunk of purple proof grade is now junk.

This is now;

Earlier I shot this;


And you can see at the bottom that even though not off by much it was enough to make hash of the design.

I’d love to see a video of the whole start to end process of these cuts that get messed up for you. Something has to be significantly wrong with the machine or the process to keep getting repeat cuts that don’t match up with your first pass cuts.

Here that is the lesser problem, the main one is the need to go back. If you look at the second set of cuts that moire effect is the second cut being off by less than you could see when it was cutting.

Thanks for letting us know. I’m sorry that your print didn’t come out beautifully!

To cut successfully, there are three important things to check. First, your material must lie flat. This requires a clean, properly installed crumb tray and flat materials. Second, there must be no obstructions, dirt, or damage preventing the laser light from reaching your material. Third, your design must be set up properly - for example, with lines that are fully on the material and that are set to cut. It’s hard to know which issue might be affecting your print, so please thoroughly inspect your unit and design according to the suggestions in our troubleshooter.

Once you’ve inspected and cleaned, please try another print. We included an extra piece of Proofgrade Draftboard with your materials shipment for troubleshooting. Please print the Gift of Good Measure on Proofgrade Draftboard and let us know the result. If it doesn’t print well, please let us know the date and time of your print and send photos of the front and back of the print.

Proofgrade Draftboard was not the issue here, I have printed several on that extra sheet. The Proofgrade Purple is what did not cut and the Gift of Good Measure not a design that challenges the location settings even if it was done as two passes,

Even when the location settings do change that is not to say that the next print doing exactly the same design and settings will cause the same error,

I posted this jump in another thread, but the next one I did of the same everything came out perfect, falling apart as I took it from the crumb tray.

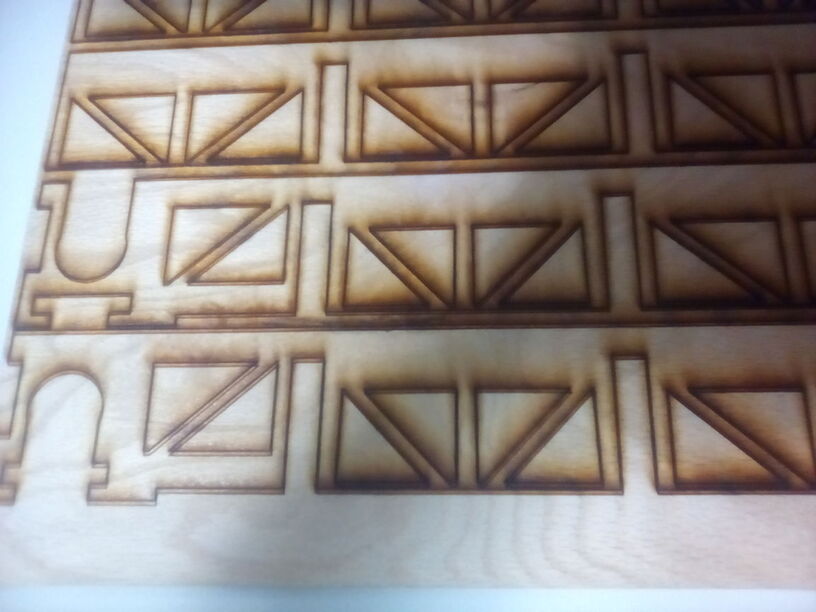
Quite obviously if three passes are needed for a complete cut, they all have to be in the same place or the backside will be blank except for the blast throughs.

Support can’t give you suggestions on non-Proofgrade materials. If you want them to check out how your machine is running, you need to do the tests they ask for on the Proofgrade material and tell them the date, time and time zone that you ran it, so they can look at the metrics for your machine at that time during the cut. They have all of that stuff measured.

If you don’t necessarily want the help of Support, the rest of us can give you suggestions in the Beyond the Manual section. (I’m going to shift this there so I can ask some questions and give you some suggestions on non-Proofgrade materials.)

How are you setting the three passes? There is a setting in the Manual settings that lets you specify the number of passes…is that what you are doing? Or are you just sending it to cut a second time once the job has finished and you saw that it didn’t cut through?

When you check it to see if the cut went through, are you making absolutely sure that you did not shift the backing material by even a millimeter? The slightest shift will cause the second cut to hit in a different place. I pin the material down before using it with the Honeycomb pins, then I am sure it is not shifting. Tape or magnets will do the same, but the pins are the best to keep the material backing from moving.

If you are sending a second cut, are you leaving the images on the screen alone? If you shift the image on the screen at all, the second cut will not line up. We have to align the images on the screen to the Preview after the image has been cut once, but if you leave it alone, it should nail it.
Only send something to be re-cut using the thumbnails and the Print button.

If you still want to have support test your machine, you’ll need to run your tests on Proofgrade. Otherwise you’re spinning your wheels. They don’t provide suggestions for non-Proofgrade tests.

Had you given any thought to just slowing the speed down a little bit - five or ten points ought to do it, in order to complete the cut in one pass? If you have a material that you know is hard to cut, keep notes on the best settings for it.

Well I did as asked and ran the gift of good measure at Proofgrade settings on draftboard. I even took out and cleaned the main lens before trying. This was the third time on that piece of draftboard so there are two others but this is the third time and last in the row…

(Pardon the finger painted arrow )
Flip the board over and you can barely see anything at all…

The finger painted arrows pointing out the faint row of dots that mark tiny blowthroughs.

This was done by Puff between 6:50 and 7:01 Eastern Daylight time.

1 Like

Done using default settings? Material is not warped at all?

And I have to ask this because it’s happened a couple of times recently… did you put the lens back in in the correct orientation? That can cause focus problems and incomplete cuts.

I’ll shift it back to P&S.

Yes all were default settings I had a big magnet holding the center flat, and I had just cleaned and replaced the master lens. I would not think it crooked as I was careful in doing it, and I turned the Glowforge off and then on a bit so it could re-orient itself to the correct zero as my moving stuff might have thrown it off.

It’s not that the lens is crooked, but it’s possible to put it in upside down. When you put it into the bottom of the head, the bowl shape needs to be pointing up. The flat side of the lens needs to be pointing down.

It’s something to take the lens out and check. It will cause the beam to not cut through if it’s in there upside down.

1 Like

I know this and was actually mindful of that when putting it back so I am certain it is correct.

Uh oh, I missed this during the first pass…you can’t turn the machine off between the two cut passes. That re-sets the camera view.

Next time you have to send a second cut, do not turn off the machine. Leave the file open, don’t move the material on the bed, don’t move the images on the screen…just hit the Print button in the app again. It will line up perfectly.

That might have been your issue with the alignment of the cuts being off. The not cutting through might be something that support would still want to look into though.

1 Like

I am painfully aware of all the things that can reset the camera view, and certainly avoid those I have any control over.

What I was talking about was resetting the camera after taking the lens out to clean it.

1 Like

Oh, gotcha.

1 Like

I’m so sorry for the late reply. Thanks for taking the time to run that test and post photos of the results. If possible, there are a couple more steps I’d like you to try:

  1. Please clean the mirror inside of your printer head according to the instructions here

  2. After you’ve cleaned, take a photo of the mirror’s surface and send that to us

  3. Try another print, and let us know how it goes

Thank you in advance!

It’s been a little while since I’ve seen any replies on this thread so I’m going to close it. If you still need help with this please either start a new thread or email support@glowforge.com.