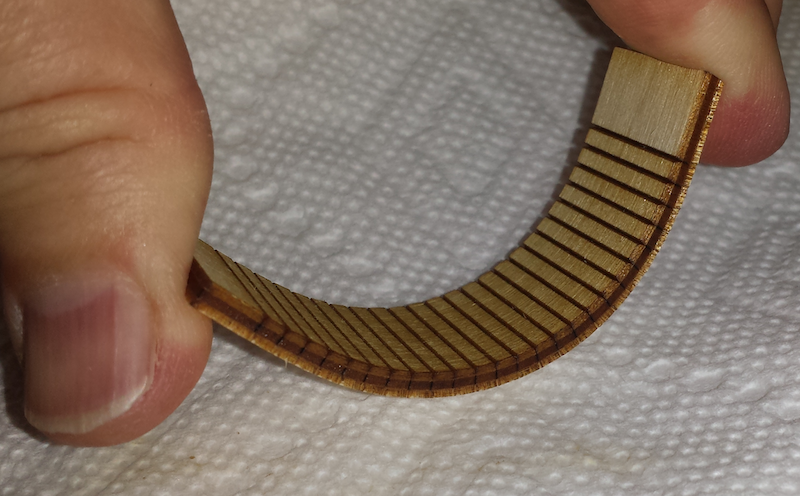
My background is in woodworking,so I’ve been playing a little with a laser analog to kerfing for bending wood. With regular tools, you make a series of cuts almost through a piece of wood or plywood. The cuts weaken the wood, and the material removed by the cutting gives the inner edge of the piece room to have a shorter (partial) circumference than the outside. The cuts don’t go through, so it still looks like a solid piece.
Problem with lasers is that the kerf is so small that you’d have to space a zillion scores right next to each other to get a decent bending radius, and that way lies a mass of embers. So I had a minor inspiration: “What if we mess up the cut by putting the focus at 0, down at the bottom of the wood? Won’t the defocusing make the kerf wider at the top?” And yes it does.
3mm cheapjack ply with a cut at 100/90 every 2.5mm (extra points to someone who figures out how to do this effectively as a low-lpi engrave). Oh, and make sure your scores go across the grain, not with it
I already had a set of tests for what speeds cuts through this ply and which didn’t
You’ll definitely want to do some testing, because moving the focus point reduces your cutting efficiency from what it would be if the laser was focused on the surface. So it doesn’t score as deeply as you would otherwise expect. I don’t know if moving the focus point way above the surface would give you a useful effect, or, contrarily, propping the material up to move the focus below the bottom and getting an even wider kerf.
I did that in my engrave calibration template update. The 7 rows I ditched got replaced by .43 (max), .185 .225, .325 and 0, .045, .085 (for the .125 Baltic Birch I was testing). I’ve got to run it against some clear acrylic so I can see how it turns out and how deep the engraves go (should be able to see that thru the edges). I think the extreme settings will be really useful based on @karaelena’s (?) unfocused acrylic project.
While we’re on this, it occurs to me that this might be a good case for two passes at higher speed or lower power. That might deepen the wide-kerf part of the cut without adding too much time.
Meanwhile, a little more work suggests you can get marginally better kerfing by focusing above the surface by about 0.100 or so and doing two passes at double speed. If I were doing this for real, I’d dampen the wood a little with steam before bending and use tape or something to constrain the outside surface from cracking (and maybe use better ply). But as it is my bendiest 3" test piece is closing in on 180 degrees.
The way I often make corner joints in wood is to butt the ends together and glue them with a fillet of wood along the inside. Ugly on the inside but less ugly on the outside than finger joints.